HB Optoelectronic HBP1003D User Manual
Page 2
2. Creating 3D Image from Half Side by Side or Top
and Bottom Video/Image Files
(1) Choose input source:
● VGA/HDMI/AV Device: Press Source key to select your input source.
● USB drive/Micro SD card: Please switch to the main menu below.
13
17
14
15
16
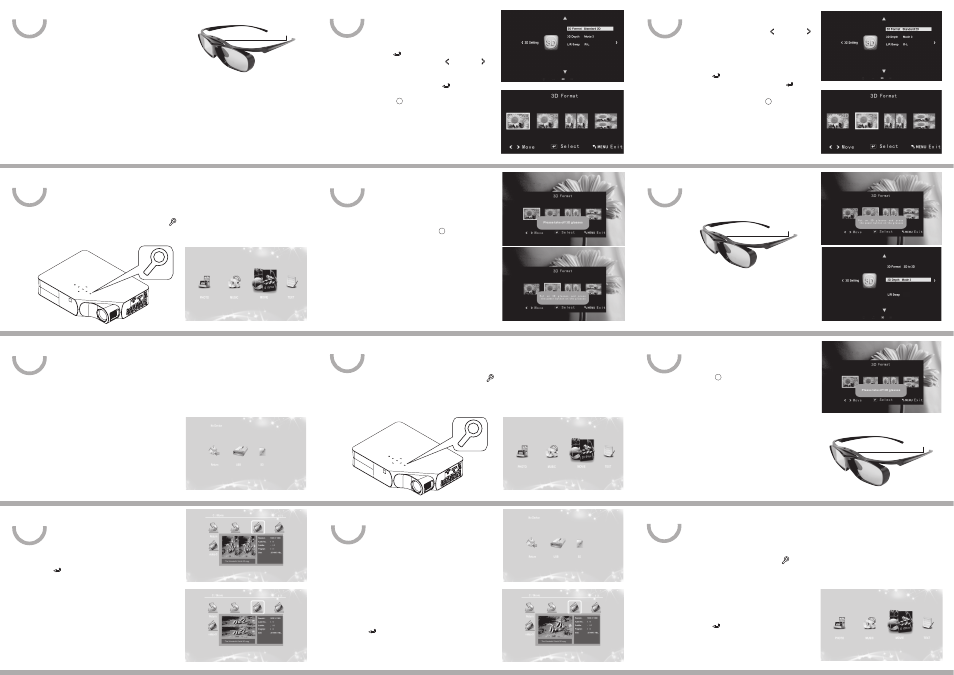
(4) Put on your 3D glasses when you see
the blue message window. Press the power
button on the 3D glasses.
18
19
(7) To turn off the 3D glasses: Press the
power button of the 3D glasses for 1.5 seconds .
You will see the glasses flashing 3 times before
they turn off. Glasses will automatically turn off in
5 minutes if they do not receive a 3D signal from
the screen.You don’t have to swiftly push the
power button of the glasses to re-watch 3D files;
if you do so, the LED won’t light up.
Power Button
Power Button
Power Button
Main Menu
3D Setting/System Setting – 3D Depth
3. Creating 3D Image from 2D Files
(1) Choose input source:
● VGA/HDMI/AV Device: Press Source key to select your input source.
● USB drive/Micro SD card: Please switch to the main menu as below.
F. Using Your Projector: 2D Projection
1. Play from AV/HDMI/VGA Device
(1) After you connect your multimedia device and the projector,
turn on the projector. Press Source key to select your source.
(2) Follow the instructions of your device to play your files.
20
(3) Select 3D Format:
● Enter OSD menu. Use Left and Right
to switch to 3D Setting(or System Setting),
and select 3D Format.
● The video/image will be in pause status in this
stage.
● Press to go into 3D Format
Submenu. Select “2D to 3D.” Press to
confirm.
● Users can also use the 3D key on the
remote control to select “2D to 3D.”
(5) To turn off the 3D glasses: Press the
power button of the 3D glasses for 1.5 seconds .
You will see the glasses flashing 3 times before
they turn off. Glasses will automatically turn off in
5 minutes if they do not receive a 3D signal from
the screen.
(2) Play your file:
● VGA/HDMI/AV Device:
Follow the instruction of your device to play your file.
● USB drive/Micro SD card:
On the main menu, choose your file type as “Photo/Movie”
and select your source as USB drive/Micro SD card. Enter your folder and choose your file.
● Choosing the wrong file format (Photo, Music, Movie and Text) will not open,
you have to return to the last procedure (p. 14) to choose the right format.
USB/Micro SD Card Select Menu
3D Setting/System Setting
● Preview: Keep the cursor on the file for 5
seconds, a Preview window will pop out to show
the format of the 3D file that you chose is
“Half Side by Side” or “Top and Bottom” Press
to confirm to play the file.
Preview-Half Side by Side
Preview-Top and Bottom
USB/Micro SD Card Select Menu
3D Setting/System Setting – 3D Format
Main Menu
21
22
23
24
(2) Play your file:
● VGA/HDMI/AV Device: Follow the
instructions to play your file.
● USB drive/Micro SD card: On the main
menu, choose your file type (Photo/Movie/Text)
first and select your source as USB drive/Micro
SD card. Enter your folder and choose your file.
● Preview: Keep the cursor on the file for
5 seconds, a Preview window will pop out to
show the 2D file that you will choose. Press
to confirm to play the file.
(3) Select 3D Format:
● Enter OSD menu. Go to 3D Setting (or
System Setting) >> 3D Format.
● The video/image will be in pause status .
● Press confirm to go into 3D
Format Submenu. Use Left and Right
to select the corresponding image
(Half Side by Side or Top and Bottom) based on
the Preview images. Press to confirm
you choice.
● The 3D key on the remote is
depressed for 2 Seconds to select the sync
with your glasses with the 3D image on the
screen.
● If the 3D format of the next file differs from
the one just played, you have to choose the
right format again.
3D Format Submenu
(5) Adjust 3D depth effect: Enter OSD menu.
Go to 3D Setting(or System Settings) >> 3D
Depth to adjust the intensity of your 3D depth
effect.
(6) Return to 2D mode: Choose 3D Format
again and select Standard 2D; or users can also
use the 2D key on the remote control to
select Standard 2D. Take off your 3D glasses
when you see the blue message window above.
2. Play from USB Drive/Micro SD Card
(1) On the main menu, choose the type of the files
you are going to play: Photo/Music/Movie/Text.
(2) Press to confirm and choose
your source as USB Drive or Micro SD card on the
screen. Enter your folder and choose your file.
(4) Put on your 3D glasses when you see the
blue message window. Press the power button on
the 3D glasses.
(5) To Return to 2D mode: Choose 3D
Format again and select Standard 2D; or
users can also use the 2D key on the
remote control to select Standard 2D. Take off
your 3D glasses when you see the blue message
window below.
(6) To turn off the 3D glasses: Press the
power button of the 3D glasses for 1.5 seconds
to turn them off. You will see the glasses flashing
for 3 times before they turn off. Or, they will be
automatically off in 5 minutes if they do not
receive a 3D signal. You don’t have to swiftly push
the power button of the glasses to re-watch 3D
files; if you do so, the LED won’t light up.
Preview
R-L
2D
3D
2D
3D