Highland 11201 User Manual
Highland For the car
Congratulations on your purchase of the Ramp Champ
TM
Telescoping Ramps.
The ramps are comprised of four components: an Outer Section; an Inner
Section; a Locking Rod; and, a Cambuckle Tie Down. The ramps may be
used as a single unit or in pairs.
The Ramp Champ adjusts from 5-1/2 feet when folded to nearly 8 feet
when fully extended. It is impervious to gasoline, diesel fuel, oil or kero-
sene, and will never rust or corrode.
WARNING
• READ AND UNDERSTAND THESE INSTRUCTIONS AND THE WARNING LABEL
FOUND ON EACH RAMP BEFORE USING THE RAMP CHAMP. FAILURE TO DO SO
MAY RESULT IN PROPERTY DAMAGE AND/OR SERIOUS PERSONAL INJURY.
• This product is not to be used to load any automobile or truck onto a trailer or other
conveyance.
• DO NOT exceed the 750 lb. per ramp maximum load capacity.
• Exercise extreme caution when loading or unloading your equipment.
• Do not ride equipment moving up or down the ramp. Push or pull the equipment up or down
the ramp, using a winch if necessary.
• If loading objects onto a vehicle tailgate, contact the vehicle manufacturer first for maximum
safe tailgate and bed area load capacity.
• Do not use ramp if the tailgate is higher than 40” above ground.
• Make certain ramp is dry and free of oil, grease or fuel before using.
• Inspect all surfaces of ramp sections for damage before using. If damage or stress is
evident, DO NOT USE RAMP.
• Locking Pins must be securely in place, through both ramp sections, before using
ramp.
• Do not alter the ramp in any way.
VEHICLE POSITIONING
• Make certain the vehicle to be loaded is on a level, firm surface.
• Place the vehicle’s transmission in the PARK position and engage the emergency brake
securely. Use a wheel chock to prevent vehicle movement.
SETUP AND LOADING
• Remove all contents from the shipping carton.
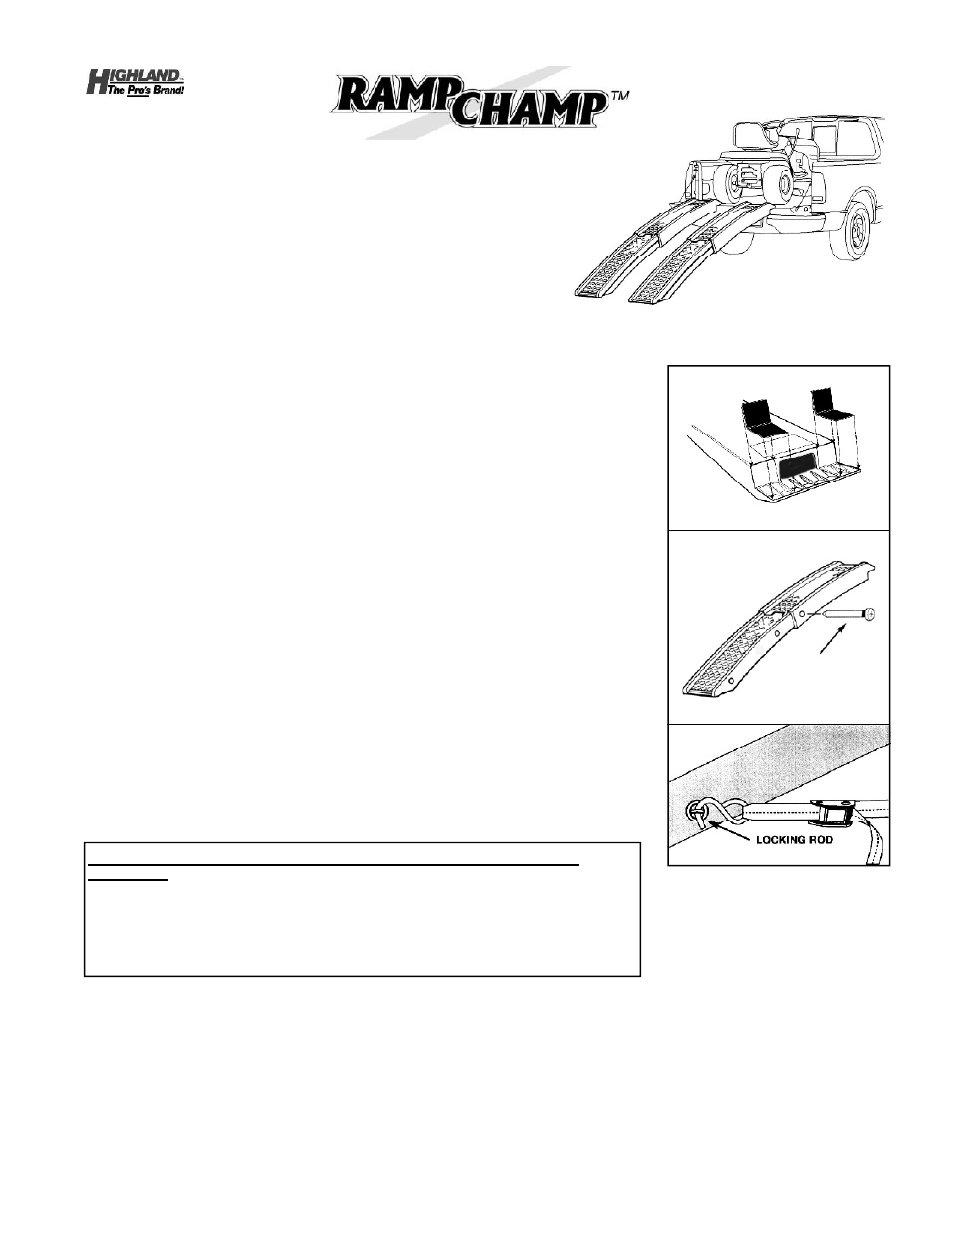
• Peel paper backing off of the black rubber non-skid pads and attach pads to the bottom
surface of each ramp’s tongue, as shown in Figure A.
• Extend the inner and outer Ramp Sections to desired length.
NOTE: When using a pair of ramps, both ramps must be adjusted to the same length.
• Place the tongue end, with non-skid pads attached, of each ramp onto the lowered tailgate
of the vehicle.
• Space ramps apart to suit the equipment to be loaded. Be certain that equipment wheels fit
within the ramp side walls.
• Align hole in the side of Outer Section with a corresponding hole in the Inner Section.
NOTE: The following two steps are ABSOLUTELY CRITICAL to the safe use
of the ramp.
• Insert a Locking Rod through both sides of the ramp to prevent accidental telescoping
of the two sections, as shown in Figure B.
• Attach one end of the Cambuckle Tie Down (supplied) to the end of the Locking Rod that
was inserted into the ramp assembly, as shown in Figure C. Attach the other end of the
Tie Down to a suitable strong METAL fitting, trailer hitch, or METAL bumper edge. Tighten
Tie Down to secure Ramp to vehicle tailgate.
• With a second party observing the loading process, move the equipment smoothly and
quickly up the ramp and into the vehicle.
DO NOT LEAVE EQUIPMENT ON THE RAMP.
• Secure the loaded equipment to the transport vehicle to prevent damage to vehicle and
equipment.
• When unloading equipment, follow the same steps before backing equipment down ramp.
NOTE: Some garden tractors have mower decks that may not raise high enough to
clear the top of the ramp. If your mower deck drags on the ramp, remove the deck
before transporting.
For installation assistance or to order parts, call 1-800-234-6992 (Customer Service Department),
Monday through Friday, 9:00 a.m. to 5:00 p.m., or visit our Web site at www.highlandusa.com.
Part No. 3943900
Rev. 05/2002
NON-SKID PADS
BOTTOM SURFACE OF RAMP TONGUE
LOCKING ROD
STORING THE RAMP CHAMP
• Clean all surfaces thoroughly.
• Remove Locking Rod and
completely collapse the ramp.
• Insert the Locking Rod into the
mating holes of the ramp.
• To prevent unauthorized use or
theft of ramp, pull a chain or
cable through any of the
matching hole positions and
padlock to a secure surface.