Kanguru Defender Basic+ Quick Start User Manual
Quick start guide
Quick Start Guide
For Kanguru Defender
TM
portfolio
09.13.13 v2.4 © 2013 Kanguru Solutions
Legal terms and conditions available at www.kanguru.com.
Please review and agree before use. Thank you.
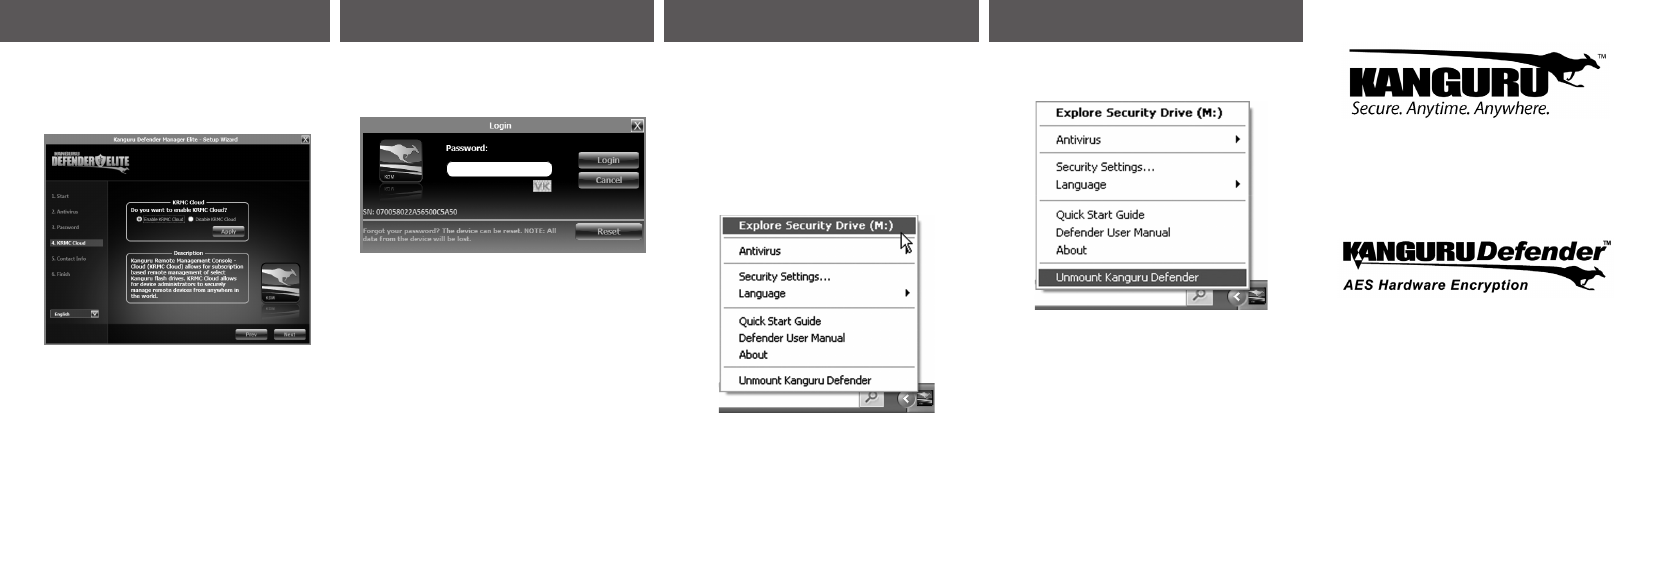
5. ENABLING KRMC CLOUD
Kanguru Defender drives can be remotely managed
using the Kanguru Remote Management Console
(KRMC). If your drive is configured for use with KRMC
Enterprise edition then this step will not be available.
To Enable KRMC Cloud functionality:
1. Select the Enable KRMC Cloud option and then
click on the Apply button.
2. A dialog box will appear asking if you want to
register your device with KRMC Cloud. Click on
the Yes button.
3. Your web browser will open and direct you to the
KRMC Cloud login page.
6. LOGGING INTO KDM
After completing the Setup Wizard, the KDM
application will start. For security reasons, you will be
asked to enter your password.
To continue, enter your password and then click on the
Login button. Once KDM has confirmed your login
password, it will mount the secure partition. You can
now access the secure partition as you would a standard
removable drive.
Warning! If you enter your password incorrectly 7
times in a row (by default), then your data will be
automatically erased. An on screen warning message
will be displayed after the 6th failed attempt, informing
you that you only have one password attempt remaining.
Note: Click on the VK icon to access the virtual
keyboard. The virtual keyboard is a graphical
representation of a standard keyboard layout. You can
click on the keys on the virtual keyboard to enter your
password in order to prevent keylogging software from
spying your login password.
7. ENCRYPTING FILES AND FOLDERS
A key feature of the Kanguru Defender is Drag &
Drop functionality; allowing you to simply drag files
and folders that you want to encrypt onto the drive’s
secure partition using the standard Windows Explorer
interface. The Kanguru Defender automatically encrypts
these files.
To open the secure partition, simply click on the KDM
taskbar icon and select Explore Security Drive.
Alternatively, you can access the private partition
through My Computer or Windows Explorer. The secure
partition will be labeled SECURITY once it is unlocked.
Note: Files saved on the secure partition of your
Kanguru Defender device are only accessible after you
have successfully logged into KDM.
8. REMOVING YOUR DEFENDER
To exit KDM, click on the KDM taskbar icon and select
Unmount Kanguru Defender.
When you exit the application, KDM will lock the
SECURITY partition and your files will become
inaccessible until you login with the correct password
again.
Warning: Do not disconnect the Kanguru Defender
without first properly unmounting your device. Doing
so may result in file damage or corruption.
After you have umounted the security partition, use the
“Safely Remove Hardware” option from the system tray
in order to safely disconnect your drive.