Kanguru Wireless Mouse with Mini Keyboard 2.4 GHz User Manual
Kanguru Storage
Wireless Mouse with Mini Keyboard 2.4 GHz
User’s Manual
Thank you for choosing the
Kanguru Solutions Wireless Mouse with
Mini Keyboard 2.4GHz. You are moments away from enjoying the
convenience this device brings to your home, office or while you’re one
the road. This palm-sized, wireless device has three (3) unique features,
including a multi-touch trackpad, mini QWERTY keyboard with
multimedia playback controls, and the ability to function as a laser
mouse. With superb 2.4GHz wireless technology, you can control any
PC from distances up to 200 feet (line of sight). Low-power
consumption gives you at least 80 hours of continual use and the
internal battery can be conveniently recharged through any standard
USB2.0 port.
©2011 All rights reserved.
F
EDERAL
C
OMMUNICATIONS
C
OMMISSION
This device complies with Part 15 of the FCC Rules. Operation is subject to the
following two conditions: (1) this device may not cause harmful interference, and
(2) this device must accept any interference received, including interference that
may cause undesired operation.
Note: This equipment has been tested and found to comply with the limits for a
Class B digital device, pursuant to Part 15 of the FCC Rules. These limits are
designed to provide reasonable protection against harmful interference in a
residential installation. This equipment generates, uses and can radiated radio
frequency energy and, if not installed and used in accordance with the
instructions, may cause harmful interference to radio communications. However,
there is no guarantee that interference will not occur in a particular installation If
this equipment does cause harmful interference to radio or television reception,
which can be determined by turning the equipment off and on, the user is
encouraged to try to correct the interference by one or more of the following
measures:
Reorient or relocate the receiving antenna.
Increase the separation between the equipment and receiver.
Connect the equipment into an outlet on a circuit different from that to
which the receiver is connected.
Consult the dealer or an experienced radio/TV technician for help.
Changes or modifications not expressly approved by the party responsible for
compliance could void the user‘s authority to operate the equipment.
EU
D
ECLARATION OF
C
ONFORMITY
This product carries the CE-Mark in accordance with European Directives.
Package Contents
1x Wireless Mouse with Trackpad and Mini QWERTY Keyboard
1x USB Receiver (embedded in the back cover)
1x Rechargeable Battery
1x USB Charging Cable
1x User’s Manual
System Requirements
Windows
®
XP / Vista / 7
USB2.0 port
1. Plug the USB receiver into PC USB port
Take out the USB receiver embedded in the back cover and plug
the USB receiver into a USB2.0 port on your PC.
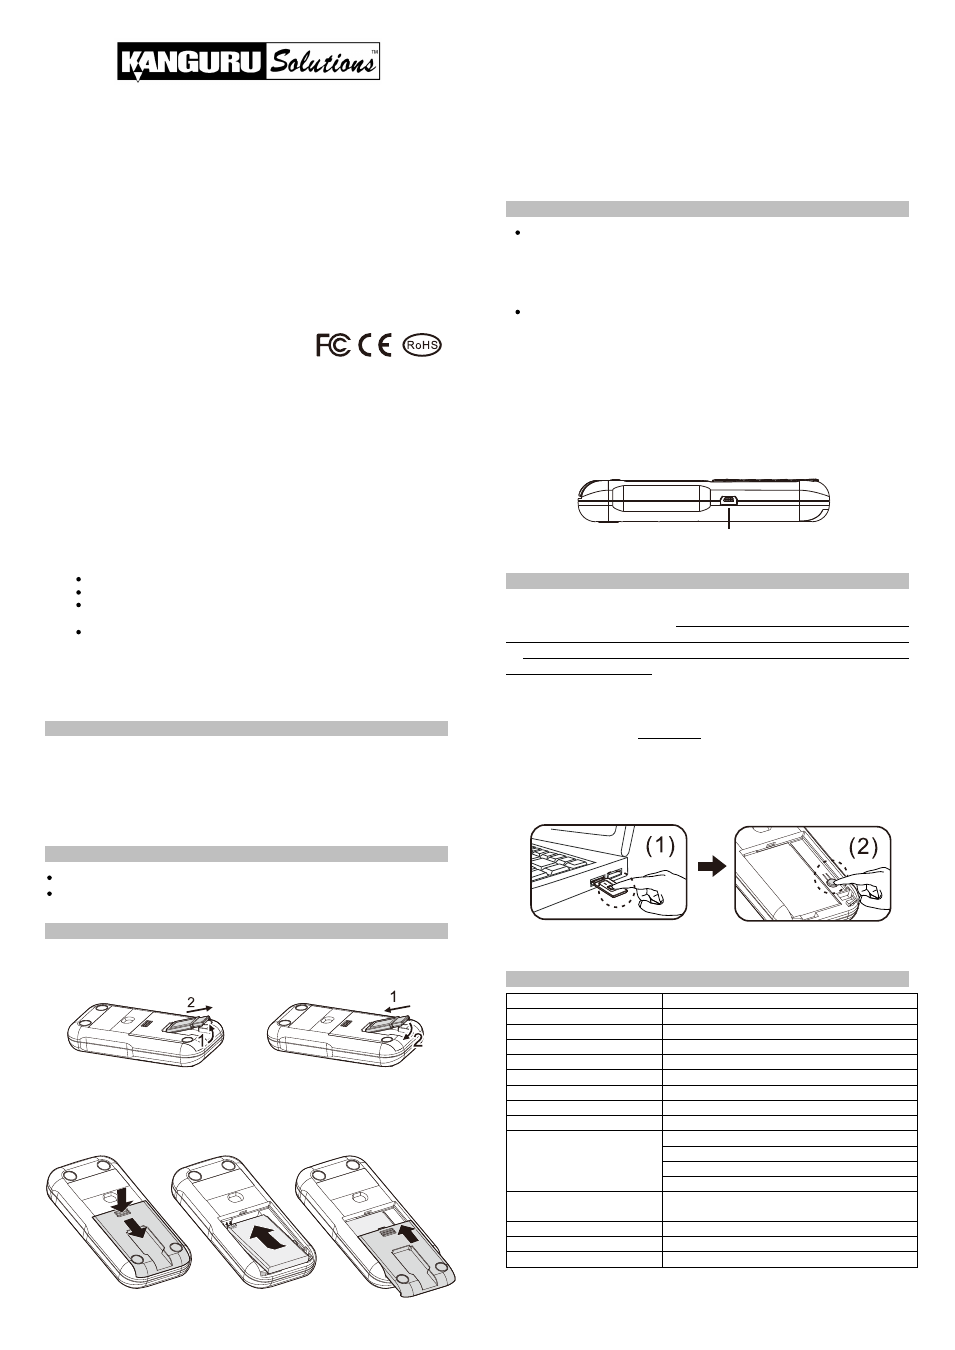
2. Insert the battery
Press and slide the battery cover open. Insert the battery firmly with
the contact pins on the battery matching up with the ones in the
device. Replace the battery cover and slide it up, back into place.
Note before first use: Use the USB charging cable to charge the
device for at least two (2) hours. See the next section “Low Battery
Indication and Charging the Battery” for complete instructions on
charging the battery.
Now you can begin using your
Kanguru Wireless Mouse with Mini
Keyboard. Please note that the device is set in the multi-touch
trackpad mode by default. For details on changing the mode and other
operations, please read the following section “General
Operation
”.
Low battery indication
When battery power is at low capacity, the indication LED will
light up red anytime you press a key, button or the trackpad.
Please charge the battery immediately.
Charging the battery
Connect the supplied USB charging cable between this product
and a USB port on your PC to charge the battery. The red
indication LED will blink while charging. The indication LED will
turn off once the battery is fully charged.
Note:
Battery charge time depends on remaining battery power,
operation condition and working environment, etc. The rechargeable
battery has a limited number of charging cycles. When you find that you
need to frequently recharge the battery, you may need to replace the
rechargeable battery.
You do not need to conduct ID pairing when you use this product, UNLESS
the following situation occurs:
Battery is charged, the device and USB
receiver are within connection distance but the product does not work
or when you want to use more than one of these devices in the same
location at the same time.
In such cases, you may need to conduct ID pairing to prevent
interference
(1) Click the ID Link button on USB receiver. The red LED will light up
and it will enter into
20-second ID pairing, stand-by time.
Note: If you press the ID Link button again during 20-second stand-by time, the ID pairing
action will be cancelled.
(2) Within the 20-second stand-by time, press the pairing button in the
device’s battery compartment until the red LED on the USB receiver
blinks 3 times. Three blinks means the ID pairing was successful.
Frequency
2400 ~ 2483 MHz
Channel number
16
ID number per Channel
65,535
Modulation
GFSK
Antenna type
PCB track
Wireless range
Up to 200 feet (line of sight)
Working voltage
DC 3.0V ~ 3.8V
Battery
BL-5C 850mA-hour Li-Ion rechargeable battery
Transmission power
1mW
Power consumption /
Battery continuous
operation hours
Standby : 0.4mA / 2125 hour
Keyboard mode : 1mA / 850 hours
Multi-touch trackpad mode : 10mA / 85 hours
Laser mouse mode : 30mA / 28.3 hours
Weight
3.25oz (including BL-5C battery and USB
receiver)
Dimension
Approximately 4.5” (L) x 2.2” (W) x 0.8” (H)
Operation temperature
32°F(0°C)~140°F (60°C)
Operation humidity
10%~85%
Steps for removing USB receiver
Steps for reinserting USB receiver
Press and slide the battery cover
Insert the battery
Replace the battery cover
Connection port for USB charging cable
Getting Started
Low Battery Indication and Charging the Battery
ID Pairing
Specifications