Kleenmaid SS5000 Maxitub User Manual
Ss5000 kleenmaid maxi tub
I N S T A L L A T I O N I N S T R U C T I O N
SS5000 Kleenmaid Maxi Tub
1 P R E - I N S T A L L A T I O N I N S T R U C T I O N S
IMPORTANT
Please ensure Household pipes are thoroughly flushed to remove debris before
connecting your laundry tub to pipeworks. To prevent foreign particles damaging the
ceramic cartridge an “ In line” filter is recommended to be installed prior to the mixer.
Maximum temperature 80° C, recommended 5°C to 65°C
Maximum pressure 175 PSI, Minimum 15 PSI.
If hot and cold water presures are significantly different, then a regulator / flow control
devise should be fitted.
REGULATION COMPLIANCE
Comply with current Drainage and Plumbing Regulations as required by your local authority.
Sanitary plumbing shall only be carried out by a Registered Plumber.
DETERMINE SITE
Determine the most suitable position for the laundry tub. It may be used either to the left or right of the
Washing Machine. Allow 10mm clearence between the units. Mark the position on the floor as reference.
PLEASE READ THE ENTIRE INSTRUCTION
BEFORE INSTALLING THE LAUNDRY TUB
M O U N T I N G S I N G L E L E V E R U N I T I N T O C O N S O L E
R e m o v e M i x e r a n d S p r a y h a n d l e f r o m b o x .
S c r e w m o u n t i n g s t u d s f i r m l y i n t o b a s e o f m i x e r u n i t .
T h e n t h r e a d t h e f l a t r u b b e r w a s h e r u p t h e f l e x i b l e h o s e s t o
t h e b a s e t h e M i x e r u n i t .
P l a c e M i x e r u n i t i n t o c o n s o l e b y t h r e a d i n g f l e x i b l e h o s e s
t h r o u g h m o u n t i n g h o l e . M o u n t i n g s t u d s n e e d t o p a s s t h r o u g h
2 s m a l l h o l e s i n s i d e t h e m o u n t i n g h o l e .
T h r e a d t h e ' o ' r i n g u p t h e f l e x i b l e h o s e s t o t h e b a s e o f
t h e M i x e r u n i t t h e n p l a c e c l a m p i n g w a s h e r a r o u n d f l e x i b l e
h o s e s a n d s l i d e o v e r m o u n t i n g s t u d s e n s u r i n g t h e ' o ' r i n g
i s s i t t i n g i n t h e p r e s s e d g r o o v e .
T a k e t h e 2 b r a s s s l e e v e n u t s a n d s c r e w o n t o s t u d s w i t h
t h e h e x . p o r t i o n a w a y f r o m t h e M i x e r b a s e . T i g h t e n w i t h
t h e r i g h t s i z e s p a n n e r .
B e f o r e c o n n e c t i n g f l e x i a b l e h o s e s c h e c k a l l s e a l s h a v e
r e m a i n e d i n t h e c o u p l i n g n u t s , n o w c o n n e c t f i t t i n g t o
t a p s a n d p u l l o u t s p r a y h o s e .
P l a c e s p r a y h a n d l e i n t o m i x e r b o d y a n d a l l o w h o s e t o
h a n g f r e e a t t h e r e a r . P l a c e t h e w e i g h t s u p p l i e d o n t o
t h e h o s e a t t h e l o w e s t p a r t . T h i s i s t o h e l p t h e h a n d
p i e c e t o r e t u r n t o t h e h o l d e r . P h o t o “ A ”
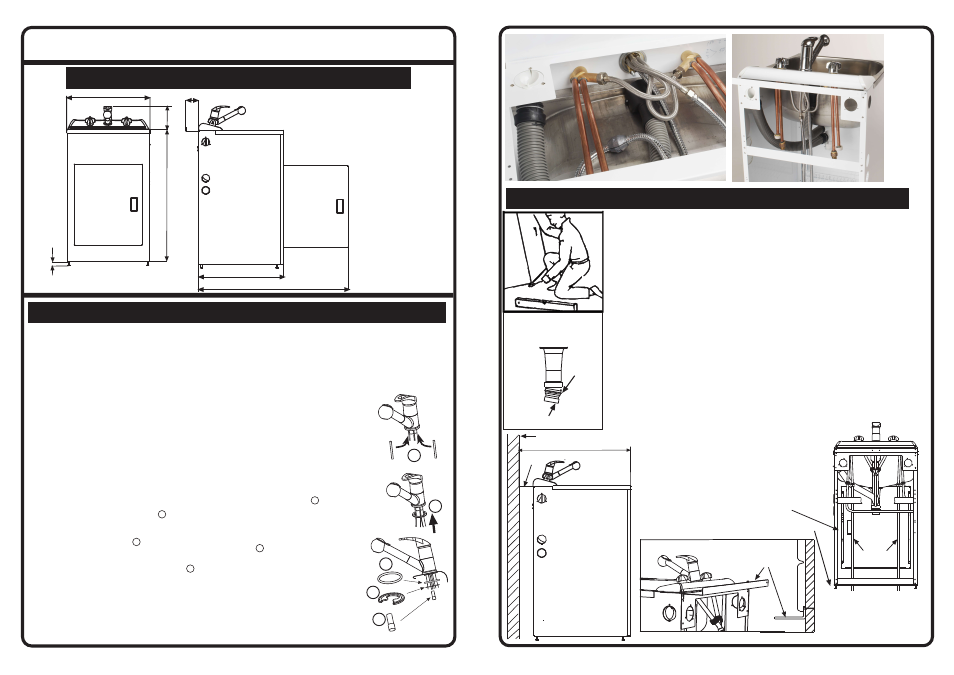
A:Fit the four leveling feet supplied to the bottom of the cabinet and
adjust to align with Washing Machine height. Tilt laundry tub slightly
to assist with access. Check top of laundry tub with spirit level.
Ensure the cabinet does not rock.
B : P o s i t i o n l a u n d r y t u b t h e n c u t t h e h o u s e W a s t e P i p e w h i c h
s h o u l d a l r e a d y b e i n s t a l l e d t o t h e e x a c t h e i g h t . T h e f i n a l h e i g h t
w i l l d e p e n d o n t h e W a s t e Tr a p d i m e n s i o n s . C o n n e c t W a s t e
Tr a p t o y o u r l a u n d r y t u b . The extra waste adapter is not required for use
in Australia.
C : To c o n n e c t h o t a n d c o l d w a t e r p i p e s t o t h e m a i n s , u s e s u i t a b l e
c o n n e c t o r s . S t a n d a r d f i t t i n g s a r e a v a i l a b l e a t m o s t P l u m b i n g
S u p p l i e s .
N O T E : F o r i n s t a l l a t i o n s i n A u s t r a l i a a n
a p p r o v e d s t o p c o c k m u s t b e f i t t e d t o b o t h h o t a n d c o l d w a t e r
i n l e t p i p e s .
D : U n s c r e w R e a r S h e l f w h i c h f o r t r a n s p o r t a t i o n p u r p o s e s i s
m o u n t e d a t t h e r e a r o f c a b i n e t ( r e f e r d i a g r a m b e l o w &
P H O T O B ) .
F a s t e n t h e c a b i n e t t o t h e w a l l e i t h e r t h r o u g h t h e h o l e s i n t h e
b a c k f l a n g e o f t h e c a b i n e t s i d e s o r b y t h e R e a r S h e l f w h i c h i n
t u r n e n a b l e s t h e l a u n d r y t u b t o a l i g n w i t h t h e f r o n t o f t h e
W a s h i n g M a c h i n e . E n s u r e R e a r S h e l f i s f a s t e n e d t o t h e c a b i n e t
w i t h f o u r s c r e w s ( s u p p l i e d ) . A l t e r n a t i v e f a s t e n i n g c a n b e
a c h i e v e d t h r o u g h t h e f l o o r.
N O T E S
H o u s e P l u m b i n g s u p p l i e d b y
t h e c u s t o m e r
Washing Machine Drain System
s u p p l i e d w i t h t h e l a u n d r y t u b
A l l d i m e n s i o n s a r e i n
m i l l i m e t e r s
991
562
85
Waste Adaptor
( NZ Only)
Apply
Plumbing
PVC glue
Rear shelf flange can be tiled over
Rear
Shelf
560
Max 25
888
170
1
2
3
4
5
PHOTO A
PHOTO B
750873 Issue A
ECN: 04053
Rear
Shelf
Wall
647
Rear shelf transport
mounting position.
Adjustable
Feet
NOTE: For installations
in Australia an approved
stopcock must be fitted
to both hot and cold
water inlet pipes
2 S e c u r i n g l a u n d r y t u b
3
4
5
2
1
WATER
MAINS