Kleenmaid MT301 User Manual
Page 2
2
3
4
5
6
1
11
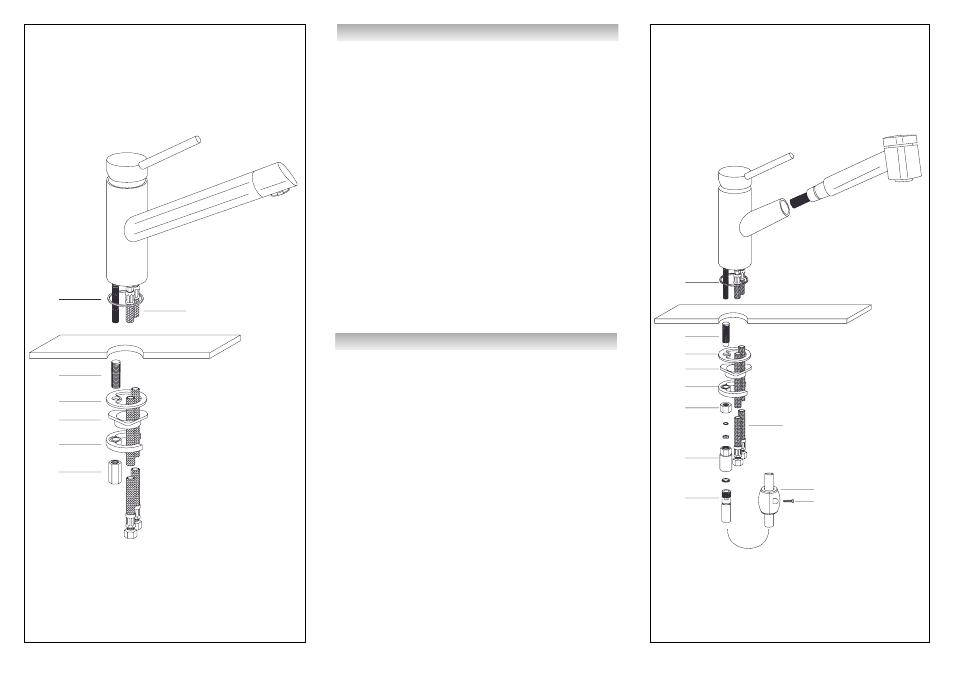
MT301 Mounting and plumbing connection
-
Turn off water supply
-
Drill 35 mm. hole in bench top or stainless steel sink
-
Place rubber seal item 1 into the recess of the bottom of the tap body or
collar if applicable
-
Screw inlet hoses item 11 into body of tap ensuring hot and cold hoses are
inserted into the correct ports
-
Place the hoses thru the hold in the bench top of the sink and position the
tap
-
Place item 3 (rubber seal) over the mounting bolt and 2 against the underside
of bench or sink
-
Place plastic supporting collar item 4 over the mounting bolt 2 and against
the underside of bench or sink (note flat triangle side of plastic collar should be
against the bench or sink)
-
Place metal mounting bracket item 5 over mounting bolt 2 and screw on
securing nut item 6 and tighten metal bracket against the underside of bench
or sink
-
Position tap and securely tighten fixing nut
-
Connect inlet hoses item 11, ensuring the sealing washers are in place to the
correct hot and cold water taps
-
Turn on water supply
-
Check tap for operation and test for leaks.
1
2
3
5
4
6
7
8
11
9
10
MT401 Mounting and plumbing connection
-
Turn off water supply
-
Feed nylon hose thru the body of the tap (from top to bottom)
-
Connect shower head to nylon hose with the rubber seal supplied and tighten
-
Drill 35 mm. hole in bench top or stainless steel sink
-
Place rubber seal item 1 into the recess of the bottom of the tap body or collar
if applicable
-
Place the hoses thru the hold in the bench top of the sink and position the
tap
-
Place item 3 (rubber seal) over the mounting bolt 2 and against the underside
of bench or sink
-
Place plastic supporting collar item 4 over the mounting 2 bolt and against
the underside of bench or sink (note flat triangle side of plastic collar should be
against the bench or sink)
-
Place metal mounting bracket item 5 over mounting bolt 2 and screw on
securing nut Item 6 and tighten metal bracket against the underside of bench or
sink
-
Install non-return valve item 7 to the inlet which is located on the tap moun-
ting bolt (ensure rubber and fibre washer are inserted into the non-return valve)
-
Connect nylon hose to non return valve using rubber seal provided and
tighten
-
Position tap and securely tighten fixing nut
-
Attach counterweight item 9 to the nylon hose 8 using screw item 10 in such
a way that it provides downward pressure to allow easy retraction of the pull out
shower head. Note: the counterweight should not touch the bottom of the cabinet
until the hose is fully retracted.
-
Connect inlet hoses item 11, ensuring the sealing washers are in place to the
correct hot and cold water taps
-
Turn on water supply
-
Check tap for operation and test for leaks.
MT 301
MT 401