Kleenmaid KED420 From Serial No. 706411 User Manual
Import ant user informa tion, Reversing the door opening, Instructions for use
J
B
J
2
F
G
1
B
A
E
C
D
J
3
B
H
E
C
D
J
–
This tumble dr
yer is intended f
or NORMAL DOMESTIC
USE ONL Y.
–
Please note it is not recommended that the dry
er be
placed directly next to o
vens or cook
ers, as the
perfor
mance of the dry
er may be aff
ected.
–
Any
electr
ical wor
k required to install the appliance
should be carried out b
y a qualified person.
–
It is important to clean the lint filter after each dr
ying cycle
and the condenser ever
y three or four months or the
restrictions to airflo
w will extend dr
ying times and could
cause the safety cut-out to tr
ip.
–
A car
pet must not obstr
uct the ventilation openings in the
base of the dry
er.
–
Do not stack the tumb
le dry
er on top of any other
appliances without the correct stacking kit.
–
Under no circumstances should anything other than the
recommended articles be placed in the tumb
le dry
er.
–
The tumble dr
yer should be ser
viced by an appointed
service organisation and only gen
uine parts used.
–
It is dangerous to alter or modify the product in any w
ay
other than fitting authorised accessor
ies.
–
We recommend that the appliance is unplugged each
time after use.
It should alwa
ys be disconnected from the
electricity supply if it is to be left unattended f
or long
periods (i.e
.w
eekends
, holidays etc.)
–
The rear of the dry
er gets quite hot during use
.P
osition
the dry
er so that the back is not accessib
le while in
operation, b
ut the sides have a space a
vailab
le to allow
air flow
.
–
It is impor
tant to clean fluff from the window of the dr
yer
and around the door seal after each drying cycle
.F
ailure
to do so could result in water leaking.
–
DO NOT
use a two-w
ay adaptor
, or extension lead.
The
dry
er must be connected to its o
wn socket.
–
DO NOT
bloc
k the air inlets at the front and back of y
our
dry
er.
–
DO NOT
allow fluff to accum
ulate around the tumble
dry
er.
–
DO NOT
exceed the recommended maxim
um load.
–
DO NOT
allow children to tamper with the controls and
keep them a
wa
y from the dry
er when it is in operation.
–
DO NOT
place articles in the dr
yer if an
ything other than
a water solution has been used in the cleaning process
.
–
DO NOT
attempt to dry dr
ipping wet ar
ticles or items
containing foam r
ubber or r
ubber-lik
e materials
.
–
DO NOT
use the tumble dr
yer if y
ou suspect that it is
damaged in any w
ay.
Under no circumstances should you
attempt to repair the appliance yourself
.Repairs carr
ied
out by ine
xperienced persons ma
y cause serious injur
y .
Consult your local appointed ser
vice engineer and insist
on genuine spare par
ts.
THIS APPLIANCE MUST BE EARTHED
IMPORT
ANT USER INFORMA TION
These notes are provided in the interest of saf
ety .Y
ou must read them bef
ore installing or using the appliance.
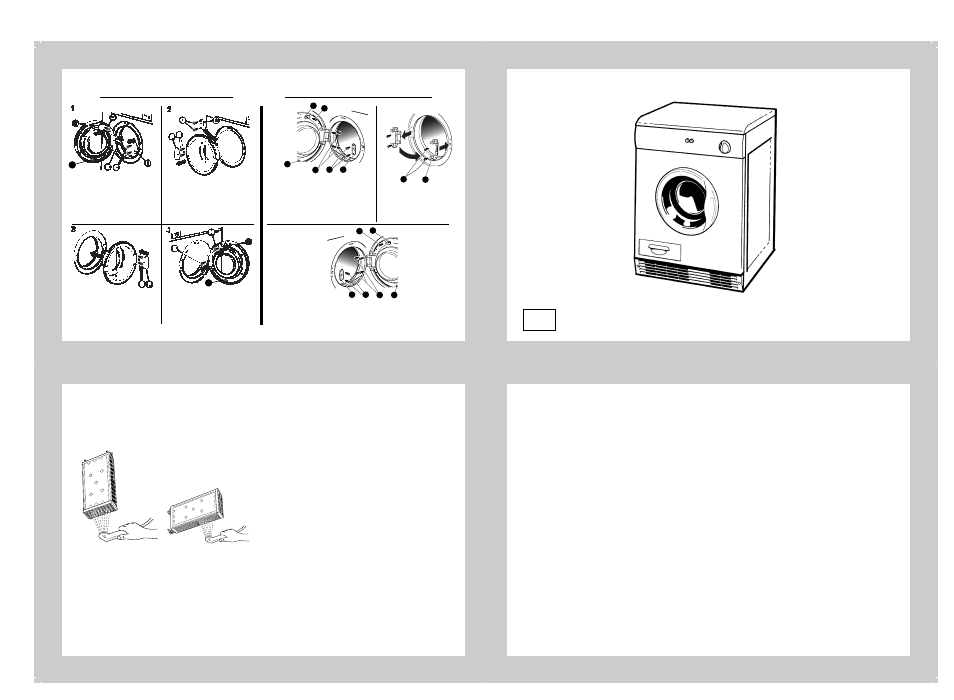
REVERSING THE DOOR OPENING
MII CONDENSER
FPL ‘98
4213 094 87802
Dryers fitted with hinge cover:-
Dryers fitted without hinge cover:-
Your dryer is supplied with a reversible door. To change the direction of opening proceed as follows for your type of door.
Open the door. Undo screw
(A) remove switch strike (B)
and replace screw. Undo
screw (J) and remove buffer.
Remove screws (C) and latch
plate (D). Remove hinge cover
screw (E). Close the door.
Pull the hinge cover (F)
forwards to remove it.
Remove two outer screws
(G). Remove door. Fit latch
plate (D) with screws (C).
Reverse door and fit to dryer
in closed position.
Refit
screws (G) and hinge cover
(F). Open the door.
Fit screw (E) to secure hinge
cover. Remove screw (H) at
top of door and refit switch
strike (B) as shown. Refit
buffer (J).
Open the door. Undo screw (A)
remove switch strike (B) and replace
screw. Undo screw (J) and remove
buffer. Remove screws (C) and latch
plate (D). Remove hinge block screws
(E). Remove door from hinge blocks.
Remove hinge screws
(F) and hinge (G) and
refit to opposite side as
shown.
Refit latch plate (D) with screws (C). Remove screw (H) at top of
door and refit switch strike (B) as shown. Refit buffer (J). Fit door
to hinge blocks and secure with screws (E).
KED420 from
serial 706411
INSTRUCTIONS FOR USE
IMPORTANT:
PLEASE READ THESE INSTRUCTIONS THOROUGHLY BEFORE USING THIS APPLIANCE.
KEEP THEM IN A SAFE PLACE FOR FUTURE REFERENCE.
GB
THE CONDENSER
The condenser and ducting should be cleaned 3 or 4 times a year
or more frequently if the dry
er is in constant use.
See “CLEANING
THE CONDENSER”opposite
.
NOTE:
The condenser will discolour through use.
REMOVING THE
CONDENSER
–
Firmly pull the condenser out.
RE-INSTALLING THE
CONDENSER
–
Carefully push the condenser back into the machine
, until it is
pushed fully home and a “clic
k”is heard.
–
Ensure all lint and fluff is removed from around the g
rille seal
before closing or w
ater may leak.
–
IMPORTANT
:The dr
yer ma
y leak if the condenser is not
correctly re-installed.
CLEANING THE CONDENSER
CAUTION:
For maxim
um efficiency , the plates are made from
very
thin aluminium and are easily damaged.
Do not try to pok
e
anything betw
een the plates or use a hard object or tool for
cleaning.At all times
, handle the condenser carefully and avoid
crushing the plates
.
–
Remove the condenser (see opposite).
–
Flush the fluff from between the plates under r
unning water
and carefully shake off e
xcess water
.
–
Whilst the condenser is
removed, clean as m
uch fluff
as possible from inside the
ducting by reaching a hand
into the machine.
In particular
,
keep the passage from the f
an
clear (on the right hand side of
the condenser duct).
–
After cleaning, re-install the condenser (see opposite).