La Crosse Technology 308-1711bl User Manual
Wireless weather station
1
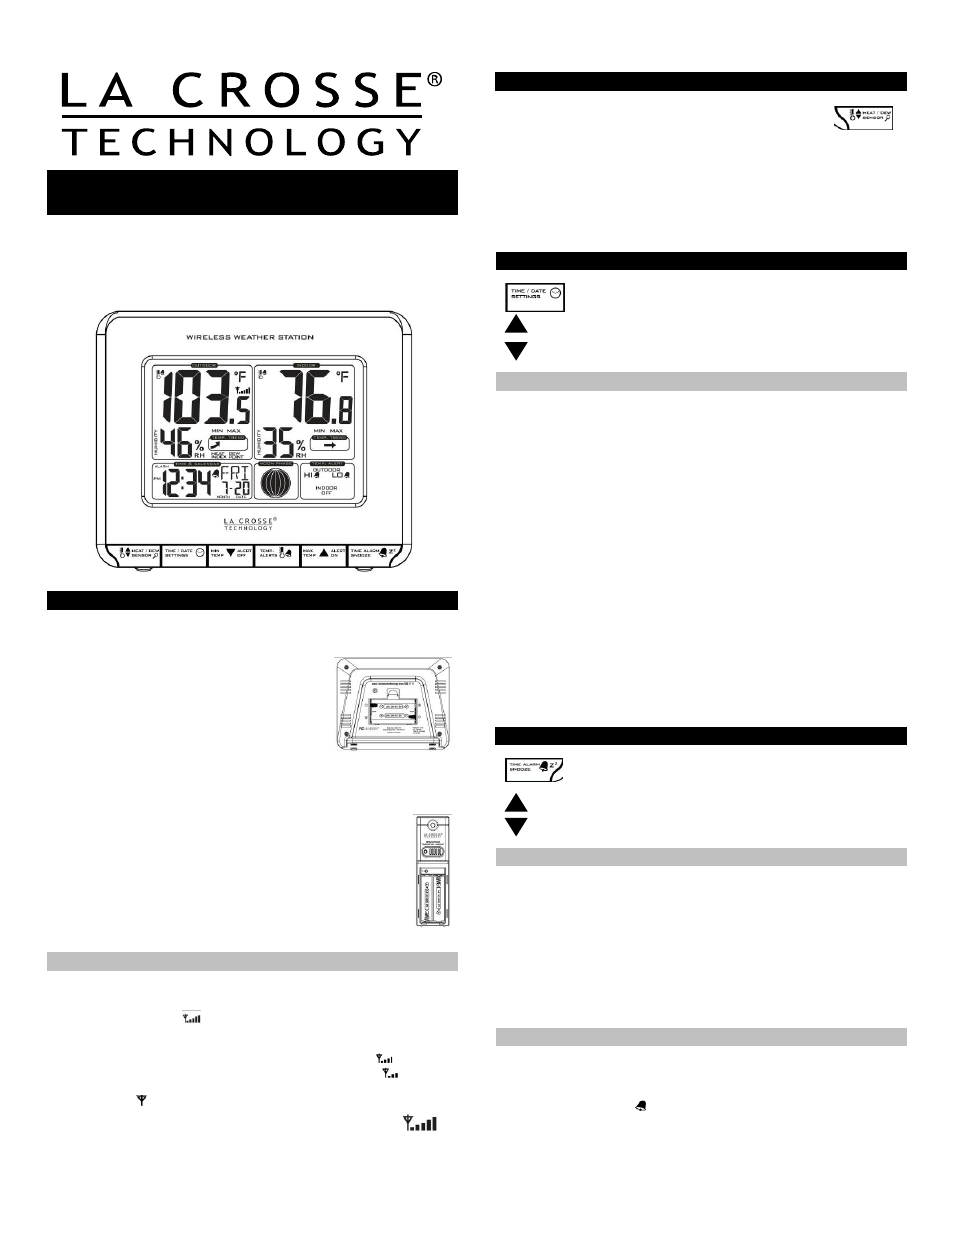
Wireless Weather Station
Model 308-1711 | Quick Setup Guide
The Wireless Weather Station features manual set time, date, time alarm,
Outdoor/Indoor temperature alerts, and moon phase. Monitor temperature
and humidity, track temperature trends and set customizable temperature
alerts--all in one convenient device. Wireless transmission range of over
200 feet (60 meters) in open air, from transmitter to weather station.
SETUP INSTRUCTIONS STEP BY STEP
STEP 1:
• Remove battery cover from the weather station. Slide tab down and pull
out to remove the battery cover.
• Insert 2 NEW AA batteries (not included) into
the back of the weather station. Observe the
correct polarity (see marking inside the battery
compartment). The weather station will light up
and show, indoor temperature, humidity and
time.
• Do Not Mix Old and New Batteries
• Do Not Mix Alkaline, Standard, Lithium or Rechargeable Batteries
STEP 2:
• Ensure that the transmitter is within 10 feet of the Weather
Station.
• To remove battery cover from TX141TH-A transmitter, slide the
battery cover down and lift off the front of the transmitter.
• Insert 2 NEW AA batteries (not included) into the transmitter.
Observe the correct polarity.
• Within 3 minutes the weather station will show readings in the
outdoor temperature area on the LCD.
• Note: Allow the weather station and the transmitter to stay
within 10 feet of each other for the first 15 minutes of set up.
TRANSMITTER SIGNAL STRENGTH
After the batteries are inserted, the weather station will search for the
outdoor temperature/humidity transmitter for 3 minutes.
The antenna symbol
will flash during reception, and temperature
display will be dashes “---“.
The antenna symbol will scroll during signal synchronization.
If synchronization fails once, the antenna will lose one bar.
If synchronization fails twice, the antenna will lose two bars.
If reception continuously fails to receive 5 times, the antenna symbol will
be shown as .
The antenna will show full display with successful RF (radio
frequency) reception.
TROUBLESHOOTING
If the outdoor temperature is not displayed after three
minutes, hold the SENSOR button on the weather station
for three seconds to search for outdoor transmitter.
Next, press the TX button on the outdoor transmitter to send signal.
If it still does not receive the outdoor temperature, remove batteries from
both the weather station and the transmitter for 15 minutes then repeat
the setup instructions from step 1.
The maximum transmitting range in open air is over 200-feet (60
meters). Obstacles such as walls, windows, stucco, concrete, and large
metal objects can reduce the range.
TIME/DATE
The TIME/DATE button will move through the program
menu and confirm settings.
Use the UP ARROW button to increase a value.
Use the DOWN ARROW button to decrease a value.
SET TIME AND DATE
Hold the TIME/DATE button for three seconds to enter time set mode.
YEAR: The Year will flash. Use the ARROW buttons to choose the year,
and press the TIME/DATE button to confirm and move to the month.
MONTH: The Month will flash, use the ARROW buttons to choose the
month, and press the TIME/DATE button to confirm and move to the
date.
DATE: The Date will flash. Use the ARROW buttons to choose the date,
and press the TIME/DATE button to confirm and move to 12/24 hour
time format.
12/24-HOUR: The time format 12/24 will flash. Use the ARROW buttons
to choose 12-hour or 24-hour time format and press the TIME/DATE
button to confirm and move to hour.
HOUR: The Hour will flash. Use the ARROW buttons to choose the
hour, and press the TIME/DATE button to confirm and move to minutes.
MINUTES: The Minutes will flash. Use the ARROW buttons to choose
the minutes, and press the TIME/DATE button to confirm and move to
Fahrenheit/Celsius.
FAHRENHEIT/CELSIUS: °F or °C will flash. Use the ARROW buttons
button to select Fahrenheit or Celsius. Press and release the
TIME/DATE button to confirm and exit the program menu.
Note: When no buttons are pressed for ten seconds, the weather station
will save the last change and default back to normal time and
temperature display mode.
TIME ALARM
The TIME ALARM button moves through the alarm setting
mode and confirms the final setting.
Use the UP ARROW button to increase a value.
Use the DOWN ARROW button to decrease a value.
SET TIME ALARM
From normal time and temperature display mode, press and release the
TIME ALARM button once to show alarm time. Hold the TIME ALARM
button for three seconds to enter alarm set mode.
HOUR: The Hour will flash. Use the ARROW buttons to set the hour,
and press TIME ALARM button to confirm and switch to minutes.
MINUTES: The Minutes will flash. Use the ARROW buttons to set the
minutes, and press TIME ALARM button to confirm.
Press the TIME/DATE button to return to normal mode
Note: When no buttons are pressed for ten seconds, the weather station
will save the last change and default back to normal mode.
ACTIVATE/DEACTIVATE TIME ALARM
From normal time and temperature display mode, press and release the
TIME ALARM button once to show alarm time.
Press and release the TIME ALARM button repeatedly to turn ON/OFF
alarm. The alarm icon appears when alarm is activated.
Note: The alarm will ring for 2 minutes then turn off.