Legrand SWP264ABBPCC5 User Manual
Screwless wall plates, Installation instructions
2. Twist screw driver until wall plate pops off snap.
3. Repeat steps 1 and 2 on the other hole in
bottom of wall plate.
4. Lift wall plate off plastic sub-plate.
REMOVAL OF PLASTIC SUB-PLATE
1. Back out device mounting screws
(about 1/2 inch, removal not required).
2. Disconnect sub-plates by pressing
on snaps with a pen tip or other
small object where indicated. (Figure 6)
3. Pull apart.
Advertencia: ¡Antes de instalar/remover, desconecte
el suministro eléctrico! ¡Riesgo de descarga eléctrica!
INSTALACIÓN
1. Desconecte el suministro eléctrico.
2. Retroceda los tornillos de montaje del dispositivo (1/2 pulgada
aproximadamente, no se requiere la remoción). (Figura 1)
3. Deslice las placas base de plástico entre la pared y el dispositivo. (Figura 2)
4. Junte a presión las dos placas base.
5. Apriete los tornillos de montaje del dispositivo, verifique que los orificios
del fleje del dispositivo estén alineados sobre las guías de las placas base
de plástico.
Installation Instructions
Screwless Wall Plates
P/N 340811 Rev. B
WARNING: Disconnect power before
installation/removal! Risk of electrical shock!
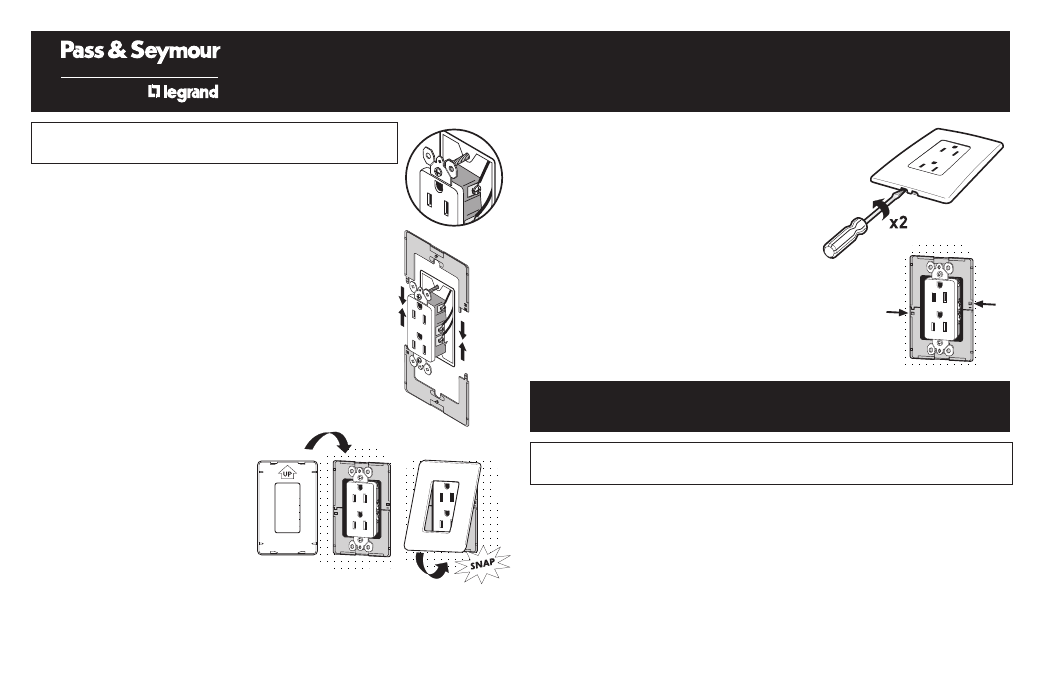
INSTALLATION
1. Disconnect power.
2. Back out device mounting screws (about
1/2 inch, removal not required). (Figure 1)
3. Slide plastic sub-plates between the wall
and the device. (Figure 2)
4. Click the two sub-plates together.
5. Tighten device mounting screws, be sure
device strap holes line up on the guideposts
on the plastic sub-plates.
6. Mount wall plate – make sure up-arrow on the
backside of the cover plate is facing up. (Figure
3) Snap wall plate into place. (Figure 4)
TIPS:
• Wall surface must be
smooth (no excess plaster
or paint drips).
• Do not over tighten device
screws, just snug so device
will not move.
• Electrical box must be flush
or recessed in wall.
REMOVAL OF WALL PLATE
1. Insert flat screw driver into one hole at bottom of wall plate.
(Figure 5)
Figure 1
Figura 1
Figure 2
Figura 2
Figure 3
Figura 3
Figure 4
Figura 4
Figure 6
Figura 6
Instrucciones de Instalación
Placa de Pared Sin Tornillo Con Placa Base de Plástico
Figure 5
Figura 5