Legrand ALTP-2 Series Pole User Manual
Altp-2, altc-2 series pole, Installation
ALTP-2, ALTC-2 Series Pole
I N S TA L L AT I O N I N S T R U C T I O N S
Installation Instruction No.: 42510R1 – Updated May 2004
Wiremold Electrical Systems conform to and should be
installed and properly grounded in compliance with
requirements of the current National Electrical Code, Canadian
Electrical Code or codes administered by local authorities.
All electrical products may represent possible shock or fire
hazard if improperly installed or used. Wiremold electrical
products are UL Listed to U.S. and Canadian safety
standards, made for interior use only, and should be installed
in conformance with current local and/or the National
Electrical Code.
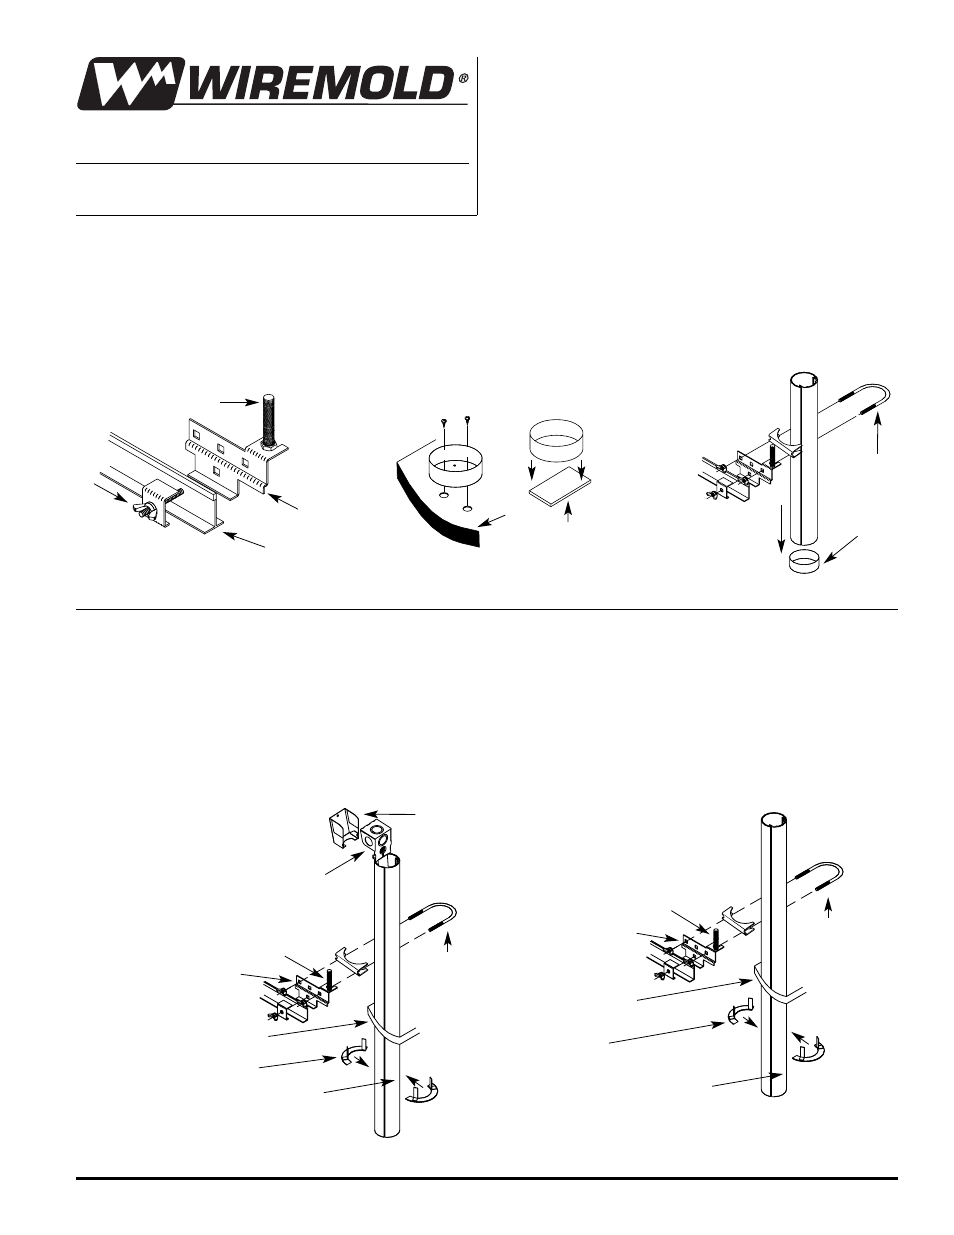
Step 1 Remove ceiling tile at the poles
intended location. Position T-Bar
Bracket as shown and secure by
tightening clamping wing nut.
Brace the bracket with a firmly
anchored 3/8" drop rod or equal.
Step 2 Secure foot to floor. For carpeted
floors, install the carpet gripper to
the bottom of foot and set in place.
For hard floors, either use either
double-sided tape or screws to
attach to the floor.
Step 3 Place bottom of pole into
foot and loosely hold top of
pole to the T-Bar Bracket
with the U Bolt.
ALTP-2 INSTALLATION:
Step 4A Provide suitable power supply through KO into
entrance end fitting. Connect feed wires to leads
provided and install cover.
Step 5A If communication cables are to be installed, feed
through the opening in top of pole. Unsnap pole
cover as required to allow routing of cables.
Cables may exit through the KO provided, or
through openings created in the field. Close the
pole cover and tighten T-Bar Bracket U Bolt.
Step 6A Replace ceiling tile
after carefully cutting
a 3" [76mm] hole for
pole. Install the trim
plates to complete
the installation.
ALTC-2 INSTALLATION:
Step 4B To install communication cables, feed through
the opening at the top of the pole. Unsnap pole
cover as required to allow routing of cables.
Cables may exit through the KO provided or
through opening created in the file. Close pole
cover and tighten T-Bar Bracket U Bolt.
Step 5B Replace ceiling tile after carefully cutting a
3" [76mm] hole for pole. Install the trim plates
to complete the installation.
Drop Rod
T-Bar
Bracket
T-Bar
Foot
Assembly
Hard Floor
Carpet
Gripper
U Bolt
Drop Rod
T-Bar
Bracket
U Bolt
Ceiling
Tile
Trim Plate
Pole Cover
End
Fitting
End Fitting
Cover
Drop Rod
T-Bar
Bracket
U Bolt
Ceiling
Tile
Trim Plate
Pole Cover
INSTALLATION: