Legrand TV2MW User Manual
Pass & seymour, Tv2m
No: 341053 – 05/13
Catalog Number(s) • Numéro(s) de Catalogue • Les Numéros de Catalogue: TV2M
Country of Origin: Made in China • Pays d’origine: Fabriqué en Chine • País de origen: Hecho en China
Pass & Seymour
®
Recessed TV Box, New Work, Metal, 2 Gang
Double prise TV encastrable en métal pour installations en neuf
Caja de TV empotrada para trabajo nuevo, metálica, doble
Installation Instructions • Instrucciones de Instalación • Notice d’Installation
TV2M
READ AND SAVE THESE INSTRUCTIONS
To be installed by a certified electrician or other
qualified person.
WARNING – To prevent severe shock or
electrocution, always turn power off at the
service panel before installing this unit or
working on the circuit.
LIRE ET CONSERVER CES INSTRUCTIONS
Doit être installé par un électricien certifié ou
une autre personne qualifiée.
AVERTISSEMENT – Pour éviter tout choc
électrique ou une électrocution, toujours couper
l’électricité au niveau du panneau d’alimentation
avant d’installer cette unité ou de travailler sur le
circuit électrique.
LEA Y CONSERVE ESTAS INSTRUCCIONES
Para ser instalado por un electricista certificado
o persona competente.
ADVERTENCIA – Para evitar descargas
eléctricas serias o electrocución, antes de
instalar o trabajar en el circuito de este
atenuador apague siempre el suministro
eléctrico en el panel de servicio.
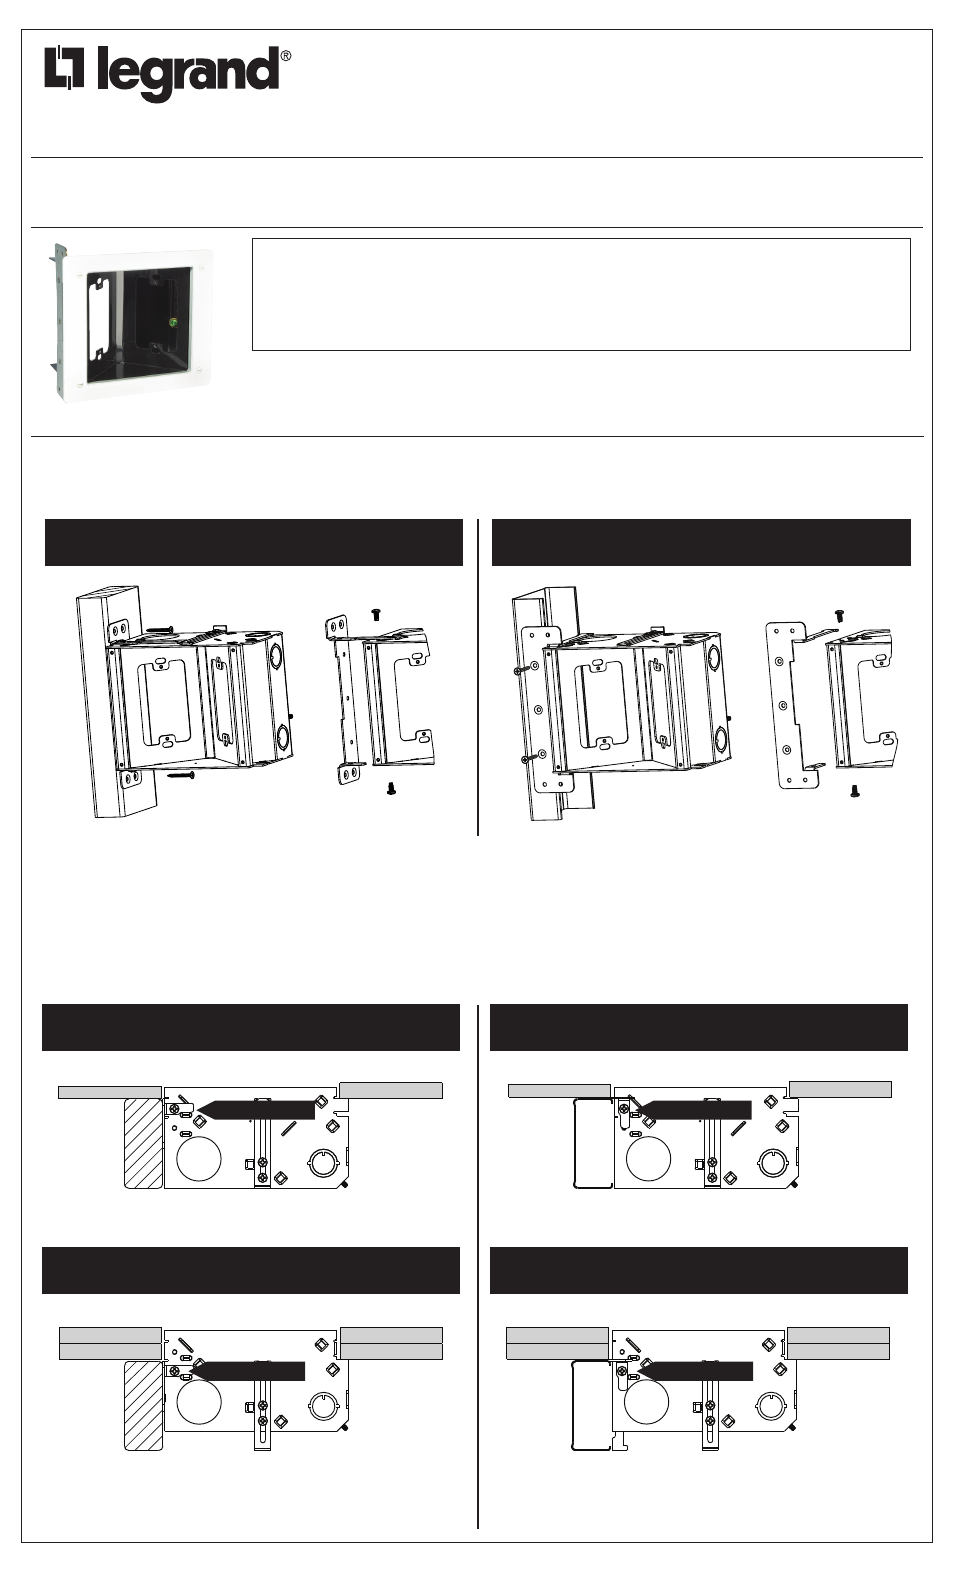
1. Determine best mounting style for your application.
Déterminer le style de montage qui convient à l’application.
Determine el mejor tipo de montaje para su aplicación.
2. Determine finished wall thickness and set adjustable bracket to appropriate size (shown below) and mounting style (determined above) by removing two
screws in bracket and pulling bracket off completely and reinstalling at appropriate location.
Évaluer l’épaisseur de la cloison posée, puis régler le support sur la dimension appropriée (voir ci-après) en fonction de cette épaisseur et du style de
montage déterminé précédemment. Pour ce faire, retirer les deux vis du support et sortir celui-ci complètement. Le réinstaller à la position souhaitée.
Determine el espesor de la pared terminada y ajuste el soporte al tamaño adecuado (se muestra a continuación) y el tipo de montaje (se determina más
arriba). Para hacerlo, quite los dos tornillos del soporte, tire del soporte hasta quitarlo completamente y vuelva a instalarlo en la posición adecuada.
Volume: 37.5 in
3
[614.5 cm
3
]
Combination Side Mounting Bracket or Face
Mounting Bracket
Accommodates Wall Thickness from 1/2" to
1-1/4" thick.
Volume : 614,5 cm
3
[37,5 po
3
]
Ensemble support de montage latéral ou
support de montage avant
Prise prévue pour les cloisons d’épaisseur
comprise entre 1,27 et 3,18 cm [1/2 à 1 1/4 po]
Volumen: 614,5 cm
3
(37,5 pulg. cúb.)
Soporte de montaje frontal o soporte de
montaje lateral combinado
Apto para paredes con espesores de 1/2 pulg.
a 1 1/4 pulg.
SIDE MOUNT
MONTAGE LATÉRAL
MONTAJE LATERAL
FACE MOUNT
MONTAGE AVANT
MONTAJE FRONTAL
SIDE MOUNT 1/2" TO 5/8" WALL SURFACE
MONTAGE LATÉRAL CLOISON DE 1,27 à 1,59 cm [1/2 à 5/8 po]
MONTAJE LATERAL PARA SUPERFICIE DE PARED DE 1/2 PULG. A 5/8 PULG.
FACE MOUNT 1/2" TO 5/8" WALL SURFACE
MONTAGE AVANT EN CLOISON DE 1,27 à 1,59 cm [1/2 à 5/8 po]
MONTAJE FRONTAL PARA SUPERFICIE DE PARED DE 1/2 PULG. A 5/8 PULG.
SIDE MOUNT 1-1/4" (5/8" X 2) WALL SURFACE
MONTAGE LATÉRAL EN CLOISON DE 3,17 cm [1,25 po] ou 1,59 cm x 2 [5/8 po x 2]
MONTAJE LATERAL PARA SUPERFICIE DE PARED DE 1 1/4 PULG. (2 X 5/8 PULG.)
FACE MOUNT 1-1/4" (5/8" X 2) WALL SURFACE
MONTAGE AVANT EN CLOISON DE 3,17 cm [1,25 po] ou 1,59 cm x 2 [5/8 po x 2]
MONTAJE FRONTAL PARA SUPERFICIE DE PARED DE 1 1/4 PULG. (2 X 5/8 PULG.)
1/2" and 5/8"
1/2"
5/8"
5/8" x 2
5/8"
5/8"
5/8"
5/8"
5/8" x 2
5/8"
5/8"
5/8"
5/8"
1/2" and 5/8"
1/2"
5/8"