Legrand L2EVSE30 Installation User Manual
Pass & seymour
Pass & Seymour
®
Electric Vehicle Charging Station
Station de chargement pour véhicules électriques
Estación de carga de vehículo eléctrico
Country of Origin: Made in China • Pays d’origine: Fabriqué en Chine • País de origen: Hecho en China
Catalog Number • Numéro de Catalogue • Le Numéro de Catalogue: L2EVSE30
Installation Instructions • Instrucciones de Instalación • Notice d’Installation
No: 341054 – 11/13
NOTES:
Read and understand all directions contained in
this document.
Observe all local electrical and building codes.
Make sure the wall structure is capable of supporting the
charging station.
Leave this installation document with the vehicle/home
owner.
INSTALLATION
The following tools are required for a wall mount installation of
the L2EVSE30 charging station:
• Wire cutters, level, drill with 1/8" bit, tape measure, pencil,
Phillips screwdriver, T30 Torx driver, slip joint pliers, wire
crimpers.
Additional equipment required (not included)
• copper supply cable (specified by NEC
®
)
• circuit breaker (specified by NEC)
• appropriate wall anchors (for studded wall or solid wall
installation)
• applicable flexible conduit and fittings
Note: a hole is provided in the wiring compartment that
will accept 1" NPT conduit fittings.
• (2) #10 x 2" wood screws
• eyelets for incoming power cables
LOCATING THE CHARGING STATION
The charging station should be mounted conveniently near the
electric vehicle (ev) parking location. The station is supplied
with an 18 ft. charging cord with a charge connector on the
end. This connector is intended to mate with the charging
port that is located on the electric vehicle. The charging
station should be mounted in a location where there is a clear,
unobstructed path to the vehicle charging port on the car. The
recommended mounting height for the charging unit is at least
18" but not more than 48" above the floor per NEC article 625.
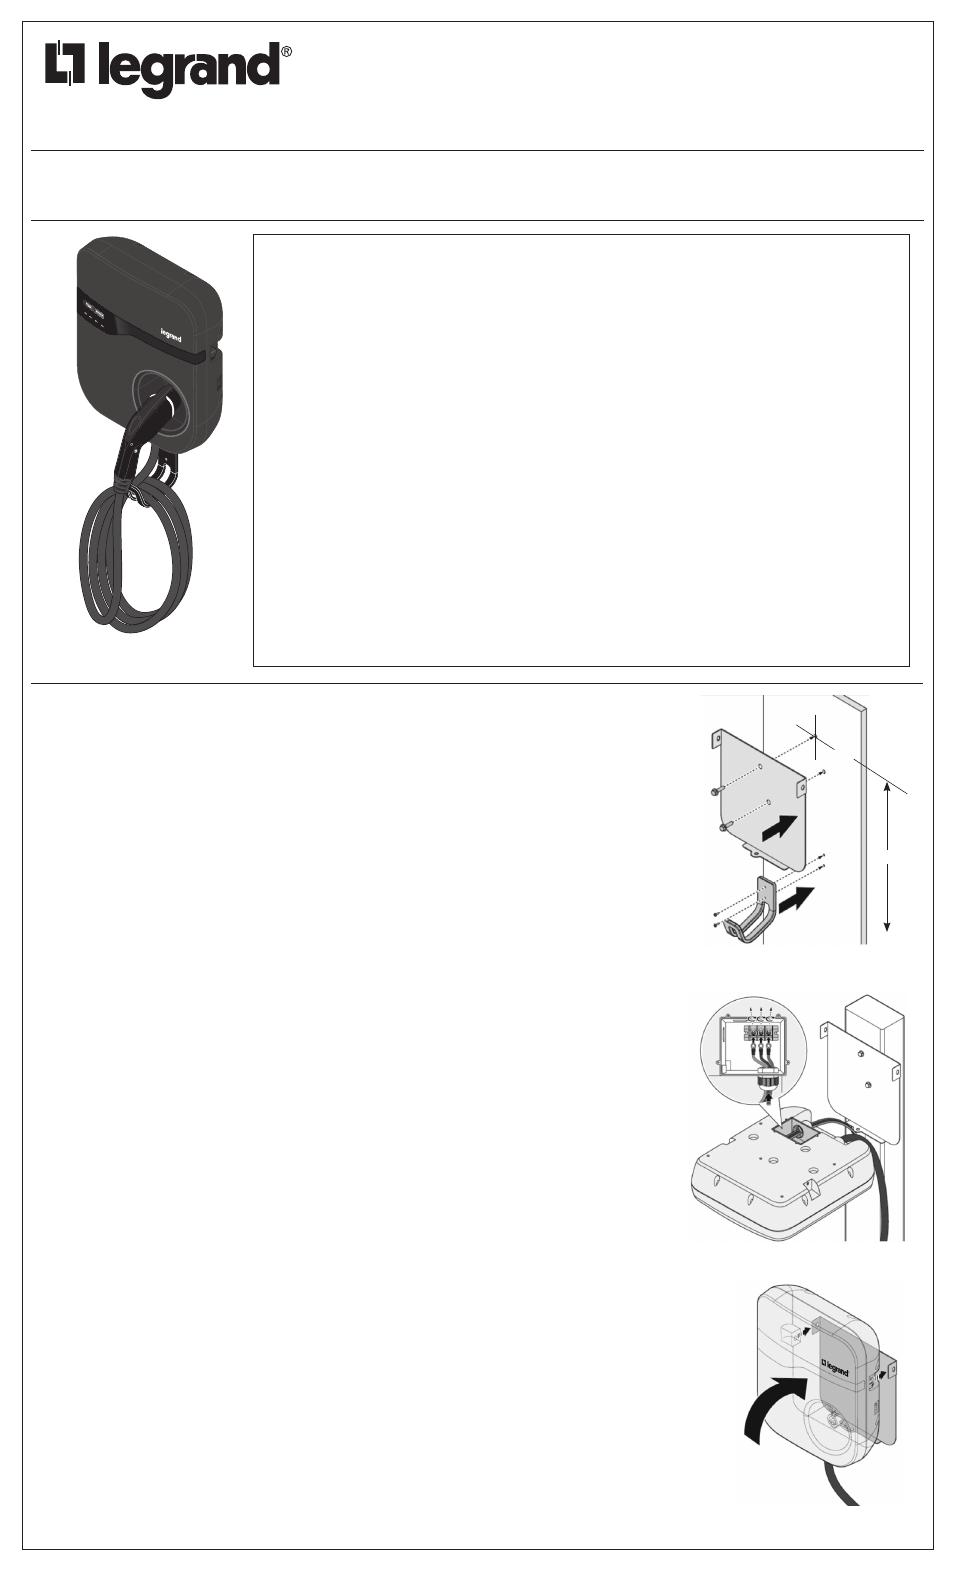
INSTALLING THE CHARGING STATION
1. Remove the charger from packaging and identify the
charger mounting plate.
2. Locate a vertical wall stud where the charging station
will be mounted.
3. Measure up 52" from the floor surface and make a
horizontal pencil mark across the wall stud location.
4. Draw a vertical line that intersects the horizontal line on the
center of the stud. The intersection of these two lines will be
the location of the top hole for the charger mounting plate.
(Figure 2)
5. Using the mounting plate as a template, align the top hole
in the plate with the wall location created in step 4. Use the
plate as a template to locate the lower mounting hole.
6. For wood studs, drill 1/8" dia. mounting holes 2" deep at
the locations indicated by the plate. For metal studs or
solid walls which require anchors, refer to manufacturer’s
instructions for anchor installation.
7. Align mounting plate on wall and install wood screws
through plate into wall. For metal studs or solid wall, use
the hardware supplied with the anchors and follow the
manufacturer’s instructions for anchoring the plate to
the wall.
8. Mount the charger hook conveniently on the wall below the
charger with appropriate fasteners.
Advance to the next section: “WIRING THE CHARGING
STATION” before attaching the charger to the mounting plate.
WIRING THE CHARGING STATION
WARNING: Improper wiring of any electrical wiring device can
cause serious injury or death. These wiring devices should
be installed only by an electrician or other qualified person in
accordance with all appropriate codes and standards. If you
are not sure about any part of these instructions, consult a
qualified electrician.
WARNING: To avoid risk of fire or shock which may result
in serious injury or death, turn off power to outlet box using
breaker or fuse at the service entrance. Before wiring, verify
that power has been removed by testing with a circuit tester at
the outlet box.
CAUTION: This device is for use only with copper or copper
clad wire. Do not use this device with aluminum wire.
1. Install a dedicated, 240VAC or 208VAC, 60Hz, grounded
branch circuit with a 40A circuit breaker or fuse. This circuit
should comply with the NEC and any local codes that
apply. The circuit must reach the entry port on the charger
and have a minimum of 12" of extra wire to terminate inside
the charger.
2. Remove 4 screws and cover from back of charger to access
wiring chamber.
3. Install and secure appropriate watertight bushing into hole
provided. (Hole is provided for 1" NPT fitting)
4. Feed incoming power conductors through bushing, strip
insulation, and securely crimp appropriate eyelet to the end
of each conductor. (Figure 3.)
5. Secure conductors under screw heads and torque to 17.7
lb/in (2.0 N-m).
6. Replace cover on wiring chamber and tighten 4 screws.
7. Align charger to mounting plate and secure with 3 screws
provided. (Figure 4.)
8. Close circuit breaker or fuse to energize the charger.
9. Verify the correct installation of the charger by reviewing the
indicator light panel. A solid green light means the charger
is ready to charge. For any other than solid green, see the
status indicator display located in the user guide.
INSTRUCTIONS PERTAINING TO THE RISK OF
ELECTRIC SHOCK
This product should be supervised when used around children.
Do not put fingers into the electric vehicle connector.
Do not use this product if the flexible power cord or EV cable is
frayed, have broken insulation, or any other signs of damage.
Do not use this product if the enclosure or the EV connector
is broken, cracked, open or show any other indication of
damage.
CAUTION: To reduce the risk of fire, connect only to a circuit
provided with 40 amperes maximum branch circuit overcurrent
protection in accordance with the National Electrical Code,
ANSI/NFPA 70.
READ ALL INSTRUCTIONS BEFORE
BEGINNING
The Legrand/Pass & Seymour catalog
number L2EVSE30 should be connected
only to a 240VAC or 208VAC, 60Hz,
grounded branch circuit and its
installation must comply with the NEC
and any local codes or regulations.
Installation of the Legrand/Pass &
Seymour catalog number L2EVSE30
must be performed by a licensed
electrician.
Shock, fire, property damage, personal
injury, or death may result if these
instructions are not followed.
If you have any questions about the use
or installation of this product, contact
your Legrand/Pass & Seymour technical
support representative at: 800-223-4185
(or [email protected]).
There are no user serviceable parts
contained in this product. Any attempt to
service this prod uct may result in shock
or fire causing property damage,
personal injury,
or death.
Save these instructions for future
reference.
LISEZ TOUTES LES INSTRUCTIONS
AVANT DE COMMENCER
La référence catalogue Legrand/
Pass & Seymour L2EVSE30 doit être
uniquement raccordée à un circuit de
dérivation en 240 V CA ou 208 V CA, 60
Hz, raccordé à la terre ; l’installation doit
être conforme aux normes NEC ainsi
qu’aux réglementations et lois locales.
L’installation de la référence catalogue
Legrand/Pass & Seymour L2EVSE30
doit être effectuée par un électricien
agréé.
Dans le cas contraire, il peut en résulter
une électrocution, un incendie, des
dommages au niveau de l’équipement,
des blessures graves voire mortelles.
Si vous avez la moindre question
concernant l’utilisation ou l’installation de
ce produit, contactez votre représentant
technique Legrand/Pass & Seymour au :
800-223-4185 (ou par courriel à tech_
[email protected]). Ce produit
ne contient aucune pièce pouvant être
réparée par l’utilisateur. Toute tentative
d’entretien de ce produit peut conduire
à une électrocution ou à un incendie
provoquant des dommages au niveau de
l’équipement, des blessures graves voire
mortelles.
Conservez ces instructions pour pouvoir
les consulter ultérieurement.
LEA TODAS LAS INSTRUCCIONES
ANTES DE COMENZAR
El número de catálogo L2EVSE30
de Legrand/Pass & Seymour debe
conectarse únicamente a un circuito
derivado a tierra de 240 V CC o a
208 V CC de 60Hz, y su instalación
debe cumplir con los códigos NEC
y cualquier otros códigos locales o
reglamentaciones.
La instalación del número de catálogo
L2EVSE30 de Legrand/Pass & Seymour
debe ser realizada por un electricista
autorizado.
Si no se siguen estas instrucciones,
se puede provocar choque, incendio,
daños materiales, lesiones personales
o muerte.
Si tiene preguntas acerca del uso o la
instalación de este producto, contáctese
con su representante de asistencia
técnica de Legrand/Pass & Seymour
al teléfono: 800-223-4185 (o tech_
[email protected]). No hay
piezas que puedan ser reparadas por
el usuario en este producto. Cualquier
intento de reparar este producto, puede
provocar choque o incendio que cause
daños materiales, lesiones personales
o muerte.
Guarde estas instrucciones para
referencia futura.
Figure / Illustration / Figura 3
Figure / Illustration / Figura 1
Figure / Illustration / Figura 4
Figure / Illustration / Figura 2
52"
Floor