Legrand WDT100 User Manual
Dual technology wall switch occupancy sensor
TROUBLESHOOTING
Lights do not turn ON with motion (LED does flash)
1. Press and release each button to make sure that the correct lights come
ON for each relay. If the lights do NOT turn ON, check wire connections,
especially the Load connection. If the lights turn ON, verify that the
correct On Mode is selected in DIP switches 8 and 9.
2. Check to see if light level control is enabled: cover the sensor lens with
your hand. If the lights come ON, adjust the light level setting.
3. If lights still do not turn ON, call 800.223.4185 for technical support.
Lights do not turn ON with motion (LED does not flash)
1. Press and release each button. Make sure that the correct lights come ON
for each relay. If the lights turn ON, set PIR and ultrasonic Sensitivity to
High.
2. Check the wire connections, in particular, the Neutral and Line
connections. Verify that connections are tightly secured.
3. If lights still do not turn ON, call 800.223.4185 for technical support.
ADJUSTMENTS
Sensor Adjustment
Remove the wall plate. Remove the button cap by firmly squeezing together the
top sides of the button assembly. Gently pull it away from the unit.
When the adjustments are completed, replace the button cap by inserting its
hinges into the tabs on the main unit and then squeeze the top of the button
while pressing it into the unit. Reinstall the cover plate.
Light Level Adjustment
The light level can be set with loads ON or OFF. To enable light level control and
set the threshold: 1) Make sure the room is lit appropriately. 2) Put the sensor
into TEST mode. You have 5 minutes to complete the procedure. 3) Press and
hold the ON/OFF button (Relay 1 button on the WDT-200) for 3 seconds, until
you hear a beep. 4) Step away from the sensor. After 25 seconds a beep sounds,
indicating that the threshold level is set. This threshold is retained, even if power
is lost, until it is re-set or disabled. In the WDT-200, light level control only
affects Relay 2.
To disable light level control, press and hold the Relay 1 button for 7 seconds,
until a double beep tone sounds.
Reset to Default
To reset the WDT to factory settings, press and hold the Relay 1 button for
10 seconds, until a triple beep sounds. This resets the sensor occupancy history
and disables light level control (the brightest ambient light will not hold the light
OFF).
ORDERING INFORMATION
Warranty Information
Pass & Seymour /Legrand warranties its products to be free of defects in
materials and workmanship for a period of five years. There are no obligations
or liabilities on the part of Pass & Seymour /Legrand for consequential
damages arising out of or in connection with the use or performance of this
product or other indirect damages with respect to loss of property, revenue, or
profit, or cost of removal, installation or reinstallation.
Units come in White (-W), Light Almond (-LA), Ivory (-I), Gray (-Gry), Black (-BK).
Add color designator to catalog number when ordering.
* One TP26 Cover Plate for single gang box is included with each switch.
Syracuse, NY 13221-4822
800.223.4185
www.passandseymour.com
In
st
a
lla
tio
n
In
st
ru
ct
io
n
s
Specifications
Voltages:
WDT-100 & WDT-200 . . . . . . . . . . .120/230/277VAC, 50/60Hz
Load Limits for each relay:
@120VAC . . . . . . . . . . . . .0-800W tungsten or ballast, 1/6 HP
@230 or 277VAC . . . . . . . . . . . . . . . . . . . . . . . .0-1200W ballast
Load Type Compatibility:
Incandescent, fluorescent, magnetic or electronic ballast
Horsepower Rating (each relay) . . . . . . . . . .1/6 HP @120VAC
Time Delay Adjustment . . . . . . . . . . . . . . . . . . . . .5 to 30 minutes
Walk-Through Mode . . . .3 minutes if no activity after 30 sec.
Test Mode . . . . 5 sec. at initial power up or DIP switch reset
PIR Adjustment . . . . . . . . . . . . . . . . . . . .High or Low (DIP switch)
Ultrasonic Adjustment . . . .Minimum to Maximum (trimpot), Off
Frequency . . . . . . . . . . . . . . . . . . . . . . . . . . . . . . . . . . . . . .40kHz
Light Level Adjustment . . . . . . . . . . . . . . . . . . . . . . . .8fc to 180+fc
Alerts . . . . . . . . . . . . . . . . . . . . . . . . . . . . . . . . . .Selectable Audible
P.O. Box 4822, Syracuse, NY 13221-4822
Technical Support: 800.223.4185 • www.passandseymour.com
340892 11934
Catalog #
Description
WDT-100
Dual technology wall switch sensor; 120/230/277VAC, 50/60Hz
WDT-200
Dual technology dual relay wall switch sensor;
120/230/277VAC, 50/60Hz
TP126
Toggle switch and decorator opening wall plate *
US Patents: 5189393, 5640113,
6617560B2, A4787722
Lights do not turn OFF
1. There can be up to a 30 minute time delay after the last motion is
detected. To verify proper operation, set DIP switch 1 to ON, then reset
switches 1 and 2 to OFF to start Test Mode. Move out of view of the sensor.
The lights should turn OFF in approximately 5 seconds.
2. Verify that the sensor is mounted at least six feet (2 meters) away from
any heating/ventilating/air conditioning device that may cause false
detection. Verify that there is no significant heat source (e.g., high wattage
light bulb) mounted near the sensor.
3. Verify that the trimpot is not pointing at “override” (red LED on). If so,
rotate the trimpot to it’s middle setting (pointing up). The override setting
allows users to operate the sensor as a service switch in the unlikely
event of a failure.
4. If the lights still do not turn OFF, call 800.223.4185 for technical support.
Sensing motion outside desired areas
1. Select PIR Sensitivity – Low (DIP switch 4 = ON) if necessary.
2. Mask the PIR sensor’s lens to eliminate unwanted coverage area.
3. Adjust the Ultrasonic Sensitivity. Rotate trimpot counterclockwise to
reduce sensitivity.
D
E
LA
Y
P
IR
5
0
%
W
A
LK
TR
IG
G
E
R
A
LE
R
TS
R
LY
1
M
A
N
R
LY
2
M
A
N
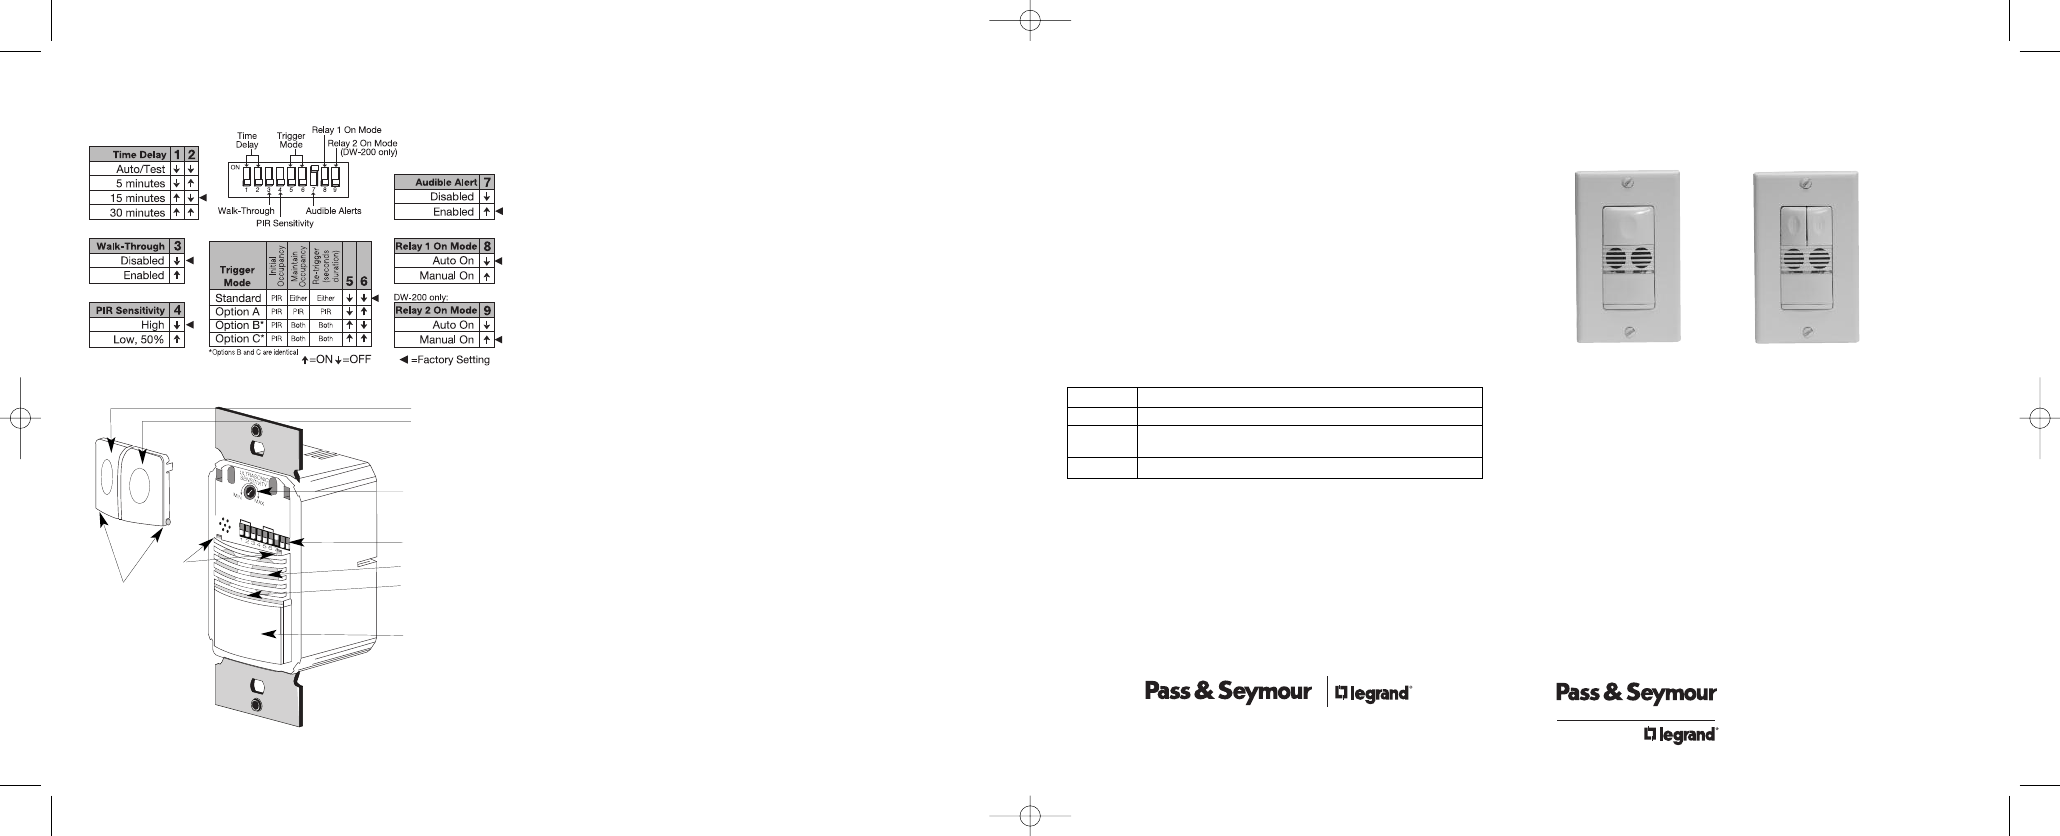
ON/OFF Buttons
Relay 1
Relay 2
DIP Switches
Detection LEDs
Red = PIR
Green = Ultrasonic
PIR Lens
DIP SWITCH SETTINGS
Call 800.223.4185 for Technical Support
Ultrasonic Cones
Ultrasonic Sensitivity
Adjustment Trimpot
Button
Hinges
Tabs
WDT-100/WDT-200
Dual Technology Wall Switch
Occupancy Sensor
WDT-200 shown.
WDT-100 has a
single button and
the Ultrasonic
sensitivity
adjustment trimpot
is in a slightly
different position.
WDT-100
WDT-200
WDT_340892_11934.qxd:340892 11934 WDT_Instruction Sheet 10/12/09 4:08 PM Page 1