0 maintenance – Mathey Dearman MSA Saddle Machine User Manual
Page 12
12
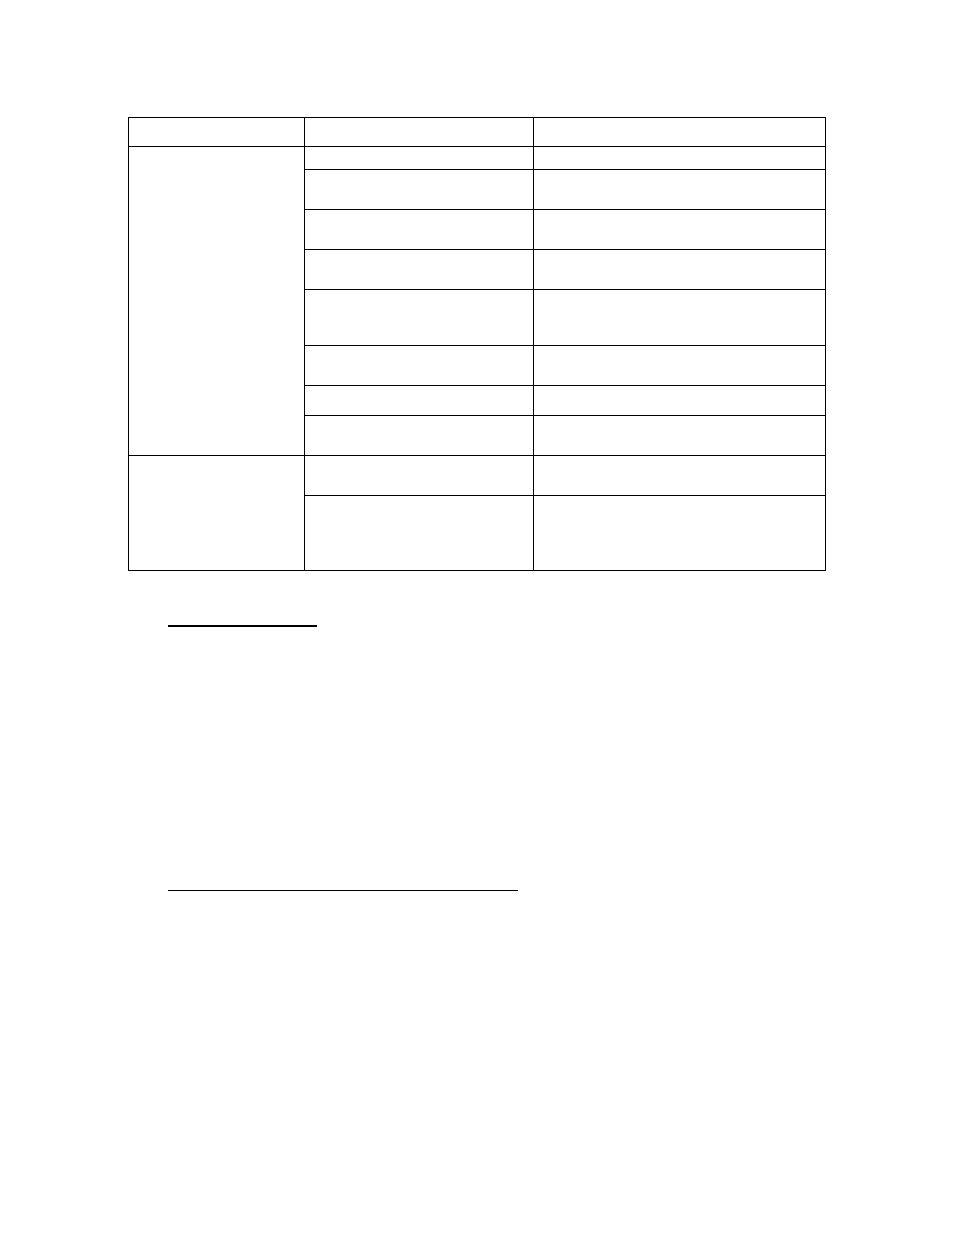
Table 7 – Trouble shooting – Manual Machine
Symptom
Possible Cause(s)
Corrective Action
Machine is cutting out
of square
Incorrect Spacers are used
Use only Mathey Spacer.
Customer is cutting tubing.
Contact Mathey Dearman Sales Department
for Spacers for tubing.
The Spacers are not in contact with
pipe.
Reposition machine so that both Spacers
contact the pipe and re-tighten Boomer.
Torch, Torch Arm or Torch Carrier
is loose.
Tighten Wing Nuts or Thumbscrews.
Hoses are binding.
Wrap the Hose one (1) full turn around the
pipe. Rotate the Ring Gear of the machine so
the Hoses unwrap during the cutting process.
Machine has been dropped.
Send the machine to a certified repair station
for resizing Cap Ring, Ring Gear and Saddle.
Torch is at end of Torch Arm.
Move the Torch closer to the Ring Gear.
The Pinion Gears are too shallow in
the large Ring Gear.
Readjust the Pinion Gear so it is at the proper
depth in Ring Gear
Machine hesitates or
stops as the Pinion Gear
enters the Ring Gear.
The timing of the Pinion Gears to
the Ring Gear is out of adjustment.
Readjust the timing of the Pinion Gear to the
Ring Gear per the repair instructions.
The Drive Chain is stretched.
Readjust the Bearing Brackets to eliminate
the slack in the Chain per the repair
instructions. If the slack cannot be eliminated
replace the Drive Chain.
7.0 Maintenance
In order to the maximum life of the 1SA Saddle machine, the maintenance should be performed by an authorized Mathey
Dearman Certified Repair Center. The Mathey Dearman Pipe Cutting and Beveling Machine requires only minimal
maintenance; however, these are precision machines. In order to achieve proper results, make sure your machine is
handled with reasonable care and it kept clean and lubricated. The machine should be stored in a protective container
such as a Mathey Dearman Machine Storage Box or the original factory shipping crate during transporting or when not in
use.
The Ring Gear, Pinion Gears, and Drive Chains should be kept clear of slag and other trapped abrasives, especially sand
and dirt. The Saddle, Ring Gear, and Cap Ring should be cleaned weekly and the Ring Gear Track Surfaces should be
coated with Lubriplate 130-AA or equal lubricant weekly under heavy use and before storing. The Drive Chains and
Sprockets should be cleaned regularly and coated with a film of a light oil or lubricant such as WD-40 or equal. Lithium
Grease should be applied to the Grease Zerk (Figure 5 item 9) of the Single Bearing Bracket (Figure 5) and to the Grease
Zerk (Figure 6 item 11) of the Double Bearing Bracket (Figure 6) weekly.
Contact Mathey Dearman at 918-447-1288, should any questions arise that are not covered in the manual
7.1
Timing the Ring Gear to the Pinion Gears
7.1.1 Remove the Tie Rod Handle (Figure 4 item 7) from the Single and Double Bearing Brackets (Figure 4 item 4 & 5)
by removing Hex Head Cap Screws (Figure 5 item 10) with a 7/16" wrench.
7.1.2
Using a 1/8” allen wrench loosen the 2 Socket Set Screws (Figure 5 item 6) in the Sprocket of the Single Bearing
Bracket (Figure 5).
7.1.3 Rotate the Ring Gear (Figure 4 item 3) clockwise (as viewed from the front of the machine) until the gap in the
Ring Gear is at the 11:00 Position and off the Pinion Gear (Figure 5 item 3) of the Single Bearing Bracket (Figure
5) or until the Pinion Gear does not make contact with the Ring Gear (Figure 4 item 3).
7.1.4 Rotate the Sprocket (Figure 5 item 2) on the axle ((Figure 5 item 4) of the Single Bearing Brackets (Figure 5) to
make sure it is loose on the axle.
7.1.5 Rotate the Ring Gear (Figure 4 item 3) clockwise (as viewed from the front of the machine) until the gap in the
Ring Gear is at the 12:00 Position.