OpenEye OE5-N4 User Manual
N4 professional grade network recorder quick guide
N4 PROFESSIONAL GRADE NETWORK RECORDER
Quick Guide
31138AC
Copyright ©2013 OpenEye. All Rights Reserved. Information contained in this document is subject to change without prior
notice. OpenEye does its best to provide accurate information but cannot be held responsible for typos or mistakes.
23221 E Knox Ave
Liberty Lake, WA 99019
1.888.542.1103
CONNECTIONS
No. Item
No.
Item
No. Item
1
Power
8
USB
15
5.1 Surround Sound
2
USB
9
16
Optical Output
3
10
DVI-I
17
Line in - Line level
4
eSATA
11
HDMI
18
Speaker Out
5
Network
12
USB
19
Mic In - Non Used
6
USB
13
20
RAID management port
7
14
5.1 Surround sound
21
Network
1
2
3
4
5
6
7
8
9
10
11
12
13
14
15
16
17
18
19
20
21
This guide is a quick reference for users to install and operate the N4 network recorder and
only provides basic information. For further details on installation and operation, please
refer to the User Manual.
BOX 1 CONTENTS
NVR CASE KEY
REPAIR DISK /
SOFTWARE DISK
MOUSE
KEYBOARD
POWER CABLE
DVI to VGA ADAPTER
QUICK START GUIDE
ACCESSORY BOX CONTENTS
N4 RECORDER (without drives)
Due to the number and weight of the hard drives, the G4 GraniteRack iSCSI Storage Server
is shipped in two boxes.
RACKMOUNT RAIL KIT
BOX 2 CONTENTS
HARD DRIVES (in boxes, 4 per box)
ACCESSORY BOX
(see contents below)
FRONT BEZEL
12
!
1
2
4
3
56
7
8
9
10
11
12
13
14
15
16
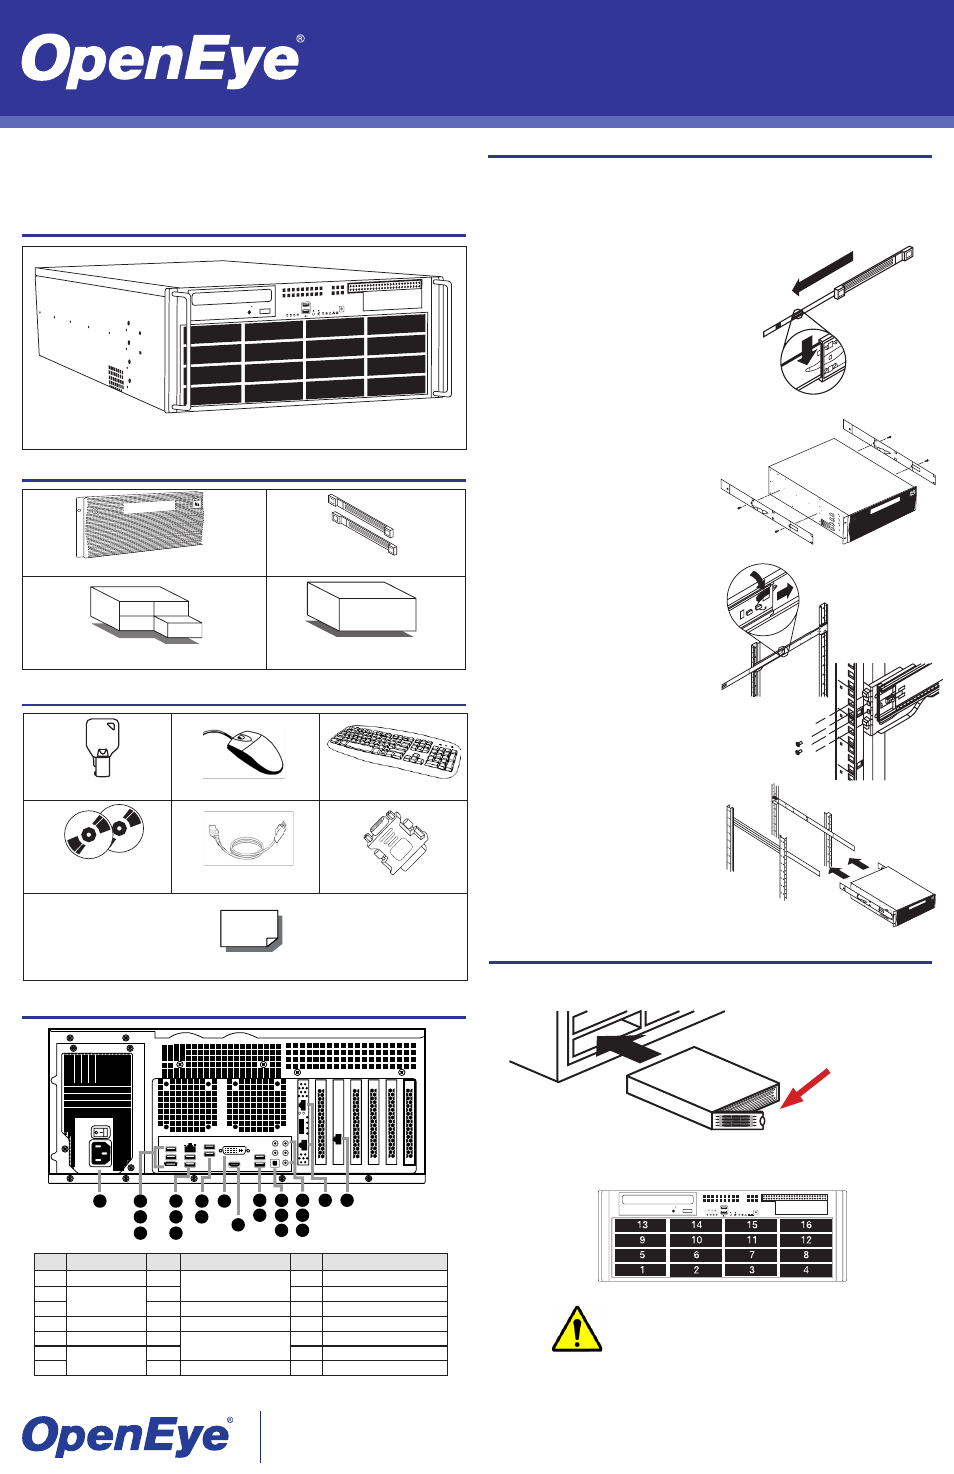
RACKMOUNT ASSEMBLY INSTRUCTIONS
The box your OpenEye G4 network recorder was shipped in should include two rail assem-
blies, two rail mounting brackets, and the mounting screws you will need to install the system
into the rack. There are a variety of rack units available on the market, which may mean the
assembly procedure will differ slightly. Refer to the installation instructions for your model of
rack unit. Please read this section in its entirety before you begin the installation procedure.
Installing the Recorder into a Rack
1. Extend the outer rails
2. Align the inner rails with the outer rails on
the rack.
3. Slide the inner rails into the outer rails,
keeping pressure even on both sides.
When pushed all the way into the rack,
the rails will click into a locked position
(preventing removal without pressing the
quick-release tabs).
Installing the Outer Rack Rails
1. Secure the back end of the outer rail to
the rack using the leaf springs and screws
provided.
2. Press the button where the two outer rails
are joined to retract the smaller outer rail.
3. Hang the hooks of the rails onto the rack
holes and, if desired, use screws to secure
the front of the outer rail onto the rack.
4. Repeat these steps for the other outer rail
extension.
Separating the Sections of Rack Rails
1. Extend the rail assembly by pulling it out-
ward.
2. Press the quick-release tab.
3. Separate the inner rail extension from the
outer rail assembly.
4. Repeat theses steps for the second rail
assembly.
Installing the Inner Rail Extensions
1. Place the inner rail extensions on the side
of the chassis, aligning the hooks of the
chassis with the rail extension holes. Make
sure the extension faces outward, just like
the pre-attached inner rail.
2. Slide the extension toward the front of the
chassis.
3. Optional: Secure the rail extension to the
chassis with 4 screws (included).
4. Repeat these steps for the other side of the
chassis.
HARD DRIVE INSTALLATION
Your recorder will be shipped with the drives in a separate box. To insert the drives, pull the
blue latch release on the front of the drive, insert the drive into the proper port, and close the
latch.
Pull blue button to
release latch
Your hard drives should be inserted in order, 1-16, depending on how many hard drives you
have purchased. Each hard drive is marked with the number of its port. See the diagram
below for the order of hard drive ports.
12
FOR UNITS WITH RAID CONFIGURATION ONLY:
Use only identical models to replace the hard drives
Do not re-insert failed drives.