Installation, Alignment – Protech Audio 65306 User Manual
Page 2
INSTALLATION
Page 2
8/95
ALIGNMENT
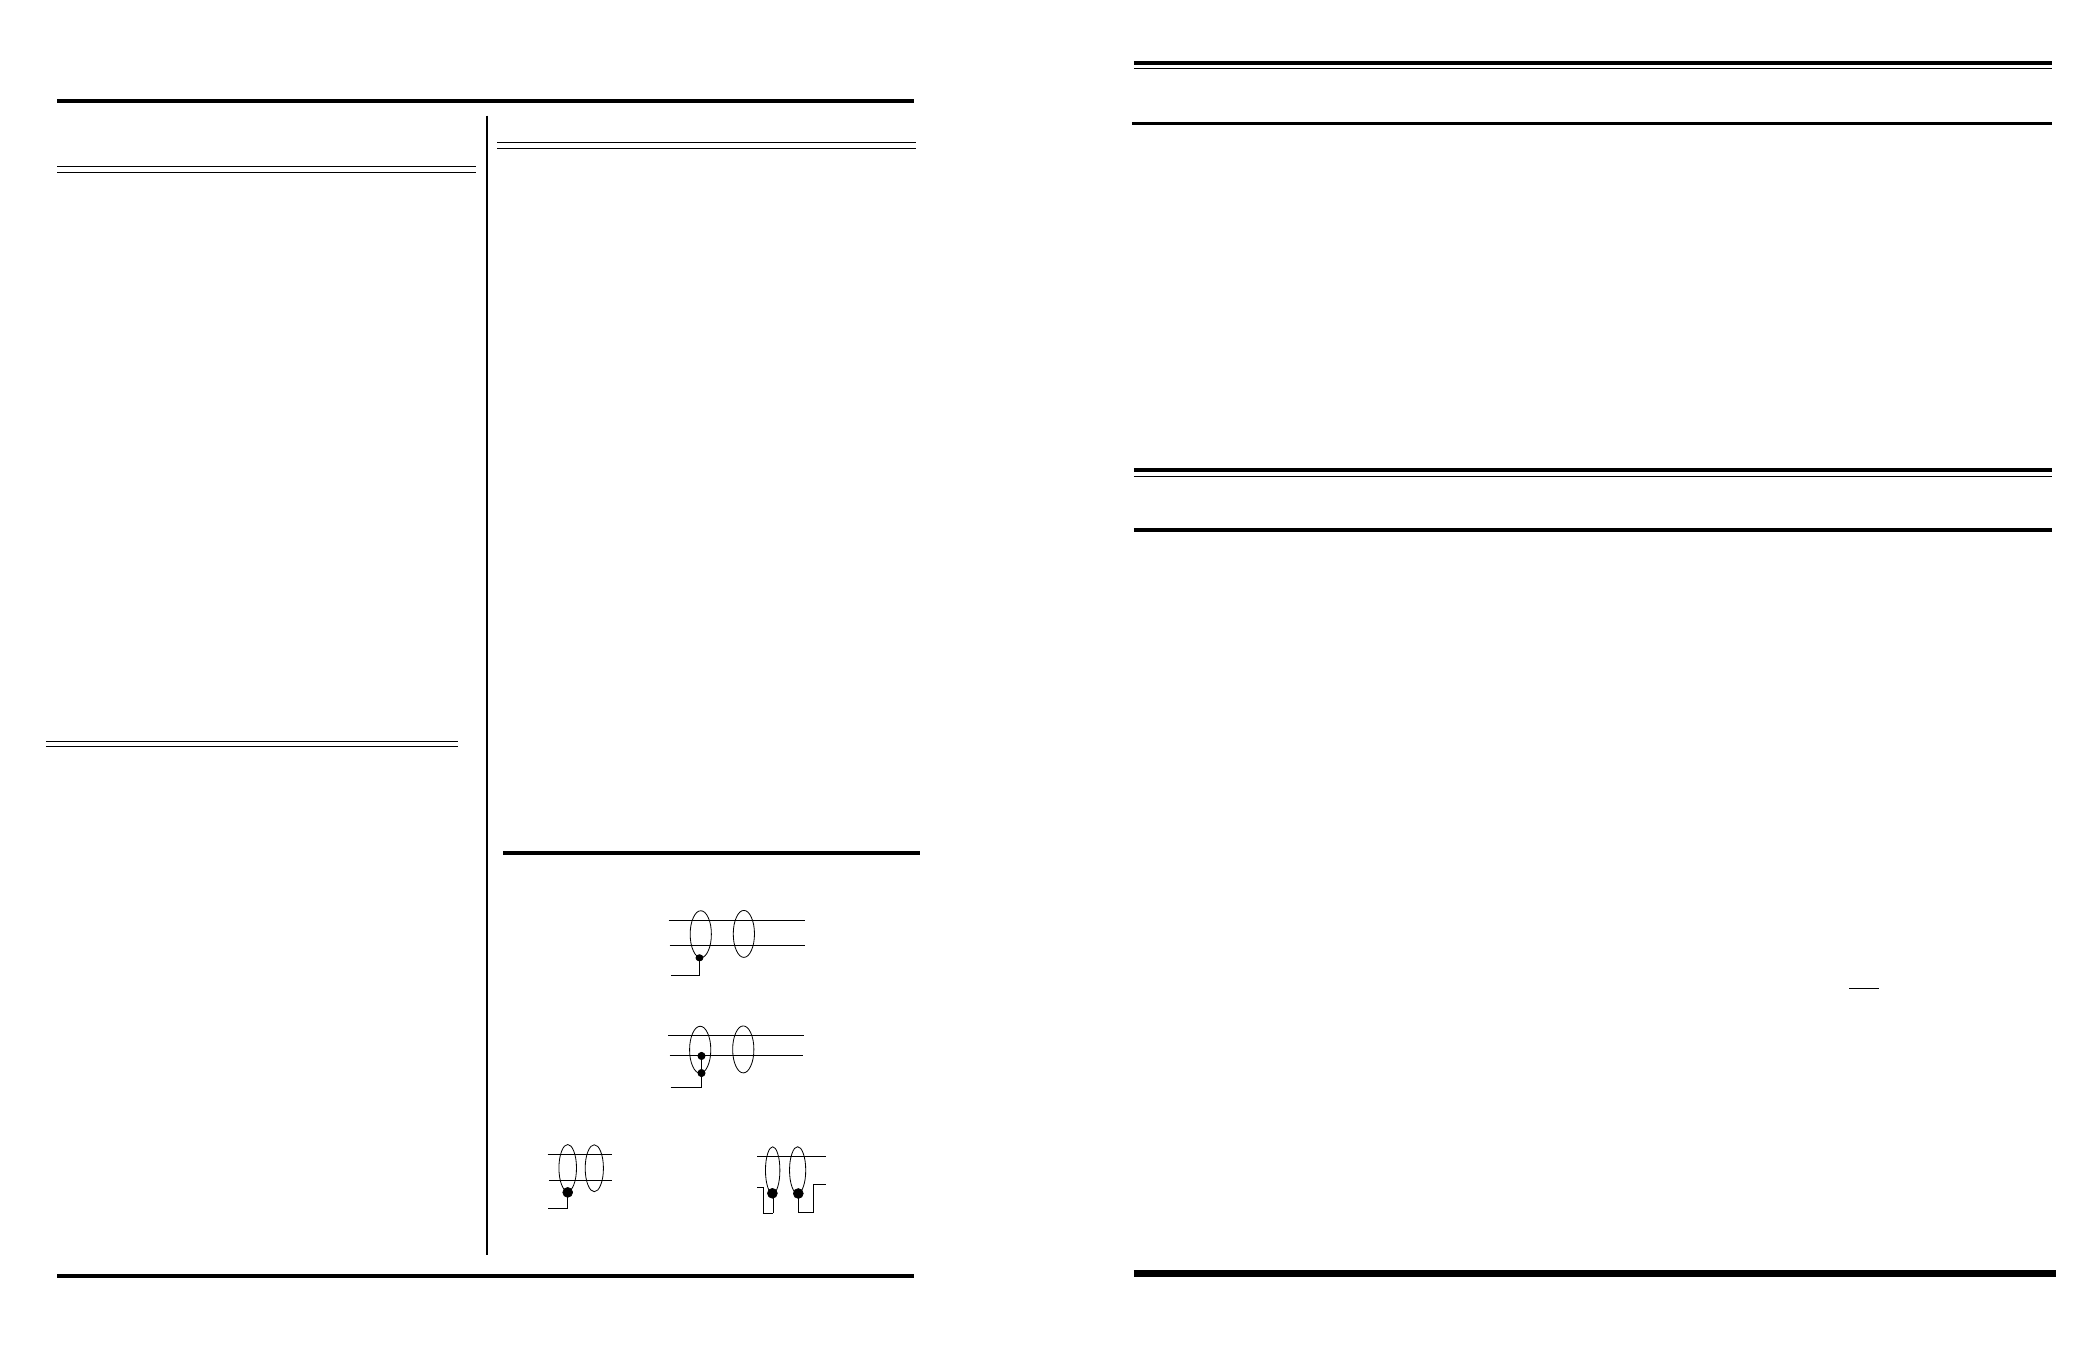
UNBALANCED INPUT CONNECTIONS
BALANCED INPUT CONNECTIONS
HI
LO
SH
HI
LO
SH
BALANCED & UNBALANCED OUTPUT CONNECTIONS
LO
HI
UNBALANCED
TO POWER
AMPLIFIER
HI
LO
SH
BALANCED
TO POWER
AMPLIFIER
INITIAL CONTROL POSITIONS
BGM Knob = Full CCW Position
BGM PRE/POST Switch = PRE Position
PGM #1 Knob = Full CCW Position
PGM #2 Knob = Full CCW Position
PGM #3 Knob = Full CCW Position
THRESHOLD Knob = Full CW Position
RATIO Knob = Full CW Position
GAIN LIMIT Knob = 6dB Position
LIMIT Knob = Full CW Position
MIN/AUTO/MAX Knob = MIN Position
METER SWITCH = Output Position
The Model 65306 is designed to be mounted in a
standard 19" width EIA rack. The position of the unit
in the rack is not critical, since it does not use
significant power, and therefore does not produce
heat.
After installing the Model 65306 in the audio rack,
wire all audio inputs and output using double con-
ductor shielded cable. Various operating methods
may be used. In order to select the proper termina-
tion points for a particular operating method, refer to
the wiring diagrams on pages 3 - 5. If the speaker
grid is to be used as the sening device, care must be
taken to insure the wire gauge used is large enough
to handle the output power of the power amplifier.
Speakers may be used for sensing only when there is
no background music. Also, the internal speaker
switching relay in the Model 65306 is rated up to 100
watts. If power amplifiers rated over 100 watts are to
be used, an external switching relay is required (see
page 5).
With MIN/AUTO/MAX switch in MIN position, apply
audio signals to each input, and adjust input control knob for
nominal -10dB output.
Turn MIN/AUTO/MAX switch to MAX position. Apply
audio signals to each input, and adjust AUTO GAIN
LIMIT switch set maximum gain to be allowed (for high
ambient noise condition).
Turn MIN/AUTO/MAX switch to AUTO position.
Set meter mode switch to AUTO GAIN.
Slowly, turn THRESHOLD control knob counterclockise
until meter indicates additional gain is being added to
output signal. Then, slowly turn THRESHOLD control
knob clockwise until additional gain is removed from
output signal. This will set the threshold of expansion
for the current ambient noise condition. It may be
necessary to repeat this adjustment several times, to fine
tune the adjustment. If the ambient noise level increases,
the Model 65306 will increase the output level.
IF NECESSARY ADJUSTMENTS-
If AUTO GAIN should add gain at a faster rate than
necessary, turn RATIO Knob CCW, until proper
rate is achieved.
IF necessary, adjust OUTPUT LIMIT knob CCW to
limit the overall output level. Remember, this level
must be higher than the combined initial output
level and the AUTO GAIN switch setting. i.e.-,
minus 10dB plus 12dB AUTO GAIN = +2dB.)
When using speakers for sensing, there are a few key items to consider.
First, sensing with speakers when background music is present, is not recommended. Although it has been
tried by some manufacturers, sensing with speakers when background music is present, does not work very
well. In order for the speaker to properly create the back EMF (electro-motor force) needed to send a signal to
the sensing input, the speaker should be de-energized for a period of 1 to 2 seconds. This is to allow the speak-
er to reach a zero output condition. Next, the speaker should be allowed to react to the ambient noise condition
for a period of 2-3 seconds. This allows the speaker to create an average output level, instead of reacting to a
cough or a yell.
There are only two ways to create these 3-5 second pauses in the background music. One is to have the ambi-
ent level controller interupt the music every 15 to 20 seconds. This creates a very noticeable, and unpleasant
effect on the background music. The second is to purchase prerecorded music with the pauses built-in every1-
2 minutes. This condition does not allow the level controller to react properly to all changes in ambient noise
condition.
WHEN USING SPEAKERS FOR SENSING -
A WORD ON ADJUSTING THRESHOLD AND RATIO CONTROLS -
The threshold control determines when the Model 65306 starts to add additional gain, in relation to the
ambient noise level. The control has been optimized for operation at 11:00. The majority of installations will work well
at this adjustment level. However there are installations that may require a small adjustment form this 11:00 position.
By turning the threshold control counterclockwise, the unit will react to lower ambient noise levels. This can be seen
by setting the meter mode switch in the "AUTO GAIN" position, and the output mode switch to the "AUTO" position.
When the threshold control is turned fully clockwise, no LED's will be illuminated. By turning the threshold control to
the full counterclockwise position, some or all LED's will light up, depending on the type of sensing device that is
attached to the sensing input, and the auto gain "LIMIT" switch position. This indicates the amount of additional gain
the unit is adding to the initial signal level. During a quiet ambient noise period, the threshold control should be ad-
justed so that the lowest level LED just turns off. Remember, this is an average responding circuit, and will take 5-30
seconds to settle to the most recent adjustment.
The ratio control determines how fast the Model 65306 adds gain, in relation to changes in the ambient noise
level. In some installations, a slower than 1:1 ratio may be desired. Also, if the speaker system should create
additional reverberations in the area of the sensing device, a slower ratio may be wanted. By slowing down
the ratio (counterclockwise), the sensing device may receive reverberations from the near-field speakers, but
would still require additional input noise before it could raise the out level any significant amount. For
instance, if the ratio is set to 2:1, the unit would require 2dB of speaker reverberations and 2 dB of ambient
noise level change, befor it could raise the output level 2dB.
- Page 7 -