Randall Amplifiers RG13 User Manual
Page 2
Congratulations on the purchase of your new RANDALL RG13 Pedal/Amplifier! We at Randall Amplification appreciate that you chose our brand of guitar instrument
amplifiers and wish you years of great tone and enjoyable playing time with your new machine. Please review the safety instructions and be aware that the documentation
provided in this manual references 120volt USA versions of the models covered. Note that the POWER listed on the power supply should be for your countries’ power standard.
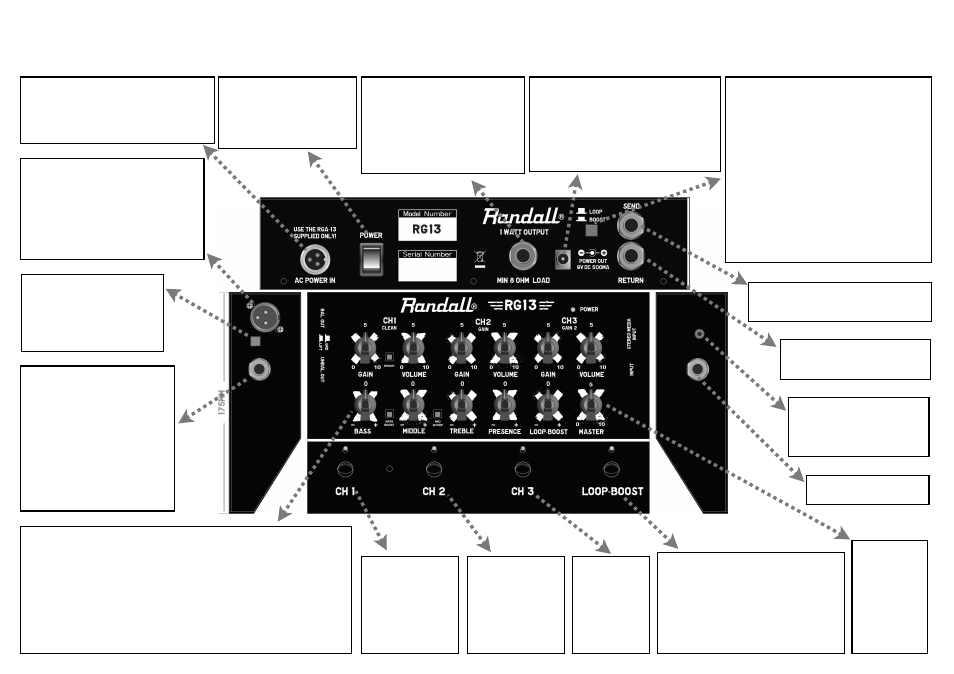
1/8” Stereo Media input: Plug
your i-anything, CD player,
computer here and the level
form the external device will
send signal to play along with.
1/4” instrument input:
Plug your guitar in here!!!
1/4” line output:
No Speaker Emulation
• Connects to guitar amplifier
input
• Connects to amplifier effects
loop return
• Connects to power amp input
• Connects to next pedal in
effects chain.
XLR ground lift changes the
ground connection to fix
ground loops when interfacing
with other equipment - use at
quietest setting for best
performance.
XLR Balanced output with Speaker
Emulation circuit that electronically
simulates the sound of a microphone
signal miking a Randall 4x12 speaker
cabinet. This allows for better tonal
performance when sending direct feed
to a PA/Sound System or directly to a
recording interface.
Connect included external power supply
unit here.
Note that power supply will vary for each
international region. Check voltage if your
bring your RG13 to different countries.
Power switch turns unit on
and off. Be sure to power off
or mute volume on other
external devices connected
when powering RG13 on or
off to avoid damage.
Speaker output- connect this to any
speaker enclosure 8 Ohms or
greater including headphones.
(some headphones may only play on
one side)
Minimum 8Ω Load!
Wattage isn’t an issue, so don’t be
afraid to use a big cab like a 4x12.
***Note that unit does not need
speaker load to operate***
External 9 volt DC power output for
external pedals. Do not exceed 500ma
power maximum! (check the power draw
on your external gear) Also note the
polarity in the diagram- center pin is (-)
negative - if you plug in a device with
opposite polarity then sound may mute or
power will not be activated.
Loop/Boost mode selector:
Boost mode disables the send/return
allowing the LOOP-BOOST knob to control
the amount of boosted or cut (- or +) signal
sending to master volume when engaged.
Loop mode allows for external FX to be
engaged in and out of signal.
Mute mode - with Loop mode engaged and
nothing plugged into send/return engaging
Loop-Boost footswitch will mute signal.
Tuner-mute mode - with Loop mode
engaged, plug from send into external tuner -
when LOOP-BOOST footswitch is engaged,
unit will mute and send signal to tuner
Loop send: Plug from this into input of
external FX or into tuner input when
using in tuner-mute mode.
Loop return: Plug from output of
external FX into this return when
using loop mode.
Channel 1- Clean:
For cleanest sound
turn volume all the
way up and use gain
knob to match
channel volumes.
Bright switch adds
some “Sparkle”
Channel 2 Gain1:
This is standard
overdrive channel-
use gain knob to set
amount of distortion
and set volume to
match other
channels.
Channel 3
Gain2: Same
set up as
Channel 2 but
with more
available gain.
Loop-Boost : this footswitch engages or
disengages all of the possible modes
associated with Loop-Boost.
Boost mode
Loop mode
Mute mode
Tuner-mute mode
Master Volume:
This knob
controls the
overall signal
feeding all of
the outputs -
1/4”, XLR &
Speaker,
Headphones
Equalizer Section:
BASS - this knob will boost (+) or cut (-) Low Frequencies.
Bass Boost button- boost low end “fattening” sound
(use caution engaging this at high volumes - some speakers may not be
able to handle these low frequencies at certain volumes)
MIDDLE - this knob will boost (+) or cut (-) Midrange Frequencies.
Mid Scoop button- removes midrange when depressed- creates smiley
face eq curve :)
TREBLE - this knob will boost (+) or cut (-) High Frequencies.
PRESENCE - this knob will boost (+) or cut (-) Highest Frequencies.