RLE 10K Quick Start User Manual
Seahawk 10k quick start guide, Supplies for installation, Mount the device
© Raymond & Lae Engineering, Inc. 2011. All rights reserved. RLE® is a registered trademark and Seahawk™, Falcon™, and Raptor™ are
trademarks of Raymond & Lae Engineering, Inc. The products sold by Raymond & Lae Engineering, Inc. are subject to the limited warranty, limited
liability, and other terms and conditions of sale set forth at http://rletech.com/RLE-Terms-and-Conditions.html.
Supplies for Installation
Included with the SeaHawk 10K
15 foot (4.57m) leader cable
End-of-line terminator (EOL)
Available from RLE, sold separately
12-24 VAC/VDC, 50-60Hz isolated power supply
SeaHawk sensing cable, up to 10,000 feet (3048m)
Available from Other Vendors
Electrostatic discharge (ESD) protection
Mount the Device
The SeaHawk 10K can be mounted inside a panel or on a DIN rail. The device has two
adjustable orange clips on the bottom. Push the clips out to expose two screw holes that
allow the device to be mounted in a panel; push the clips in to mount the device on a DIN
rail.
Establish Physical Connections & Test the Device
The SeaHawk 10K’s circuit boards are labeled. This helps you determine which wires feed
into each terminal block. Before you apply power to the SeaHawk 10K, wire all necessary
connections and set the DIP Switches.
1. Connect the power lead to TB3 or TB4.
2. Insert the four stripped wires of the leader cable into the appropriate slots in TB2 -
from left to right: white, black, green, and red.
3. Connect sensing cable to the other end of the leader cable, and be sure an end-of-
line terminator is connected to the end of the sensing cable.
4. Secure your connection for the relay output to TB1.
5. Adjust the DIP switches to the appropriate settings.
6. Apply power to the SeaHawk 10K.
7. Test the system - simulate leaks at the beginning, middle, and end of the sensing
cable to ensure the SeaHawk 10K accurately calculates the distance to leaks.
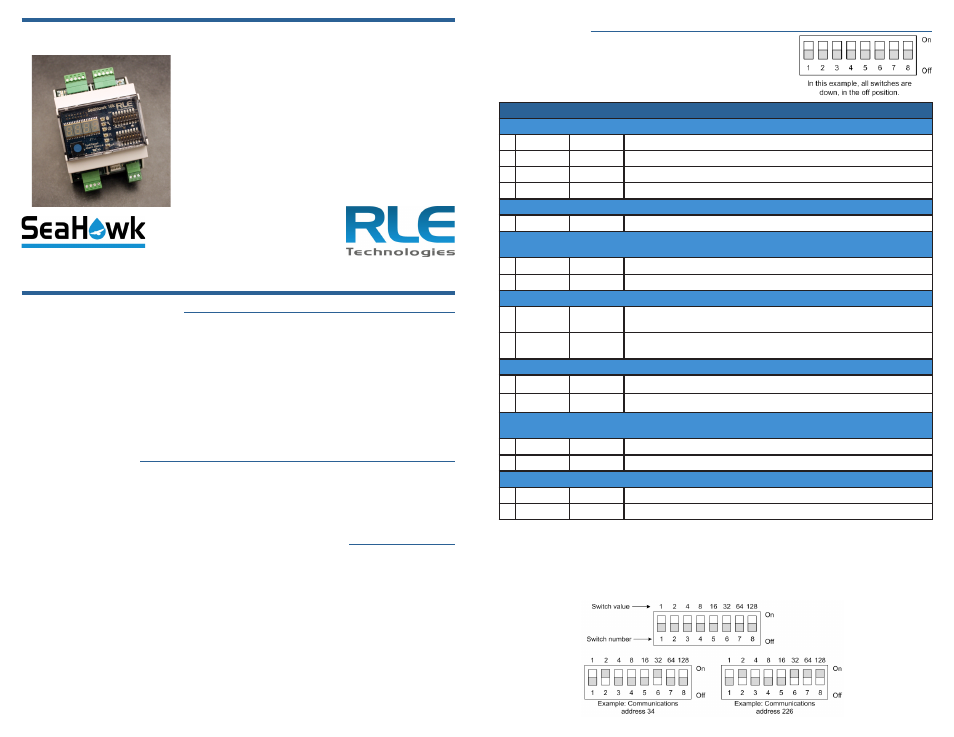
DIP Switches
The SeaHawk 10K has two sets of DIP switches. Push the
numbered switch up to turn it on; push the switch down to
turn it off. SW1 is used to configure a variety of settings on
the Seahawk 10K. SW2 is used to configure communications.
DIP Switch 1, switches 1 through 8
Set the baud rate for the EIA-485 Port
1 = Off
2 = Off
Modbus 9600 baud
1 = On
2 = Off
Modbus 1200 baud
1 = Off
2 = On
Modbus 38400 baud
1 = On
2 = On
N2 9600 Baud
Unused
3 = Off
Unused, leave in the off position.
Set the Re-alarm Interval - After a leak or cable problem has been detected, the alarm will be re-sent at a
designated interval until the alarm condition has been resolved.
4 = Off
Re-alarm interval - disabled. No re-alarm will occur.
4 = On
Re-alarm interval - 4 hours
Latching Alarm Status
5 = Off
Unlatched alarms - alarm resets itself once a detected leak or cable problem has
been resolved
5 = On
Latched alarms - alarm must be reset by manually pushing the blue Test/Rest/
Alarm Silence button, even if the leak or cable problem is no longer present
Distance Measurements
6 = Off
Cable length displayed in feet
6 = On
Cable length displayed in meters
Sensing Cable Resistance - If you have questions regarding your cable’s resistance, please reference the cable’s
data sheet.
7 = Off
2.8 Ohms per foot - Use with RLE’s orange sensing cable
7 = On
4.0 Ohms per foot - Use with most other sensing cables
Enable or Disable the Audible Alarm - The audible alarm is disabled by default.
8 = Off
Audible alarm off
8 = On
Audible alarm on
DIP Switch 2 is used to set communications options. If you are communicating via
Modbus, use SW2 to set the address of the Modbus device. This should be a number
between 1 and 254. Adjust the individual switches until their sum equals the Modbus
address. Switch values are as follows:
SeaHawk 10K Quick Start Guide
Thank you for purchasing a SeaHawk 10K distance-read
leak detection controller. This guide highlights basic device
installation and configuration. More detailed information and
troubleshooting guidelines can be found in the SeaHawk 10K
User Guide.
If, after referencing the User Guide, you need further assistance,
please contact RLE Technologies via our website -
rletech.com/support/ or call us at 800.518.1519.
v2.3
Compatible with firmware v3.0 and above
(05/2013)