RLE LD2100 Quick Start User Manual
Seahawk ld2100 quick start guide
Mount the Device
THE LD2100 is a panel mounted device. Use the included wall mount kit and
mount the controller in a convenient location.
© Raymond & Lae Engineering, Inc. 2011. All rights reserved. RLE® is a registered trademark and Seahawk™, Falcon™, and Raptor™ are
trademarks of Raymond & Lae Engineering, Inc. The products sold by Raymond & Lae Engineering, Inc. are subject to the limited warranty, limited
liability, and other terms and conditions of sale set forth at http://rletech.com/RLE-Terms-and-Conditions.html.
Installation Supplies
Included with the LD2100
LD2100 controller
Wall mount kit
Crossover cable (blue with yellow ends)
15 foot (4.57m) leader cable
End-of-line terminator (EOL)
Available from RLE, Sold Separately
SeaHawk sensing cable - up to 5,000 feet (1,524m) of conductive fluid sensing
cable or 3,500 feet (1,067m) of chemical sensing cable
Optional Enclosure (LD-ENC)
24VAC power supply (WA-AC-24-ST) or 24VDC power supply (PSWA-DC-24-ST)
Network Communications Information
Consult your IT administrator and determine the following LD2100 network
settings:
• IP Address _______________________________________________
• Subnet Mask _____________________________________________
• Default Gateway __________________________________________
SeaHawk LD2100 Quick Start Guide
Thank you for purchasing a SeaHawk LD2100 distance-read leak detection controller.
This guide outlines basic installation and configuration. Additional support information,
including the LD2100 User Guide, is available on our website - www.rletech.com.
If you need further assistance, please contact RLE Technologies at [email protected]
or call us at 800.518.1519.
v1.0
(06/2013)
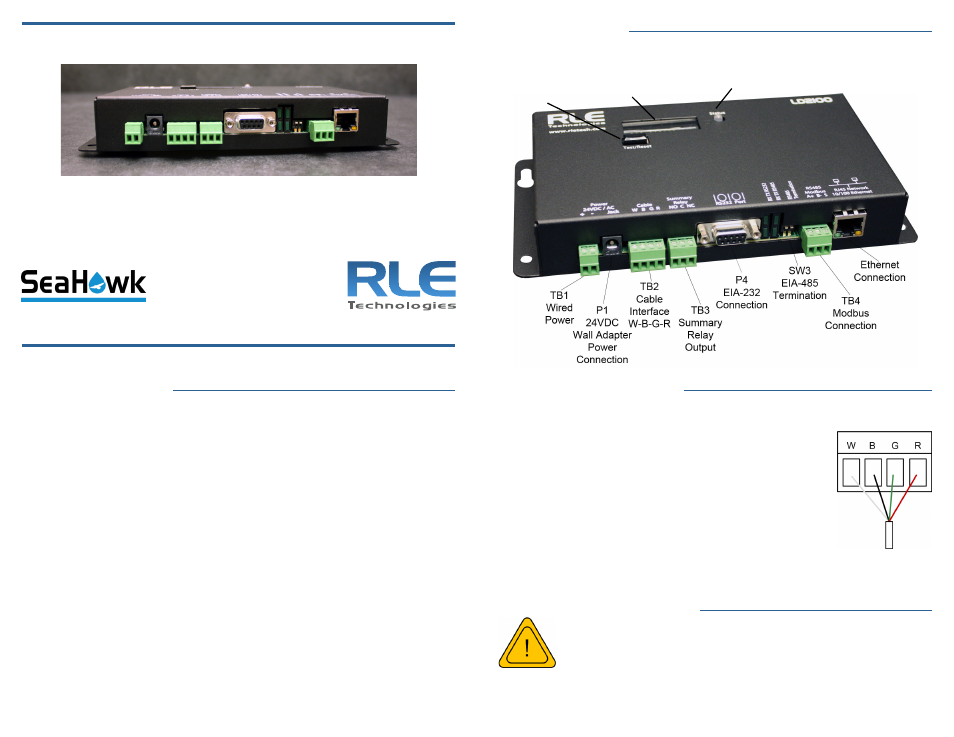
Test/Reset
Button
LED
Display
Status LED
Install the Sensing Cable
Leader cable is included with the device and is used to connect sensing cable to
the LD2100, since sensing cable cannot connect directly to the controller.
1. Insert the four stripped wires of the leader cable into the
appropriate slots in the 4-pin terminal block connector -
from left to right: white, black, green, and red. Tighten
the screws on the terminal block connector to secure the
leader cable. Thread the leader cable through a knockout
on the bottom of the enclosure and plug the terminal
block connector into TB2.
2. Unscrew the EOL from the end of the leader cable.
3. Attach the first length of sensing cable to the leader cable.
4. Route the sensing cable according to your cable layout diagram.
5. Secure the EOL to the unoccupied end of the sensing cable.
Apply Power to the LD2100
A dedicated circuit breaker must be provided within
close proximity to the LD2100 and be clearly marked as
the disconnecting device for the LD2100 leak detection
controller.
RLE recommends using a 24VDC wall adapter power supply (PSWA-DC-24-ST),
which is available separately from RLE.
1. Run a power supply to the location of the unit and plug it into P1. If you’re