RLE Wi-LD User Manual
Wi-ld quick start guide
© Raymond & Lae Engineering, Inc. 2011. All rights reserved. RLE® is a registered trademark and Seahawk™, Falcon™, and Raptor™ are
trademarks of Raymond & Lae Engineering, Inc. The products sold by Raymond & Lae Engineering, Inc. are subject to the limited warranty, limited
liability, and other terms and conditions of sale set forth at http://rletech.com/RLE-Terms-and-Conditions.html.
Supplies for Installation
Included with the Wi-LD
Wi-LD transmitter
15 foot (4.75m) leader cable
End-of-line terminator (EOL)
Mount the Transmitter
Wireless transmitters should be mounted off the floor. While the electronics are
coated to provide a moisture barrier against condensation, the transmitter is not
waterproof and submersion in water is not
recommended.
The transmitter can be mounted with
adhesive tape, adhesive-backed velcro or
adhesive-backed magnetic tape, which
works well if the transmitter will be mounted
on a metallic surface and will not disturb
the electronics. You’ll need access to the
information on the transmitter’s label - the
white sticker on the back of the unit. When
you apply your tape, velcro, or magnet, be
careful not to cover the label. Make sure the side of the transmitter with the
white RLE product label faces away from any metal surfaces.
Use tape that is 0.5 inch (1.27cm) wide. When placed correctly, the tape allows
the transmitter’s back label to remain visible. The serial number on this label is
unique to each transmitter, and you will need to refer to this number throughout
the life span of the transmitter. If tape is placed over the label, the paper label
will tear and the serial number will be unreadable.
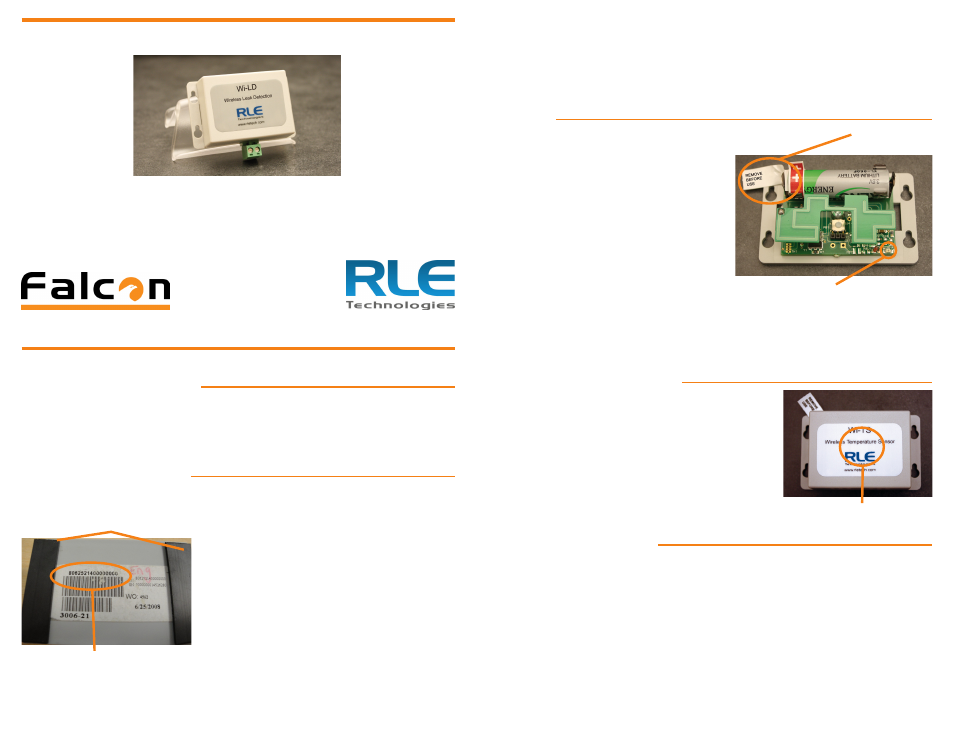
Battery
Each transmitter comes equipped with a
3.6V lithium battery, which can be replaced
as needed. The transmitter is turned off
when the product is shipped. Any time the
transmitter is shipped, it should either be
returned to this inactive state or placed in
a shielded container to prevent interference
that might cause shipping problems.
To activate the transmitter, remove the pull
tab to engage the battery. Turn off the
transmitter by re-inserting the pull tab or
removing the battery.
If you have problems operating or communicating with your wireless transmitter,
consult the Troubleshooting section of the Wi-MGR User Guide.
Installation Mode Switch
The transmitter has an installation mode switch - a
push button located in the center of the enclosure
lid. When pressed, the transmitter immediately
sends a data packet with a special mark introduced
into its ID field. This indicates which transmitter is
in service or being installed. The data is processed
by the FDS-Wi’s automatic discovery feature. For
more information regarding the FDS-Wi and wireless
sensor integration, refer to the FDS-Wi User Guide.
Wi-LD Configurations
A Wi-LD configuration couples the wireless transmitter with one of the following
three options:
1. up to 50 feet (15.24m) of conductive fluid sensing cable
2. up to 35 feet (10.67m) of chemical sensing cable
3. one SD-Z spot detector
4. one SD-Z1 spot detector
If you are using either sensing cable or an SD-Z spot detector, you may use as
much leader cable as you need to reach the area you plan to monitor.
Wi-LD Quick Start Guide
Thank you for purchasing a SeaHawk Wi-LD. This guide describes how to install
your new device.
If you need further assistance, please contact RLE Technologies via our website -
http://www.rletech.com/support/ or call us at 970.484.6510, Option 2.
v3.0
(10/2013)
Not included with the Wi-LD
SD-Z, SD-Z1, or sensing cable
Wall mounting hardware
Protective
Battery Tab
Heartbeat
LED
Push
Button
Serial Number
Magnetic Tape