Sloan AC-450 Act-O-Matic Institutional Showerhead User Manual
Ac-460
Code No. 0816192
Rev. 2 (07/12)
INSTALLATION INSTRUCTIONS FOR ACT-O-MATIC INSTITUTIONAL
AC-450 AND AC-460 SHOWER HEADS
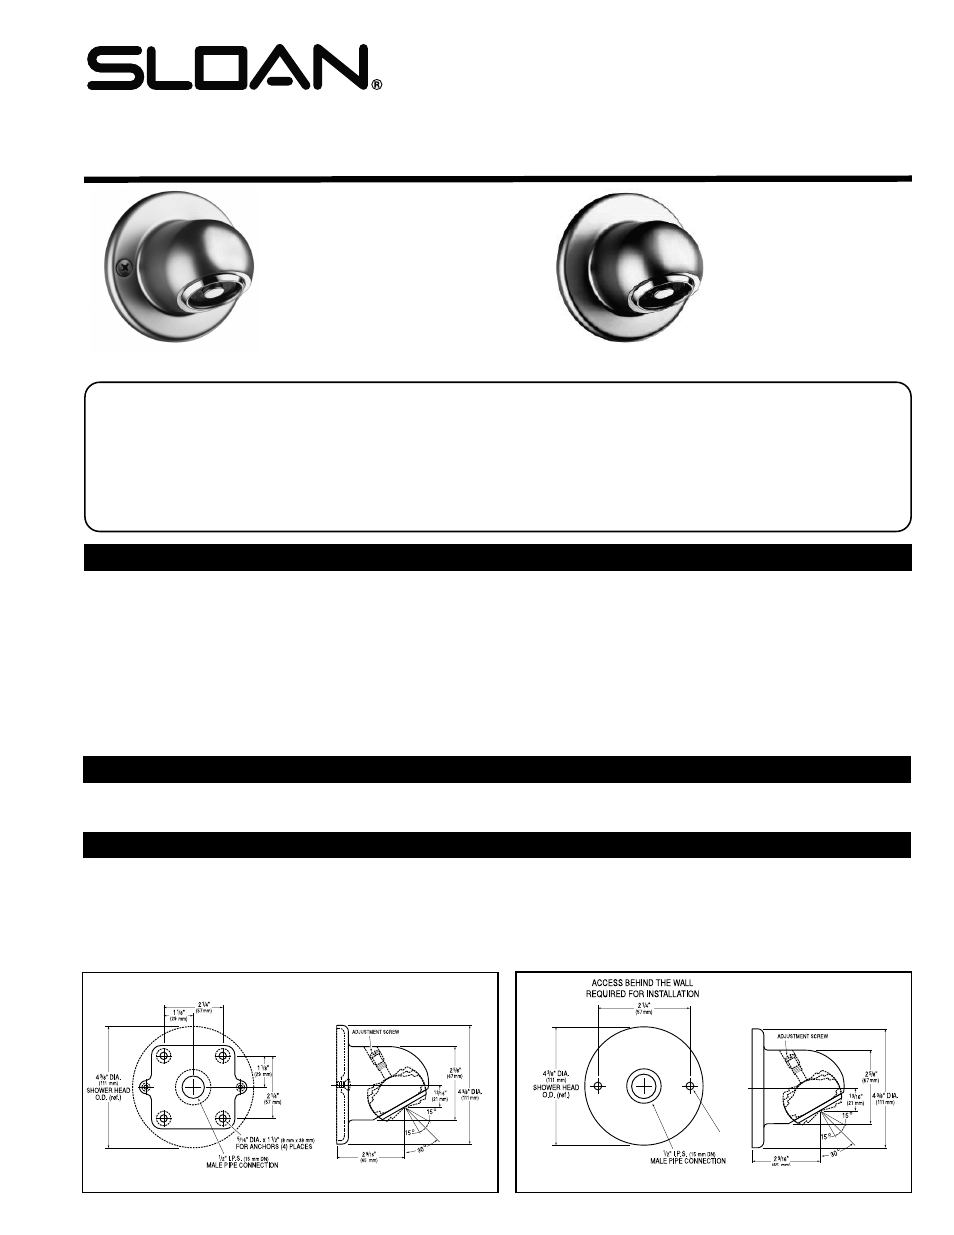
AC-450
Self-Cleaning, Wall Mounted,
Shower Head with Adjustable
Spray Direction and Integral
Flow Control.
2.5 gpm (9.4 Lpm)
2.0 gpm (7.5 Lpm)
LIMITED WARRANTY
Unless otherwise noted, Sloan Valve Company warrants its products, manufactured and sold for commercial or industrial uses, to be free from defects of material and workmanship for
a period of three (3) years (one year for SF faucets, special finish and PWT electronics and 30 days on PWT software) from the date of first purchase. During this period, Sloan Valve
Company will, at its option, repair, replace, or refund the purchase price of any produce which fails to conform with this warranty under normal use and service. This shall be the sole
and exclusive remedy under this warranty. Products must be returned to Sloan Valve Company, at customer’s cost. No claims will be be allowed for labor, transportation or other costs.
This warranty extends only to persons or organizations that purchase Sloan Valve Company’s products directly from Sloan Valve Company for purpose of resale.
THERE ARE NO WARRANTIES WHICH EXTEND BEYOND THE DESCRIPTION ON THE FACE HEREOF. IN NO EVENT IS SLOAN VALVE COMPANY RESPONSIBLE FOR ANY CONSEQUENTIAL
DAMAGES OF ANY MEASURE WHATSOEVER.
PRIOR TO INSTALLATION
The following instructions will serve as a guide when installing the Sloan Act-O-
Matic Shower Head. As always, good safety practices and care are recommended
when installing your new Sloan Act-O-Matic Shower Head. If further assistance is
required, contact your nearest Sloan Representative office or contact Sloan
Technical Support.
Prior to installing the Sloan Act-O-Matic Shower Head, install the items listed:
• Shower enclosure
• Drain line
• Water supply line 1/2" I.P.S. (13 mm DN) male thread required for connection
to shower head)
TOOLS REQUIRED FOR INSTALLATION
• 1-3/8" wrench • Slotted screwdriver for adjusting direction of stream, if required • 5/16" drill • Hammer • Phillips head screwdriver, #3 • 5/32" hex wrench
INSTALLATION
Step 1 — Drill Mounting Holes
For AC-450, locate shower head mounting holes. Drill four (4) mounting holes 5/16" x 1-1/2" (8 mm x 38 mm). Drive anchors flush with wall surface.
For AC-460, behind the wall access is required.
Step 2 — Install Mounting Plate
Secure mounting plate with wings horizontal to wall using four (4) Phillips head screws provided.
AC-460
Self-Cleaning, Wall
Mounted,Institutional
Security Style Shower Head
with Adjustable Spray
Direction and Integral Flow
Control.
2.5 gpm (9.4 Lpm)
2.0 gpm (7.5 Lpm)
IMPORTANT:
• All Plumbing is to be installed in accordance with all applicable codes and
regulations.
• Flush all water lines until water is clear before installing shower head.
• Water supply lines must be sized to provide an adequate flow of water for
each shower head. Minimum water pressure of 15 PSI (103 KPA) required.
9/32”
AC-450
AC-460