Sloan SMO Battery Powered Retrofit User Manual
Side mount operator unit, For urinals & toilets, Installation instructions
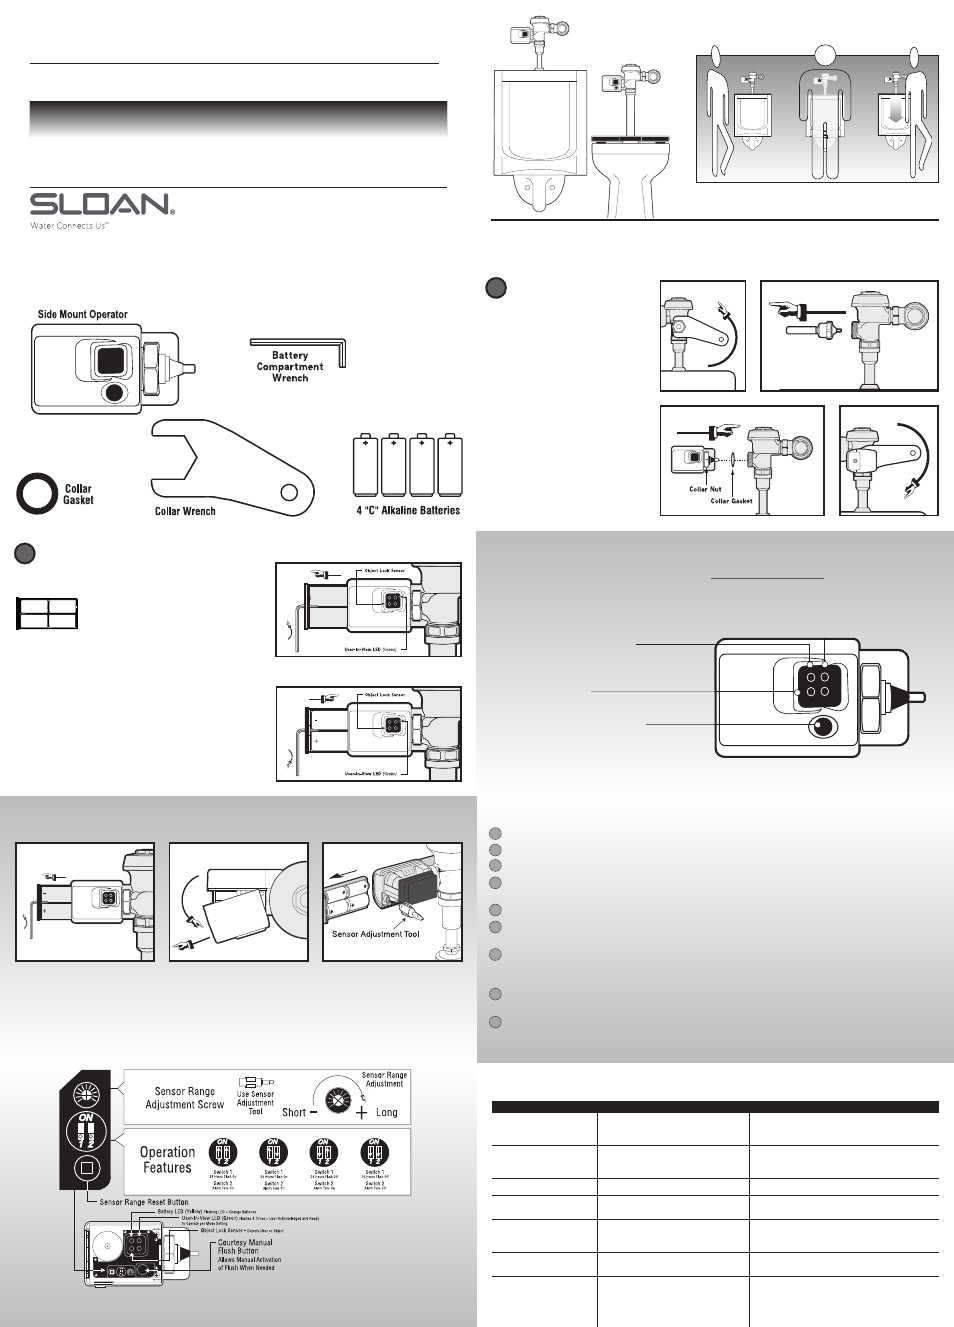
The Side Mount Operator sends out a continuous infrared beam that is reflected back by the presence of a person in
front of the urinal or toilet. “Object Lock” technology differentiates between someone walking past the unit or actually
using the fixture.
Using the supplied collar wrench,
remove handle from flush valve.
Note: On some flush valves with
a faulty air vent, or recently flushed
valve, be prepared to collect a small
amount of water with a rag or sponge
placed under the handle.
Place collar gasket into collar nut and
attach the Side Mount Operator unit
where the handle was removed. Tighten
collar nut with supplied collar wrench.
Note: Save handle in the event you wish
to reuse for service of Side Mount
Operator.
INSTALLATION
1
Using supplied battery compartment wrench, remove battery
compartment from the Side Mount Operator unit.
Load batteries into compartment tray (note
position of batteries in tray), and reinstall
battery tray into the Side Mount Operator unit.
Secure tray with battery compartment wrench.
The last three turns of the wrench will activate the Side Mount
Operator unit. The Side Mount Operator System is now
operational.
Your Side Mount Operator unit comes preset from the factory. If
special circumstances require adjustment of the activation
distance, see section “Adjusting Your Side Mount Operator.”
The Side Mount Operator unit has a 7 minute start-up sequence in
which the Object Lock Sensor will flash the User-In-View green
LED continuously as long as a user is in view. After the start-up
sequence is completed and when the Object Lock Sensor has a
user in view, the User-In-View green LED will flash only 3 times
after 5 seconds delay. This delay prevents needless flushes when
someone walks by.
-
-
+
+
-
-
+
+
ACTIVATION
VISUAL INDICATOR GUIDE
Use battery compartment wrench
to remove battery compartment
tray.
Remove cover by rotating the cover
up at the end over the battery
compartment and slide out.
Sensor Adjustment Tool comes in a
built in storage pocket. Replace after
use.
ADJUSTING YOUR SIDE MOUNT OPERATOR
Trouble Shooting Guide
PROBLEM
CAUSE
SOLUTION TO PROBLEM
Green LED (light) flashes 3
times when there are no users
Green LED (light) flashes
continuously when Object Lock
Sensor is activated by a user
Yellow LED (light) flashes
Not enough water to fixture or
too much water to fixture
Valve will not operate
Valve does not shut off
Valve does not flush even after
Sensor Range has been adjusted
Front of Object Lock Sensor is covered or
Object Lock Sensor is set too far out,
registering the opposite wall or door as a user
Side Mount Operator unit is in 7 minute start up
mode (when first activated) or Sensor Range
Reset Button has been depressed
Batteries need replacing
Diaphragm damaged or valve control stop
improperly adjusted
Object Lock Sensor range set too close to Side
Mount Operator, batteries are dead, or water
supply is turned off
Dirt or debris preventing diaphragm from
functioning properly
Dead batteries
Remove item covering sensor or adjust Sensor Range
activation distance. (See section “Adjusting Your Side Mount
Operator.”)
Green LED (light) will flash only 3 times
acknowledging a user is in view after the 7 minute
start up mode
Replace batteries
Replace diaphragm and/or adjust valve control stop
Adjust Object Lock Sensor — Replace batteries — Turn
water on.
Remove dirt or debris, consult valve manufacturer’s
directions
Replace batteries
Remove Battery Compartment
Install Battery Compartment
SIDE MOUNT OPERATOR COMPONENTS
INSTALLATION INSTRUCTIONS
Side Mount Operator Unit
for Urinals & Toilets
Restroom Hygiene Through Technology
Manufactured for Sloan Valve Company • 10500 Seymour Avenue • Franklin Park, IL 60131 • Phone: 1-800-9-VALVE-9 or 1-847-671-4300 • Fax: 1-800-447-8329 or 1-847-671-4380
www.sloanvalve.com
0816544 Rev. 2 (09/14)
USER-IN-VIEW LED (Green light flashes 3 times after 5
second delay when a user is in view. The green light
flashes constantly when a user is in view during the
7 minute start up sequence.)
OBJECT LOCK SENSOR
(Detects user or object)
BATTERY LED (Yellow light flashes
indicating it is time to replace
batteries with 4 new “C” batteries)
COURTESY MANUAL FLUSH BUTTON
(Allows manual activation of flush when
needed)
To change activation distance for the Object Lock Sensor:
1
Remove battery compartment tray as shown at left.
2
Remove cover and sensor adjustment tool as shown at left.
3
Replace battery compartment in Side Mount Operator to activate unit.
4
Press sensor range reset button as shown at lower left (the green L.E.D. will flash continuously when it has an
object in view for the seven minute reset period).
5
Stand at desired activation distance.
6
Use sensor adjustment tool and turn Sensor Range Adjustment Screw all the way down (counterclockwise)
and then turn slowly up (clockwise) until green LED begins to flash.
7
Ensure Object Lock Sensor is not detecting stall door or wall by closing door, stepping out of sensor path and
making sure green LED is not flashing. If sensor locks onto door or wall, unit will not flush properly. Shorten
activation distance.
8
Remove battery compartment, replace sensor adjustment tool and cover. Replace battery compartment tray to
reactivate Side Mount Operator unit.
9
After 7 minute start-up sequence, the green LED will flash only 3 times when a user is in view
(after a 5 second delay).
2