Sloan Toilet Bowl Installation for Two Piece Toilet Tank User Manual
Toilet installation instructions, Rough-in, Recommended tools and materials
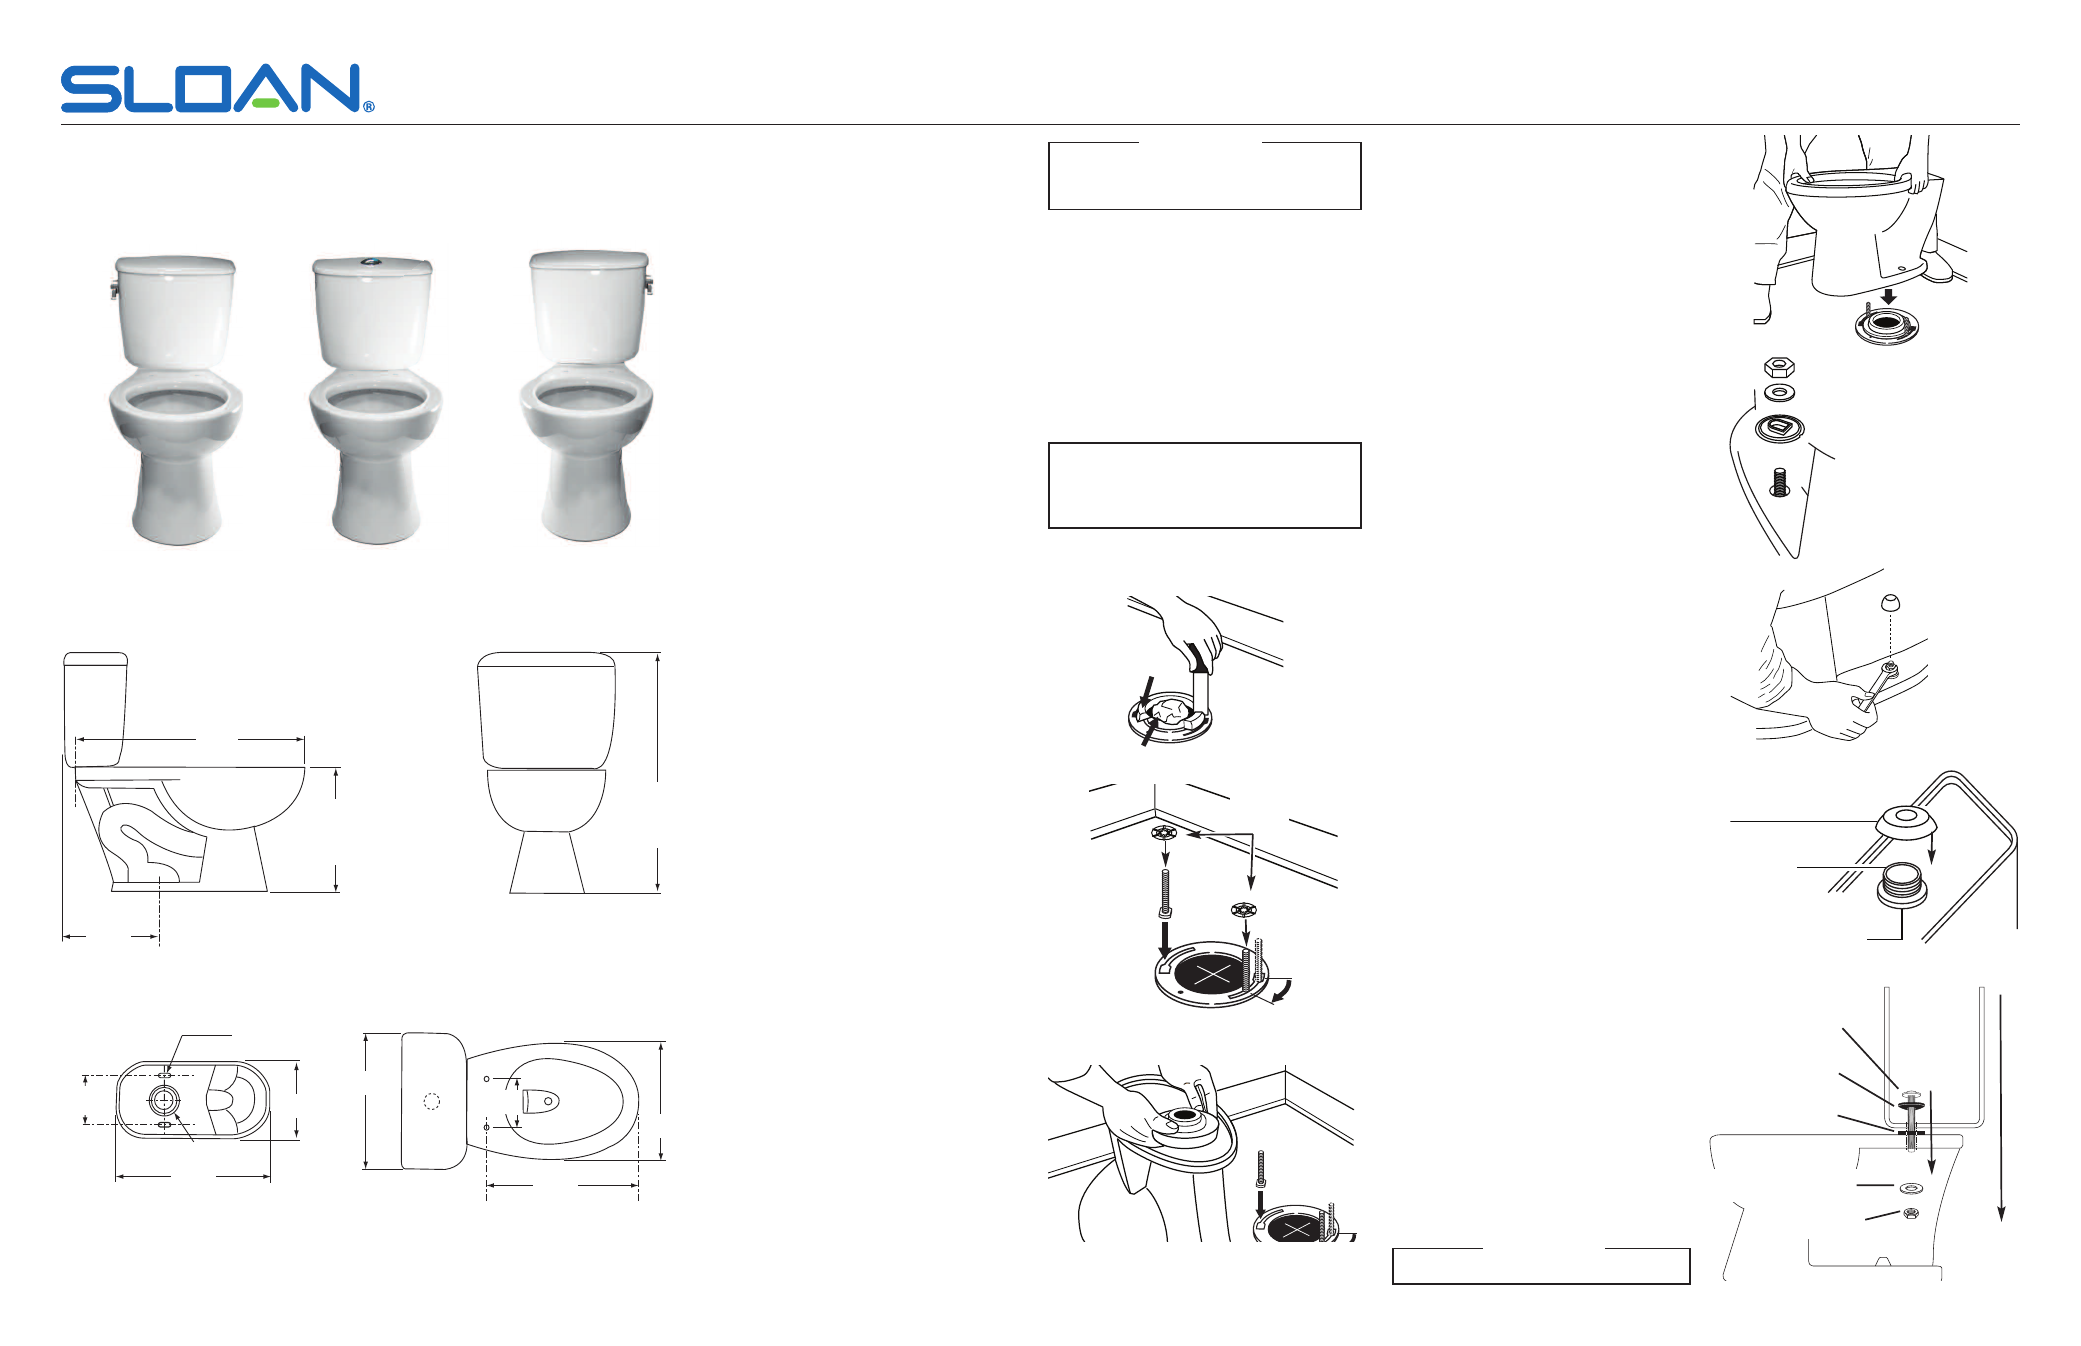
Toilet Installation Instructions
ROUGH-IN
Left Handle
Dual Flush
Right Handle
THE RIGHT CHOICE
We thank you for your purchase. Our products are 100% tested but should you have any questions,
please contact us by phone or visit our website.
RECOMMENDED TOOLS AND MATERIALS
• 10” Adjustable Wrench
• Level
• Screwdriver
• Putty Knife
• Sponge
• 1/2” Nut Driver or Socket
• Safety Glasses
• Hacksaw
• Wax Seal or Outlet Gasket
• Supply Shut-Off Valve
• Tape Measure
• Tubing Cutter
• Pipe Wrench
BEFORE YOU BEGIN
1. Observe all local plumbing and building codes.
2. Carefully inspect the new toilet and components
for damage.
NOTE: Porcelain toilets are extremely fragile.
Please handle with care to avoid breakage.
1. REMOVE THE EXISTING TOILET
Turn the water supply off. Flush the toilet, and
sponge out any remaining water. Disconnect the
water supply connection.
Remove the old bolt caps, toilet, and T-bolts. Cover
drain with rag and scrape off the old wax seal from
the closet flange.
Insert T-bolts in floor flange, and secure them with
the locking washers in order to hold them in place
while installing the bowl.
2. INSTALL GASKET AND TOILET BOWL
Set the toilet bowl on its side or upside down on
protective padding. Press the gasket onto the toilet
bottom outlet. Remove the temporary rag (if used)
from the closet flange.
Carefully align and lower the toilet over and onto
the closet flange while having the T-bolts come
through the holes of the bowl. Firmly press down
and apply weight evenly.
WARNING: Do not rock or move the toilet after
placement. A new gasket must be installed if you
break the seal.
Place the bolt cap bases, bolt washers, and
flange nuts onto bolts.
Alternately tighten the nuts a couple of turns until
snug. Verify that toilet is leveled. If the bolts
extend more than ¼” (6 mm) from the top of the
nut, cut off any excess with a hacksaw, and file
the cut edges. Snap the bolt cap over the bolt
cap base. If desired place a bead of caulk (not
supplied) around the base of the toilet bowl
where it contacts the floor.
3. INSTALL TANK TO BOWL
Turn the tank upside down and rest on
protective padding. Install the tank gasket over
the bottom threads of the flush valve, making
sure that the tank gasket covers the flush valve
nut and the tapered side is toward the bowl.
Lift the tank, right side up and position the tank
on the bowl by centering the gasket and aligning
holes on the bowl. Install tank bolts with included
rubber washers with tapered side down, through
tank, mounting spacers and bowl. Secure with
metal washers and nuts (see illustration). Tighten
bolts alternately enough to achieve a watertight
seal.
DO NOT OVERTIGHTEN.
Code No: 0816425
Rev. 4 (02/11)
5½”
(140 mm)
.43” x .83”
(11x21 mm)
6”
(152 mm)
10”
(257 mm)
29”
(730 mm)
31” ADA
(787mm)
15”
(381 mm)
17” ADA
(432 mm)
14-3/8”
(365 mm)
15”
(386 mm)
19”
(481 mm)
27”
(690 mm)
18½”
(470 mm)
12”
(295 mm)
3.15”
(80 mm)
With the exception of the water supply
Inlet, DO NOT use pipe sealant or
plumbing grease on any component!
!!! IMPORTANT !!!
If you have questions about how to install your
Sloan Toilet, consult your local Sloan
Representative or call Sloan Installation
Engineering Department at:
1-888-SLOAN-14 (1-888-756-2614)
CAUTION: Risk of personal injury or product damage.
Handle with care. Vitreous china can break or chip if
the bolts and nuts are overtightened, or if the
product is handled carelessly.
⚠
Locking
Washers
Anillo
de cera
anterior
Cubra con tela
Old
wax ring
Cover with rag
Tank
Gasket
Flush Valve
Threads
Flush Valve Nut
Tank Bolts
Rubber
Washers
Metal Washers
Metal Nuts
DO NOT OVERTIGHTEN!
!!! IMPORTANT !!!
Mounting
Spacers