SOMFY SUNEA CMO User Manual
Sunea rts cmo visual reference guide, Standard, Awning settings
my
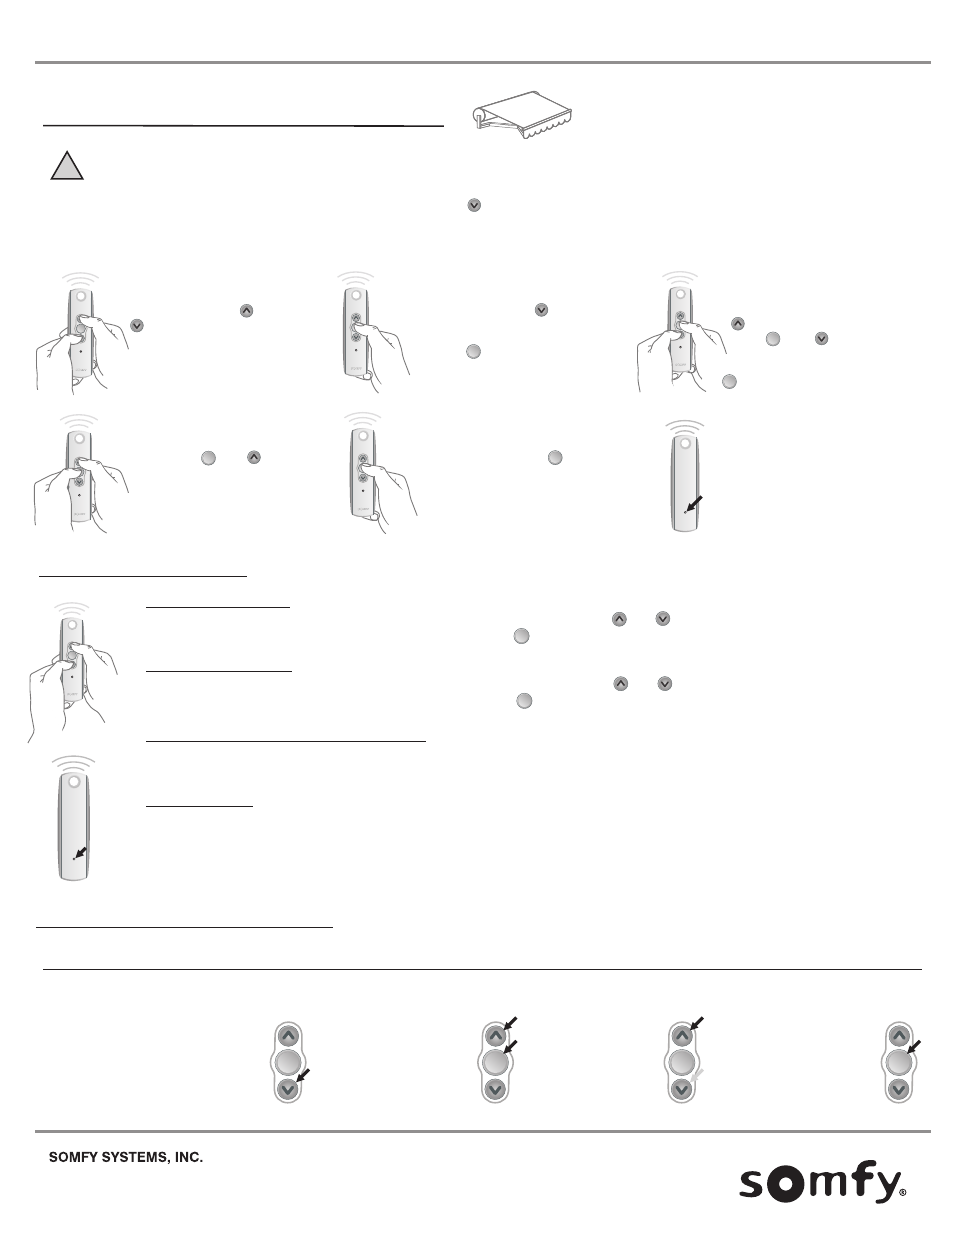
SUNEA RTS CMO VISUAL REFERENCE GUIDE
To change the lower limit:
Move the motor to its current lower limit position and let it stop. Press and hold the and buttons simultaneously until the motor
jogs, then release. Adjust to a new lower limit position. Press the button until the motor jogs, then release. Check new limit.
To change the upper limit:
Move the motor to its current upper limit position and let it stop. Press and hold the and buttons simultaneously until the motor
jogs, then release. Adjust to a new upper limit position. Press the button until the motor jogs, then release. Check new limit.
To reset the motor:
you will need to disconnect power (120vac) for 2 seconds, reconnect for 10 seconds, disconnect for another 2 seconds and reconnect.
The motor should start to move or jog (If this does not happen, continue to perform the disconnects until it does). Once the motor stops,
press and hold the programming button on the back of the remote and count to ten without letting go. The motor should jog twice.
To add a remote/channel or sun and wind sensor:
First press the programming button on the back of the already programmed remote until the motor jogs. Then press the programming
button on the remote or sun/wind sensor that you would like to add until the motor jogs. Check it.
my
my
my
ADJUSTING THE LIMITS
STEP 1
Initiate programming by
pressing both the (Up) and
(Down) buttons at the same
time until the motor jogs.
STEP 3
Bring the motor to your desired
upper limit by pressing the
button. Press and hold both
the and buttons until
the motor begins to move
down, then release. Use the
button to stop it at the desired
lower limit
STEP 5
Press and hold the
button
until the motor jogs
op
STEP 6
Press and hold the Program
button on the back of the
transmitter until the motor
jogs. Double check limits as
a precaution.
my
my
STEP 2
Check the direction of operation.
Press and hold the button and
confirm it moves the motor out.
To change the direction press and
hold the (Stop) button until the
motor jogs.
my
STANDARD
AWNING SETTINGS:
my
STEP 4
Press the
button
until the motor begins
to move up. the motor will
stop at the original upper
point.
and
my
my
my
my
my
SOMFY CANADA
This function allows you to apply tension on the fabric when the awning is fully extended. The motor can be adjusted up to a ½ half turn.
ADVANCED FEATURE FUNCTIONS
BACK IMPULSE
function for both cassette and standard awnings
STEP 3
Press the MY and Up
buttons until the awning
jogs: The motor is in
programming mode.
STEP 4
Adjust the fabric's
tension using the Up
or Down buttons.
STEP 5
Press the MY button until
the awning jogs: The
fabric's tension has been
programmed.
STEP 2
Set the awning
to the lowest
position.
my
my
my
my
L-0138
1-800-22SOMFY
1-905-564-6446
WWW.SOMFYSYSTEMS.COM
!
Both UP and DOWN limits need to be set.
Before You Begin:
Make sure the DOWN button on the remote extends the awning. ( = awning moves outward or extends). Failure to correct this
may cause damage to the awning or personal injury.
STEP 1
Disconnect power
momentarily and
reconnect.
© SOMFY SYSTEMS, INC. 4/2015