Bottom limit set by user, top limit auto set, General information, Both limits set by user – SOMFY OXIMO User Manual
Page 3
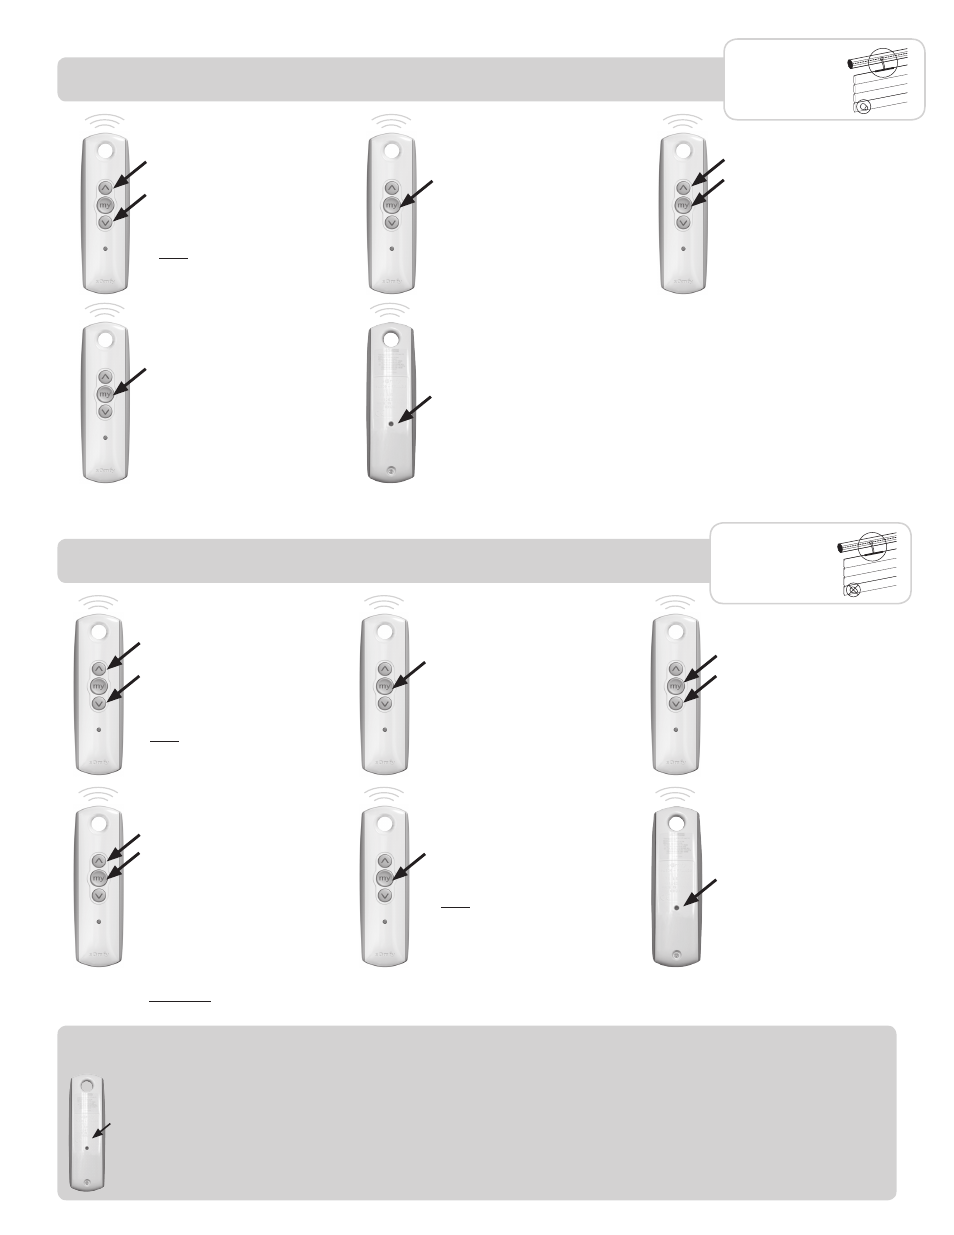
Bottom Limit Set by User, Top Limit Auto Set
STEP 1
Wake the motor by pressing
the
UP and DOWN buttons
simultaneously until the
motor jogs.
Note: After every command
the motor will jog to confirm.
STEP 2
Check the direction of rotation
with the
UP or DOWN button. If
needed, change the direction of
rotation by pressing and holding
the
MY button until the motor
jogs.
STEP 3
Run the motor to the desired
lower limit. Press the
MY and
UP buttons simultaneously
until the motor starts to run
upward. Use the
MY button
to stop the motor.
STEP 4
Press and hold the
MY button
until the motor jogs to confirm
the limit setting.
STEP 5
Press and hold the
PROGRAM
button on the back of the
transmitter until the motor jogs.
The buttons no longer have to
be held for the motor to run. The
motor will auto detect the non-set
limit from the physical stop.
To allow the OXIMO
to auto set the top limit,
the product must have a bottom stop.
To add or delete a remote/channel, press the PROGRAMMING button on the back of an already programmed remote/channel until
the motor jogs. Next, press the
PROGRAMMING button on the back of the remote/channel you wish to add or delete until the motor jogs.
To reset the motor to factory mode, start with the motor connected to power. Cut power for 2 seconds, reconnect power for 10 seconds,
cut power for 2 seconds and then reconnect power. The motor should jog or start to run. (If this does not happen, repeat the power cuts
until the motor does run). Allow the motor to stop on its own. (Do not press stop, up or down or you will have to repeat the double power
cut). Once the motor stops on its own, press and
hold the PROGRAMMING button until the motor jogs twice.
General Information
STEP 1
Wake the motor by pressing
the
UP and DOWN buttons
simultaneously until the
motor jogs.
Note: After every command
the motor will jog to confirm.
STEP 2
Check the direction of rotation
with the
UP or DOWN button. If
needed, change the direction of
rotation by pressing and holding
the
MY button until the motor
jogs.
Both Limits Set by User
STEP 3
Run the motor to the desired
upper limit. Press the
MY and
DOWN buttons simultaneously
until the motor starts to run
downward. Use the
MY button
to stop the motor near the
desired lower limit.
STEP 4
Use the
UP or DOWN button
to run the motor to the exact
desired lower limit. Press the
MY
and
UP buttons simultaneously
until the motor starts to run.
Use the
MY button to stop the
motor.
STEP 5
Press and hold the
MY button
until the motor jogs to confirm
the limit settings.
Note: Until this step, the up or
down limit can be adjusted by
repeating step 3 or step 4.
STEP 6
Press and hold the
PROGRAM
button on the back of the
transmitter until the motor jogs.
The buttons no longer have to
be held for the motor to run.
Double check the limits are in
the desired position.
IMPORTANT: The programming button in step 6 will not work until the limits have been confirmed per step 5.
Standard link at
top, bottom stop
Standard link at top,
no bottom stop