SVSi N8300 Series User Manual
N-touch, N8300 series wall controllers
N-TOUCH
Quick Start Guide
N8300 Series Wall Controllers
There are two types of installations for the N8300 series: Ring Adapter (when
mounting into an existing electrical box) and Flushmount (when mounting into an
SVSi-provided installation box).
Note: If desired, you can pre-configure the unit before physically installing it. To
do so, simply plug a PoE (Power over Ethernet) enabled Ethernet connection
into the back of the controller and skip to the section Configuring Your New Wall
Controller for further instructions.
Important: For ease of installation, only use bootless Ethernet cables when
installing the Controller into the wall. The flexibility is necessary for proper
positioning in the box’s small space.
Mounting Instructions - Ring Adapter Installation
Follow the steps below to mount your new N-Touch Wall Controller into an
existing dual gang electrical box. The instructions given assume the box is
already installed with Ethernet access running to it.
1. Secure the mounting ring adapter (included in shipment) to your existing dual
gang electrical box with four screws.
2. Connect the PoE-enabled Ethernet cable to the rear connector of the N-Touch
Wall Controller.
3. Place the N-Touch Wall Controller display into the box and secure it with four
screws (included in shipment).
4. Complete the installation by snapping the SVSi faceplate onto the front.
Ring Adapter Installation (N8301-X-02/N8302-X-02)
N8301: Stand-alone, dual-gang IP wall controller (pushbutton)
N8302: Stand-alone, dual-gang IP wall controller (pushbutton and
touchscreen) with built-in WiFi
1. Using the Wall Controller Installation Cut-Out Template (enclosed in ship-
ment), mark the position on the wall where the unit is being installed and cut
the opening.
2. Once the opening is cut (and the PoE-enabled Ethernet cable is accessible
through the opening) insert the plastic installation box (included in shipment).
Use the break-out tabs as needed to correctly position the Ethernet cable.
3. Secure the installation box to the wall with the two captive screws.
4. Connect the Ethernet cable to the rear connector of the N-Touch Wall
Controller.
5. Place the N-Touch Wall Controller display into the box and secure it with four
screws (included in shipment).
6. Complete the installation by snapping the SVSi faceplate onto the front of the
wall controller.
Flushmount Installation (N8301-X-01/N8302-X-01)
Mounting Instructions - Flushmount Installation
Follow these steps to flushmount your new N-Touch Wall Controller into the wall.
The steps given assume the installer needs no instruction on running Ethernet to
the installation box or other basics.
Configuring Your New Wall Controller
You will not be able to configure the controller until it is in the same subnet as the
host PC. N-Touch devices are shipped in Auto-IP mode with a default IP address
of 169.254.xxx.xxx. Before attempting configuration, some changes must be
made to the host PC.
Steps for IP address configuration (for Windows 8):
1. Select Control Panel > Network and Sharing Center from the Start menu.
2. Select Change adapter settings.
3. Select the wired interface connected to your AV network.
(Continued)
Configuring Your New Wall Controller (Continued)
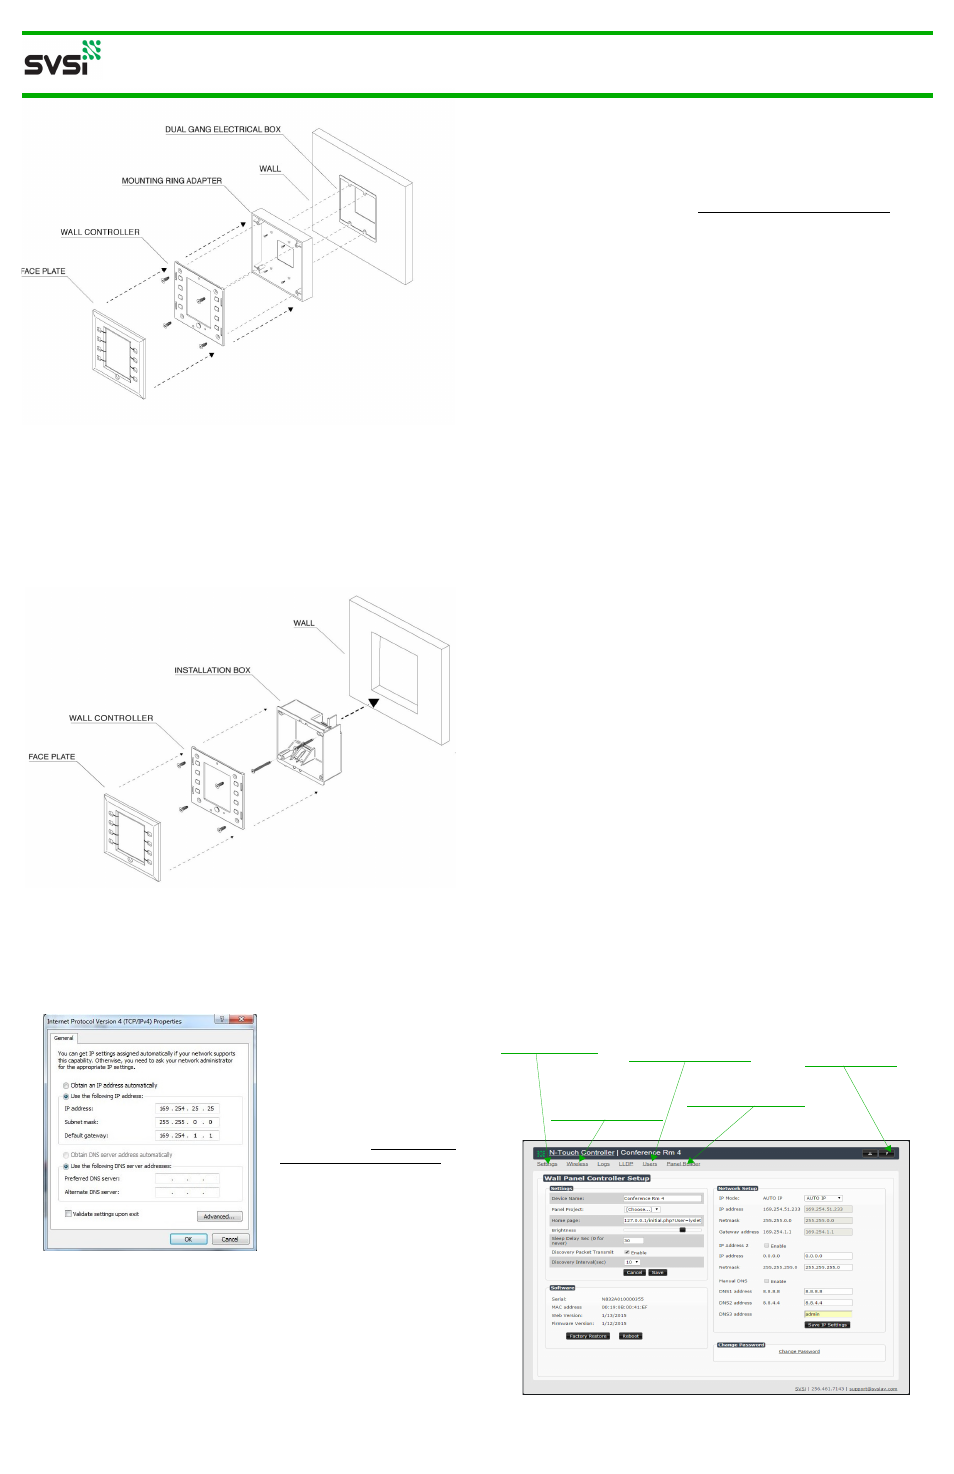
4.Click the Properties button.
5.Scroll down in the list to the
Internet Protocol Version 4
(TCP/IPv4) option. Highlight it
and click the Properties
button.The screen shown (at left)
is displayed.
6.Enable the Use the following
IP address option, and enter the
static IP address provided to you
by your network administrator.
Logging in for the
First Time
Once connected to the network,
the welcome screen appears on
the N-Touch Wall Controller’s
front panel and displays the unit’s serial number, MAC address, and IP address.
1. Using your computer, enter the N-Touch Wall Controller’s IP address into your
web browser.
2. The N-Series Wall Panel Controller Login screen displays. Use the default
login credentials (username = admin/password = password) to log in for the
first time Upon successful login, the Settings page displays (shown at right).
See the section Using
Panel Builder for details.
Click Settings to
return to this screen.
Click ? to access
additional
documentation.
See the section Viewing
Panels on the SVSi Mobile
App for details on the
Users screen.
See the section Wireless
Configuration (N8302
Units Only) for details.