Tiffen Lowel Pro-light User Manual
Lowel pro-light instructions
12' AC Unswitched Cable
Code: P2-80
#18/3 cable with IEC connector is supplied with
the Pro-light to extend its captive cable.
Code: P1-80 Original AC cable for
pre-updated Pro-lights (pre-April 2003).
Optional Power Cables
To connect to international voltage or popular battery power sources,
the following adaptor cables are available from Lowel for updated (IEC)
Pro-lights (contact us for older models).
AC options
P2-801 12’ Pro Euro cable (IEC)
P2-802
12” Pro UK cable (IEC)
12 Volt battery
P2-82
1' 4-pin XLR Cable
P2-85
1' 12v Cigarette
Lighter/CarAdaptor Cable
30 Volt battery
P2-81
1' 2-pin switched 30v Cable
Power Cables & Connectors
Female
Male
1'
Female
Male
1'
Male
Female
12'
Male
Female
12'
Female
Male
1'
The Lowel Pro-light is a professional
lighting fixture. Read these instructions
and lamp manufacturer’s warnings
before operating.
n
Not for house hold use, use only for
film, video or imaging purposes.
n
Do not leave fixtures unattended.
n
Unplug fixtures when not in use.
n
The units use lamps of several different
voltages. Make certain that lamp voltage
matches power source voltage. Example: never
connect a 120 volt lamp to a 220 volt source.
n
Units such as this emit considerable
light and heat, and if not properly used, could
be dangerous.
n
Lights should not be positioned
extremely close to people. Ultraviolet light ray
emissions can cause damage to the eyes and
reddening of the skin. The likelihood of either
occurring is increased with length of exposure,
focus intensity and proximity. Therefore, lights
should be kept away from people.
n
Avoid aiming the light at, or placing
too close to, people, delicate objects or
flammable materials.
n
Do not interfere with ventilation
by covering the lights in any way.
n
For proper ventilation, do not tilt
down beyond 45 degrees or operate sideways.
n
Do not operate Pro-lights upside-
down with lamps of more than 125 watts.
n
Do not tilt Pro-light down if mounted on
top of a camera. Camera damage could result.
n
Never touch hot parts only touch
handles & knobs for light adjustments.
n
Do not touch Pro-light upper front
end knob while operating the light, high
temperature is present.
n
Do not use near standing water.
n
Avoid mounting lights directly over
people unless secured with a safety cord
or cable.
n
The updated Pro-light (2003) has an
IEC connector for its integrated AC Cable.
However older Pro-lights use a 3 pin Edison
fixed power cable which is to be used
only with the Pro-light and not as a general-
purpose extension cable.
n
Keep Pro-light power cable away
from front housing when hot, to avoid damage.
n
If battery power is used, never store
the light without first removing the power cable
from the power source.
Lowel Pro-light Instructions
Warnings
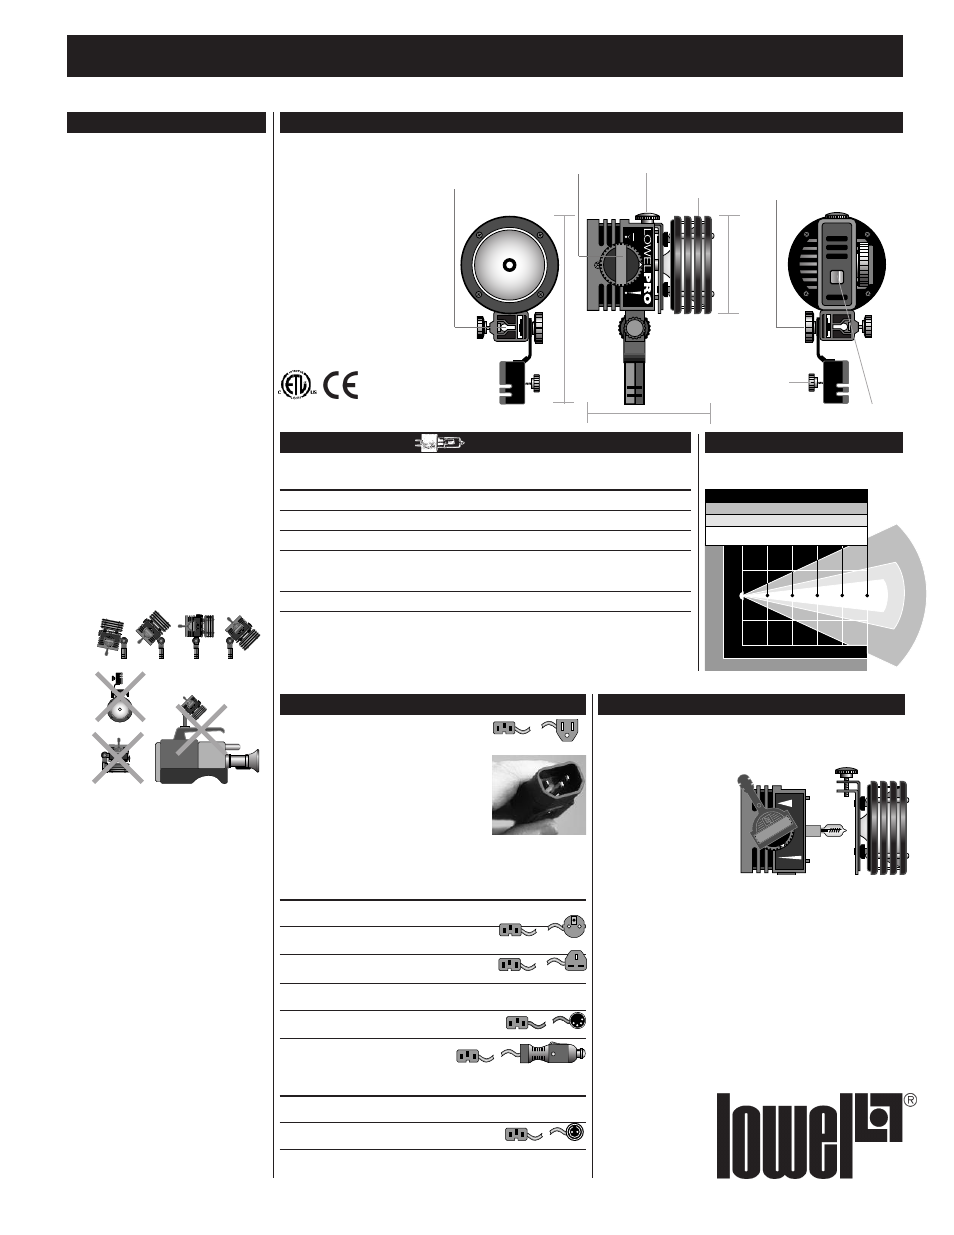
Pro-light Technical Data
Lamp/Beam Data
(Pro & i/id lamps are not interchangeable)
Performance
Slot & lock for
umbrella and
gel-frame
160° constant tension
no-yoke tilting from
stand-fitting.
4.6” (11.7 cm)
3.
7”
(
9.
4
cm
)
6.
7”
(
17
c
m
)
Front-end
comes off for
easy, no-tool
lamp change
Screw-in lock
for front-end
Focus
knob
Stand fitting
& locking
knob for 5/8”
stand tops
AC switch
Weight:
Pro w/ 4' captive cable:
1.3 lbs (590 g)
Pro w/ 4' cable & 12'
extension cable: 2 lbs (907 g)
Max. wattage: 250
Max. amperage: 8.3
Beam control: continuously variable
Fits on: 5/8" (1.59 cm) studs
Materials: primarily aluminum
and Ryton
Cable: with extension 16' (4.88 m)
#18/3. CE model with #18/2.
Switch: in-head
U.S. Patent: 4777566
Feet
5
10
15
20
25
0
5
10
5
50°
24°
10°
0
1.5
3
1.5
1.5
3
4.5
6
8
Meters
Flood
Spot
Super Spot
Beam Angles
with Clear Safety Glass
Foot Candles (Lux = foot candles x 10.8)
86
552
1139
23
143
302
11
61
135
7
34
80
4
22
47
With 120v, 200w, 3200°K,
Osram FVL lamp
Lamp
Volts Watts
°K
Avg
F. C. (lux) at 10’ (3 m)
Code
Life
Flood
Spot
Focus Range Super Spot
FVL*
120
200
3200
100 hr
23 (250)
143 (1540)
6:1
302 (3260)
FSH
120
125
3200
100 hr
11 (115)
48 (515)
4.5:1
139 (1500)
GCC
12
100
3200
100 hr
12 (125)
58 (630)
5:1
245 (2650)
JCV14.5V-50WC
12/14
50
3200
100 hr
6 (70)
28 (305)
4:1
125 (1350)
GLF/P44 ** 230
235
3200
100 hr
39 (420)
81 (880)
2:1
178 (1920)
* Replaces GCA as recommended lamp
** Only fits CE Pro-light, updated Pro-light (4/2003) & older Pro-lights with updated Front
Housing (iP2-18 )
Pro Lamp Replacement
Warning: Always unplug unit before relamping. Fixture must be cool
before lamping. Lamps must be operated at their rated voltage.
Avoid touching “glass” with bare fingers. Insert lamp carefully,
to avoid breaking.
To change lamps
1
Turn focusing knob A
to spot position.
2
Unscrew the small knob B
located on top of the front
housing. Remove front assembly.
3
Grasp porcelain socket of lamp C and rock lamp gently from side
to side while pulling straight out from fixture socket.
4
To replace lamp, hold focusing knob in spot position and insert
lamp into socket. Warning: Avoid touching the glass of the lamp
with bare fingers. Make sure lamp is well seated in the socket.
Improper insertion could result in arcing, which will shorten lamp
and socket life.
5
Replace the front housing and tighten the top knob.
Warning: Compact filament lamps such as the GCA may fail if
subject to vibration or shock while on. Turning the fixture off before
moving or adjusting
as well as operating
the focus smoothly
will help prevent
lamp failure.
A
B
C
Yes
No
Male
Female
12'