Using lowel fluo-tec front accessories – Tiffen Lowel Fluo-Tec User Manual
Page 2
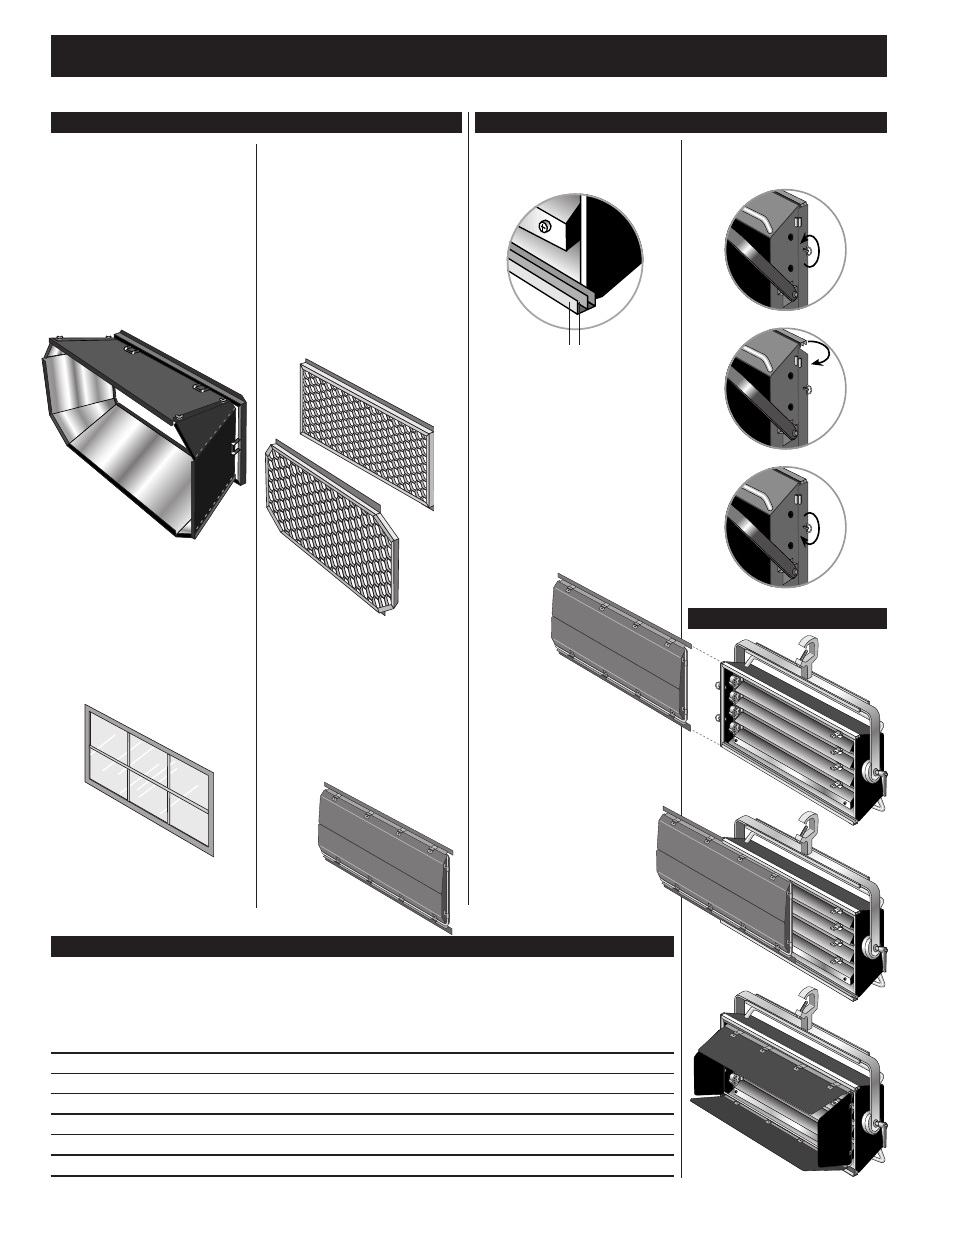
Honeycomb Grid:
Each fixture has 2 options for using honey-
comb grids to control the spill of the light,
either placing a grid on the front of the fixture,
or attaching one to the front of the Intensifier.
Because the front of the intensifier is a differ-
ent size & shape than the front of the fixture,
there are specific models for each use. It is
not possible to use the “front of fixture” grid
with the Intensifier installed. The grids are
available in black with 20, 30, or 40 degree
dispersions. If you are at all unsure of
which honeycomb to use, contact us.
Honeycomb Grids cause some loss of light
output (see chart).
Egg Crates:
for controlling spill. Slide the Egg Crate into
the front accessory slot. Less control than
Honeycomb Grid, with less output loss.
Barndoors:
For trimming spill of the light, slide Barndoor
assembly into front slot on fixture, close door-
flap and secure twist-locks. Open doors and
adjust for proper trimming of spill. Do not
operate unit with Barndoors closed.
Intensifier:
The mirrored Intensifier, when attached,
can almost double the light output of the
fixture. Assemble before attaching to light.
Intensifier is a one piece unit that unfolds
and locks together at its corners. Take care
to make sure that all quarter-turn locks are
securely fastened. Slide assembled intensifier
into front slot of fixture, close doorflap
and secure twist-locks Note - Intensifier has
grooved slot on front for attachment
of Honeycomb Grid to trim light.
Choose correct size of Honeycomb Grid.
Gel Frame:
For using colored or diffusion gels in front
of the fixture to change the color of the light
or to diffuse it further. Slide the pre-cut gel
material into the hinged frame, taking care
to trim any excess that falls outside the frame.
Slide the frame into the slot closest to the
lamps on the front of the fixture. Close &
tighten locking door-flap.of the fixture.
Front Accessories
Honeycomb Grids Comparison
Using Lowel Fluo-Tec Front Accessories
2
Slide-in Slots
Sliding in Accessories
Black 40°
Front of Fixture
25%
FLS-834
FLS-634
FLS-434
FLS-234
FLS-2534
Black 30°
Front of Fixture
35%
FLS-833
FLS-633
FLS-433
FLS-233
FLS-2533
Black 20°
Front of Fixture
54%
FLS-832
FLS-632
FLS-432
FLS-232
FLS-2532
Black 40°
Front of Intensifier
30%
FLS-844
FLS-644
FLS-444
FLS-244
N/A
Black 30°
Front of Intensifier
22%
FLS-843
FLS-643
FLS-443
FLS-243
N/A
Black 20°
Front of Intensifier
46%
FLS-842
FLS-642
FLS-442
FLS-242
N/A
The grids are black and available in 20, 30, or 40 degree dispersion for the front of the fixture or the front of the Intensifier. Honeycomb Grids
cause some loss of light output. Consult the below chart to determine the proper code for the chosen grid.
Di
sp
er
sio
n°
Gr
id
P
la
ce
m
en
t
Ou
tp
ut
L
os
s
St
ud
io
8
50
St
ud
io
6
50
St
ud
io
4
50
St
ud
io
2
50
St
ud
io
2
50
cy
There are 2 slots in front of the fixture
for slide-in attachment of Front
Accessories.
Slot A
closest to the lamps is for slide-in attachment
of the Gel Frame accessory
Slot B
furthest from the lamp is for attachment
of all other accessories.
Slots are accessible by releasing
the twist locks and opening the door-flap
on the front left side
Slots are accessible by releasing
the twist locks and opening the
door-flap on the front left side
Slot A
Slot B
Step 1
Step 2
Step 3
Step 1
Step 2
Step 3
The following available Front
Accessories can be attached to the
front of the fixture:
n
Gel Frame (supplied),
n
Egg Crate Grid,
n
Honeycomb Grid (front of fixture model),
n
Intensifier (except Model 250cy),
n
Barndoors