Lowel clamps & mounts instructions – Tiffen Clamps & Mounts User Manual
Page 2
n
Space-clamps are
professional tools, designed for
use in a wide variety of situations.
Common sense and caution should
be used to prevent accidents and
damage to objects.
n
Do not clamp to overhead
beams (etc)
that are tapered
downward.
n
Do not use lights
and equipment inappropriately heavy
for the spans, angles and surfaces
involved. Test to make certain clamp
is safely attached.
n
Never attach clamps or
lights while anyone is underneath.
Always use a safety cable.
n
The stand fitting screw must
engage the safety
undercut section of the
stud. This is especially
important when studs
are pointed downward.
If heavy equipment is used, attach it
to the stud that is pointing up or
down (rather than to the side) as this
decreases the leverage involved.
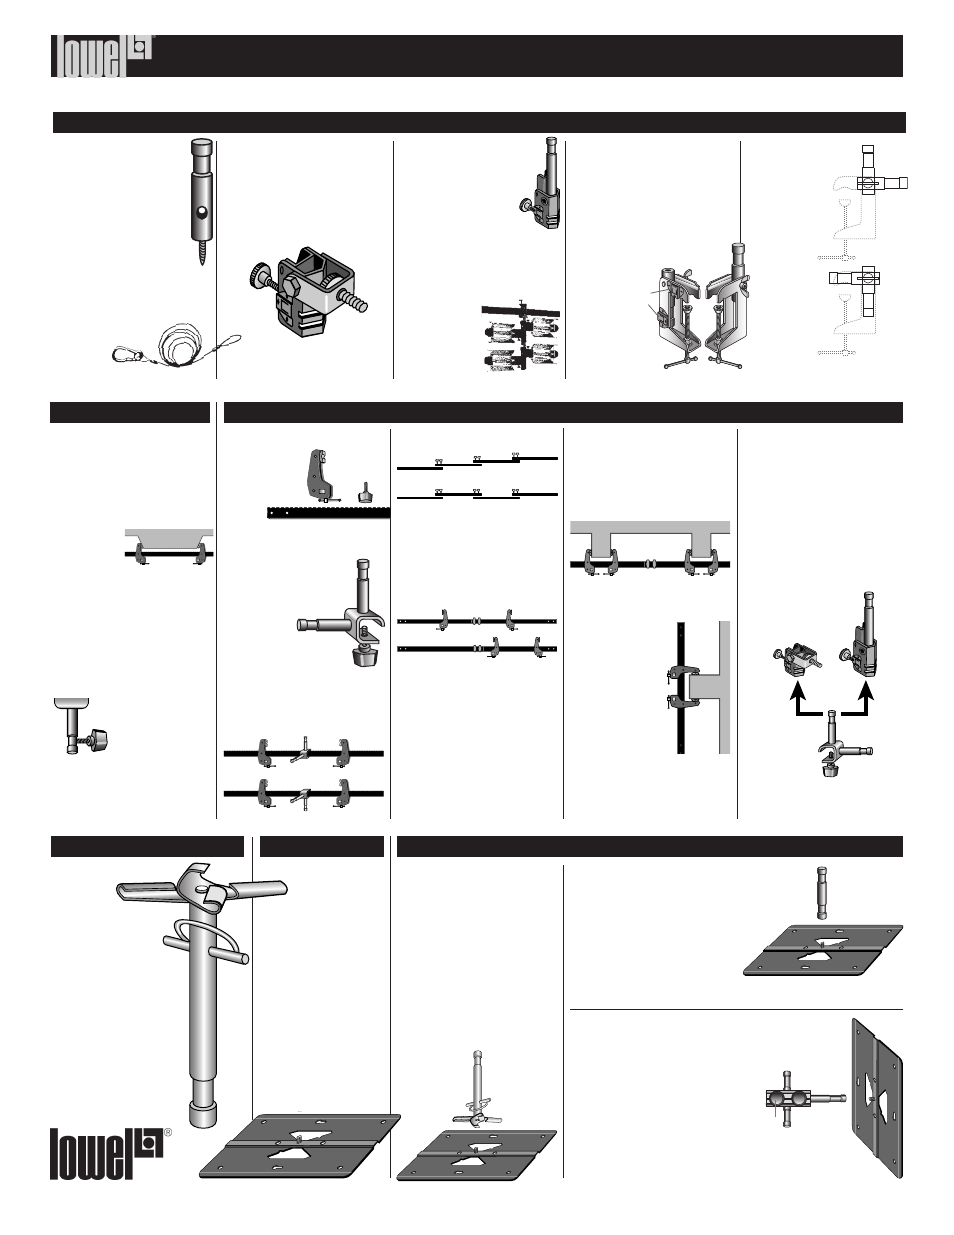
Bars & Arms
Bars have 4 holes.
Two 1/4“ clearance
holes on one end,
and two 1/4-20
threaded
holes on
the other. Arms should slip on the bar
with notches facing up toward clamp-
ing pads.
Stud Bracket
The stud bracket can be
attached to the
bar without
removing the arms—even
after the clamp is mounted (if
the bar is not flush against a
surface). For normal installations,
neither stud should be ‘aimed” in the
same direction as the arms.
Joining Bars
Two or more bars may be joined by
lining up clearance holes and thread-
ed holes and inserting the 1/4-20
threaded knobs. Keep the bars in line.
Clamping Outward
If two or more bars are joined togeth-
er, clamping arms should only be
used facing inward. Clamping
outward should only be done with
single bars, or when clamping arms
are on one bar.
Attaching Clamp
at Several Points
More than one set of clamping arms
can be used. Several stud brackets
can be added if the combined weight
of the equipment is not excessive.
Clamping to Furniture
When clamping to
potentially vulnera-
ble surfaces, use
plastic pads sup-
plied, or small
pieces of wood or
similar
material that will
spread pressure over
a greater area.
Clamps can be combined with
other Lowel Components
Tota-tilter /
Tota-daptor
If the Tota-tilter is locked onto the
stud bracket, a small device (with a
1/4-20 threaded hole) can be
screwed on. The device can then be
tilted to almost any angle. The tilter
allows two Flexi-shafts with flags to
be attached. The Tota-dap-
tor can be used to attach
Flexi-shafts with Tota-
flags and a light.
Lowel Clamps & Mounts Instructions
Mounts
For horizontal use 1
Floors and shelves
1 Place Big-foot A (name side up)
on a table.
2 Open clamp on Scissor-mount B
and fit it onto X left by cut-out in A.
3 Close clamp and tighten
5/8" stud.
4 Put light on top.
For horizontal use 2
Floors and shelves
1 Screw 5/8" stud C with a 1/4-20"
bottom thread onto the screw on A.
2 Put light on top.
For vertical use
Walls and windows
1 Screw on a Lowel Interlink D
2 Orient it using knob E so that the two
short studs line up North/South as shown.
This enables a light to pan without turning
sideways. The assembly can be nailed or
screwed to appropriate vertical surfaces.
3 Put light on top, bottom, or both.
Big-foot should not be used with lights heavier than DP.
Code: CM-30
Attaches to walls, with
screws or nails, or rests on
floor for increased mounting
options with small to medi-
um sized lights. Use with
Scissor-mount, Double Male
Stud, or Interlink System.
Code: CM-20
(Set of 2)
Attaches
small lights and
accessories to grid
of dropped-ceilings
in offices and other areas.
Always attach at intersections
of grid supported by cable
(look above ceiling tiles
to confirm). Attach fixture
to mount stud and tighten.
Use Gridlock (CM-21)
with Pro-light.
B
A
A
A
E
D
C
Space-clamp
Space-clamp Warnings
Screw-in Stud
Code: LSS (Set of 2).
Standard 5/8" (16 mm) mount-
ing stud with safety undercut
and a hole for a screw driver,
screws into wooden surfaces
such as the top of studio sets
to support small lights, flags,
reflectors, etc.
Safety Cable
Code: CM-50 (Set of 3)
Size: 34" (86.4 cm)
Braided stainless-steel
cable adds
security to
lights and accessories.
Tota-tilter
Code: T1-36
A constant tension tilt bracket for
mounting Lightflector, still cameras,
and accessories. Has a 1/4-20
knurled screw. Fits on 5/8" (1.59 cm)
or smaller stud; accepts two
Flexi-shafts.
Tota-daptor
Code: T1-35
Steps up undersize stand tops
to standard 5/8", acts as a
short extension. It has two
snap-in fittings for Flexi-
shafts. Two Tota-lights can be
locked together by turning one of the
stand fittings “backwards” and lock-
ing it onto the stand fitting extension.
For additional two Totas, a Tota-dap-
tor must be
added. Provide
sufficient ventila-
tion and prevent
cables from con-
tacting lights.
Tota-clamp
Code: T1-30
Tota-clamp supports most lights that
fit standard 5/8" studs. Tota-clamp
can be attached to pipes, stands
or flat surfaces. When clamping on
furniture, use thin wood or cardboard
to avoid marring. To rotate stud,
turn wing nut
counterclockwise
several turns.
Tota-clamp has
two snap-in
fittings C for
Flexi-shafts.
The stud can be locked
in any of four positions:
A 2 for the 5/8"
stud and B 2 for
the end with the
1/4-20 tapped hole.
A 1/4-20 screw
can be used to
lock on some
microphone
yokes and vari-
ous accessories.
C
A
B
No
Yes
No
Yes
No
Yes
Big-foot
Scissor Mount
Using the Big-foot