Triplett ProTemp 6 – PN: PT6 User Manual
Protemp 6, Instruction manual
2
3
4
1
5
ProTemp 6
Non-Contact Infrared Thermometer
Instruction
Manual
Introduction
We are confident you will find
many uses for your ProTemp 6
hand-held, non-contact
thermometer. Compact, rugged,
and easy to use—just aim, push
the button, and read current
surface temperatures in less than
a second. You can safely
measure surface temperatures of
hot, hazardous, or hard-to-reach
objects without contact.
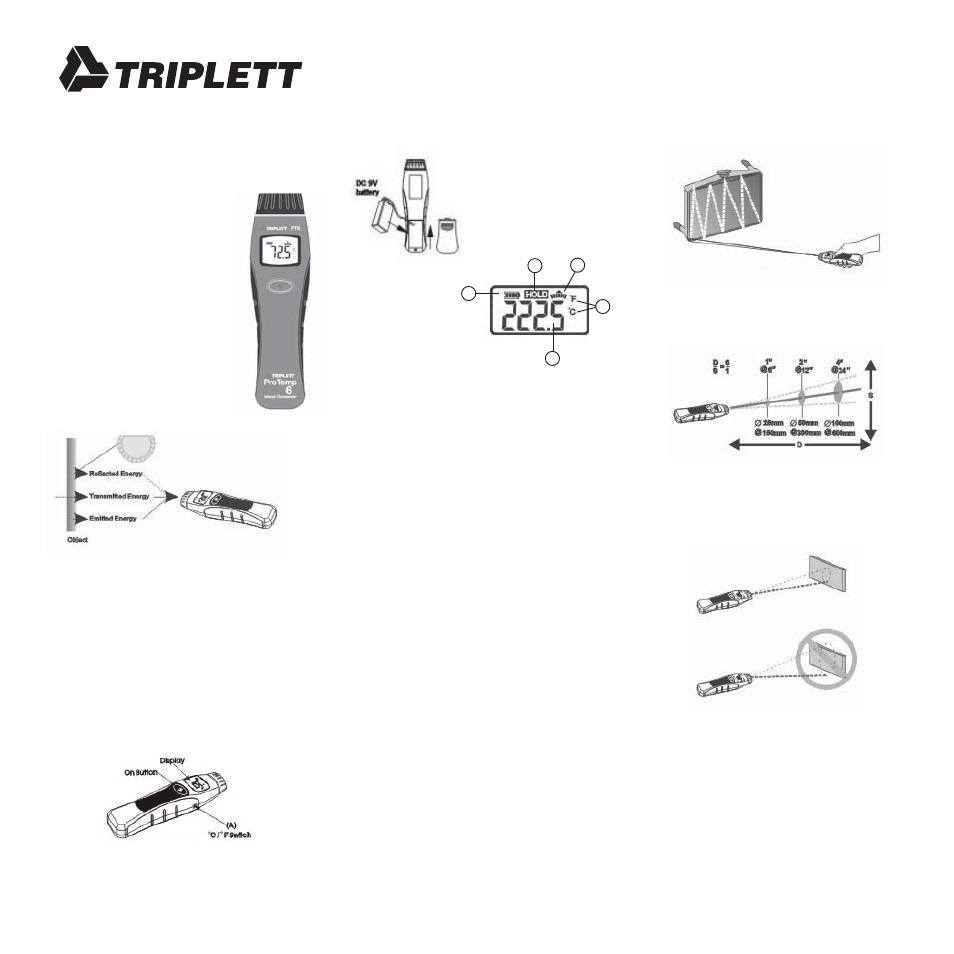
How it Works
Infrared thermometers measure the surface
temperature of an object. The unit’s optics sense
emitted, reflected, and transmitted energy, which
is collected and focused onto a detector. The
unit’s electronics translate the information into a
temperature reading which is displayed on the
unit. The built in laser aids in pointing the
thermometer by identifying the center of the
measurement area.
How to Operate the Unit
1)
°
C /
°
F and Battery
To switch between Celsius or Fahrenheit, slide
switch (A) to select C or F. When necessary,
replace the 9v battery as shown in diagram.
2) Display
1) Battery Gauge
2) Hold Icon
3) Measurement in Process
4) Temperature Units
5) Measured Temperature
3) Operating the Unit
To measure a temperature, point the ProTemp 6
at the object or surface to be measured and
press and hold the ProTemp 6’s “On” button.
The pointing laser will be activated. Point it at
the areas to be measured. The laser identifies
the center of the area.
The display of the ProTemp 6 will light up (this is
only visible in reduced lighting), the “Battery
Gauge” will indicate the state of charge of the
battery, the “Measurement in Process” icon will
oscillate, and the measured temperature will be
displayed (in
°
C or
°
F, as selected by the user).
Release the “On” button. The “Hold” icon will
light and the “Measurement in Process” icon will
go off. The ProTemp 6 will hold and display the
previously measured temperature for about 7
seconds, and then turn itself off.
How to Accurately
Measure Temperatures
1) Locating a Hot Spot
To find a hop spot aim the thermometer outside
the area of interests, then scan across with an up
and down motion until you locate the hot spot.
2) Distance & Spot Size
As the distance (D) from the object increases the
spot size (S) of the area measured by the unit
becomes larger.
3) Field of View
Make sure that the target is larger than the unit’s
spot size. The smaller the target, the closer you
should be to it. When accuracy is critical, make
sure the target is at least twice as large as the
spot size.
4) Cautions
All models should be protected from the
following:
• EMF (electro-magnetic fields) from arc
welders, induction heaters,
• Static electricity
• Thermal shock (caused by large or abrupt
ambient temperature changes—allow 30
minutes for unit to stabilize before use)
• Do not leave the unit on or near objects of
high temperature.