VXL Instruments Xtona TC1512-z Series Thin Client User Manual
Hardware installation guide, Xtona tc1512-z series thin client
Xtona TC1512-z Series Thin Client
Hardware Installation Guide
This Class B digital apparatus complies with Canadian ICES-003.
Cet appareil numérique de la classe B est conforme à la norme
NUM- 003 du Canada.
©2012 VXL Instruments Limited.
600011052135 A02
Page: 2
Xtona TC1512-z Series Thin Client
Hardware Installation Guide
The TC1512-z package consists of several items, which are listed below:
TC1512-z Thin client
Power adapter 16V / 2.5A
Pedestal
This manual
Power cord applicable to your country ( Optional )
We use our best possible efforts to ensure that all the items that should
be in the package are in fact there. However if something is missing we
do sincerely apologise and request you to either return the product to
where you obtained it from, or contact VXL at any of their sales offices for
assistance.
In order that the TC1512-z performs in accordance with expectations, you
must ensure that you install it correctly.
This guide covers the installation of the hardware, and does not cover the
configuration of Software. For software configuration refer
Precautions
While installing the TC1512-z hardware in your network infrastructure you
must ensure some simple precautions:
Do not install the hardware in areas where the unit could be
splashed with liquids or where it may be liable to become wet.
Always ensure 4 Inch space around the unit. Failure to
achieve adequate ventilation could result in damage to the
unit.
Always place the unit vertical.
Setting up the TC1512-z
The following steps will ensure that your new TC1512-z is perfectly set up
and operational.
1.
Unpack the unit taking care not to drop the product whilst
removing from the packaging.
2.
Please retain the packaging for possible future use.
3.
You will immediately need the following items:
a.
Power cord
b.
Mouse
c.
Keyboard
d.
Monitor DVI
Page: 3
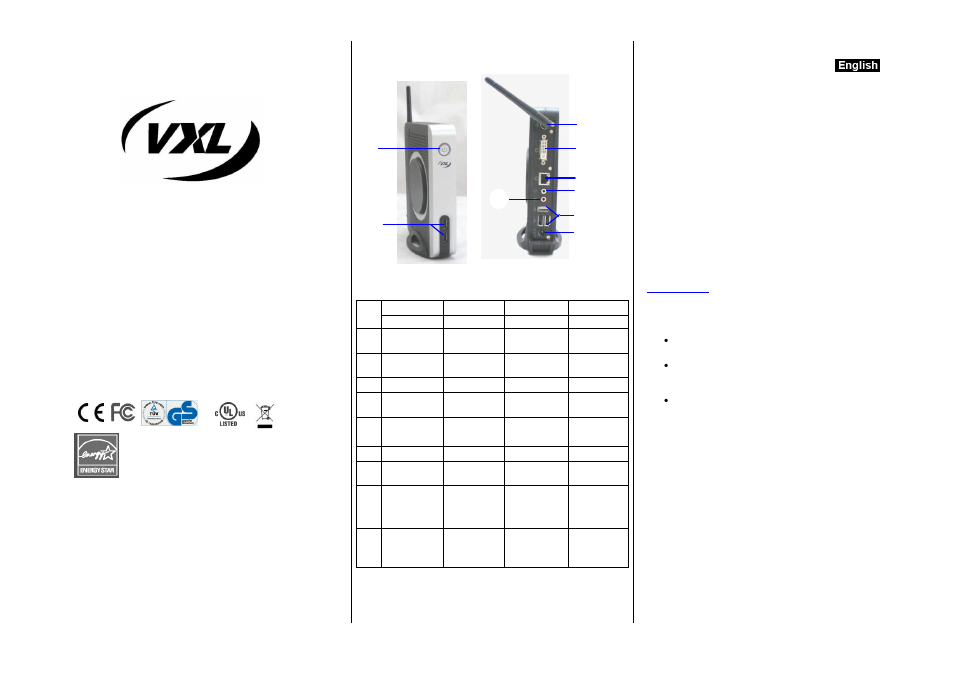
Ref
English
Français
Deutsch
Español
Components
Composantes
Bestandteile
Componentes
1
Power Button
Bouton
marche/ arrêt
Einschaltknopf
Botón de
Encendido
2
2 USB Ports
2 Ports USB
2 USB Ports
2 Puertos
USB
3
DVI-I Port
Port DVI-I
DVI-I Port
Puerto DVI-I
4
Ethernet Port
Port Ethernet
Ethernet Port
Puerto
Ethernet
5
LINE-OUT
SORTIE son
LINE-OUT
Salida de
línea
6
MIC
MIC
MIC
MICRÓFONO
7
3 USB Port
3 Ports USB
3 USB Port
3 Puertos
USB
8
DC Power In
16V / 2.5A
Prise
d’alimentation
16V / 2.5A
Netzteil
Anschluss
DC12V/2A
Entrada de
alimentación
DC 16V /
2.5A
9
Wireless LAN
( Optional )
WLAN
(en option)
WLAN
(optional)
WLAN
(Opcional )
1
2
3
4
5
6
7
8
9
I
.
T
.
E
RoHS