Airaid 200-195 User Manual
Installation instructions
Installation Instructions
For Part Numbers:
200-195
720-440 Airaid Oiled Media Filter
201-195
721-440 SynthaMax Dry Media Filter - Red
202-195
722-440 SynthaMax Dry Media Filter - Black
203-195
723-440 SynthaMax Dry Media Filter - Blue
2006-11 Chevrolet HHR
2.2L & 2.4L I4 Non Turbocharged
Automatic Transmission Only
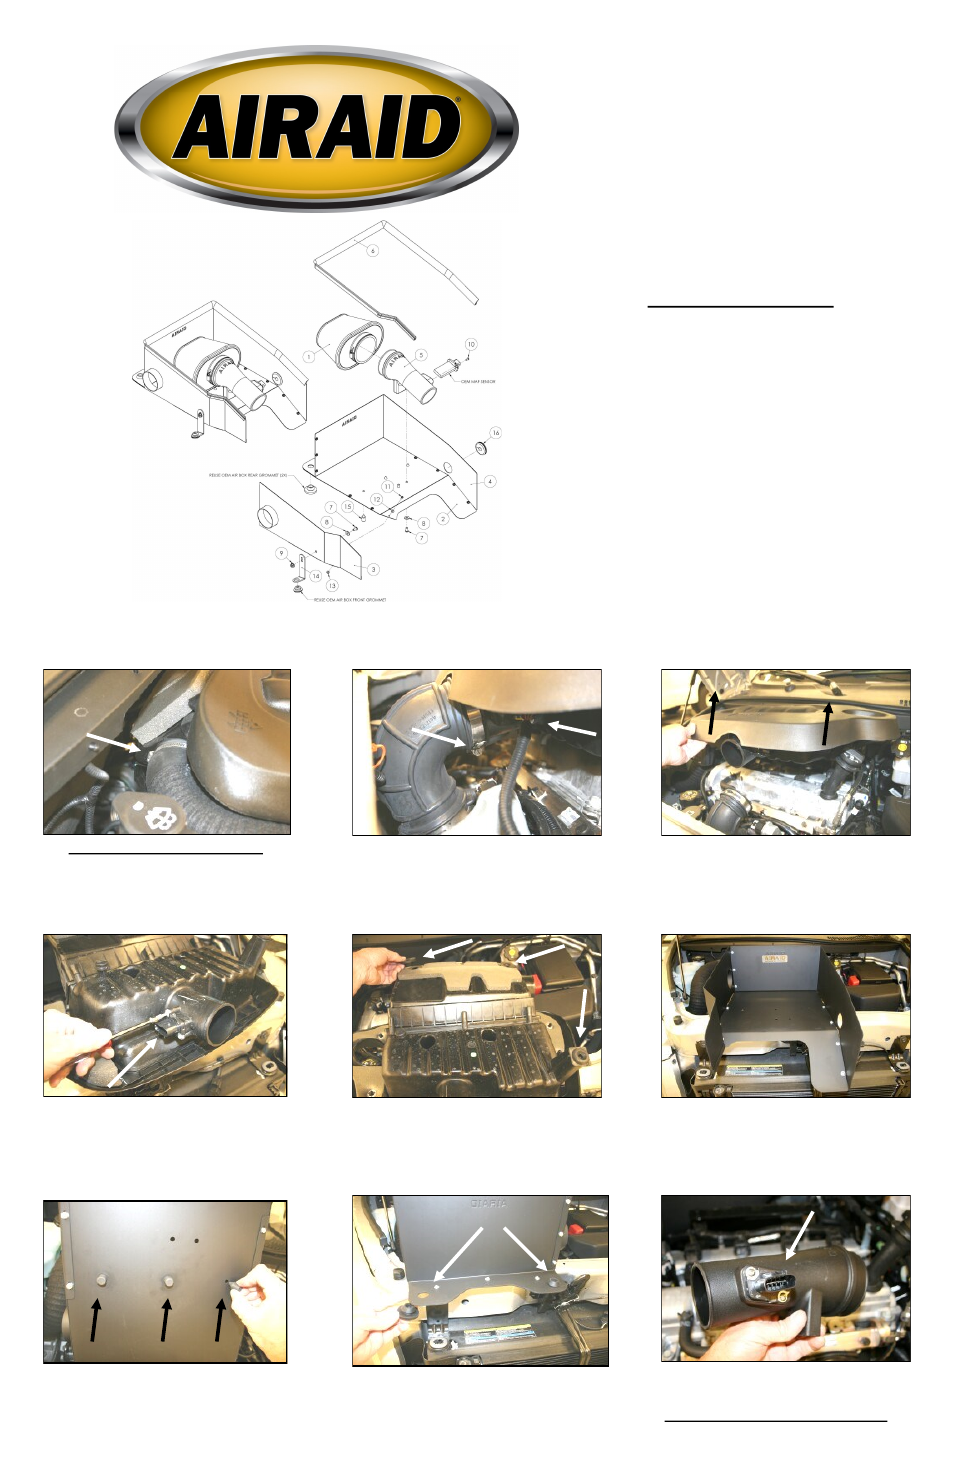
Component Identification
1.
Airaid Premium Filter
1
2. Bottom Panel
1
3. Passenger Side Panel
1
4. Driver Side Panel
1
5. Airaid Intake Tube
1
6. Weather Strip 47 1/2”
1
7.
1/4”-20x1/2” Button Head Bolt
3
8.
1/4” Flat Washer
3
9.
1/4” Serrated Nut
1
10.
8-32x3/8” Button Head Screw
2
11.
6-32x 5/16” Screw
13
12.
#6 Flat Washer
13
13.
6-32 Keps Nut
13
14.
Bracket
1
15.
Silicone Bumpers
3
16.
Large Grommet
1
17.
#20 Torx Bit
1
1. Disconnect the negative battery cable.
With a 1/4” socket, loosen the hose clamp that
holds the fresh air intake tube to the factory air
cleaner housing. Slip the tube off of the factory air
cleaner housing and set it aside, it will be re-
connected later in the install.
2. Loosen the hose clamp that holds the rubber
elbow to the factory air cleaner housing. Next
squeeze the tab on the Mass Air Flow sensor wir-
ing connector, and remove the connector from the
Mass Air Flow sensor .
3. Remove the factory air filter housing by lifting
on the front, and then the rear. There are no bolts
holding it down, only 3 rubber grommets.
4. Using the supplied #20 torx bit, remove two
screws, and the Mass Air Flow sensor from the
factory air cleaner housing. Set it aside for re-
installation later in the install.
5. Remove 3 factory rubber grommets from the
factory air cleaner housing.
6. Assemble the three Cool Air Dam panels (#2,
#3, & #4), using 13 screws (#11), washers (#12),
and nuts (#13), as shown.
7. Install the three silicone bumpers (#15) into
the three holes in the bottom of the Cool Air
Dam, as shown.
8. Install the two large factory grommets removed
from the factory air cleaner housing in step #5, into
the two holes at the back of the Airaid Cool Air
Dam.
9. Install the Mass Air Flow sensor removed in
step #4, into the Airaid Intake Tube (#5) using the
two 8/32”x 3/8” button head screws (#10).
DO NOT USE THE FACTORY SCREWS!
Full color instructions can be viewed on our web site at Airaid.com. Use the Product Search function to find your part number, and click View Details.