Airaid 200-206-1 User Manual
Installation instructions, Component identification
Installation Instructions
For Part Numbers:
200-206-1
720-477 Airaid Oiled Media Filter
201-206-1
721-477 SynthaMax Dry Media Filter - Red
202-206-1
722-477 SynthaMax Dry Media Filter - Black
203-206-1
723-477 SynthaMax Dry Media Filter - Blue
2006-09 Chevrolet Trailblazer 5.3L V8, 6.0L V8
2005-06 Chevrolet Trailblazer EXT 5.3L V8
2005-06 GMC Envoy 5.3L V8
2005-06 GMC Envoy XL 5.3L V8
2005 GMC Envoy XUV 5.3L V8
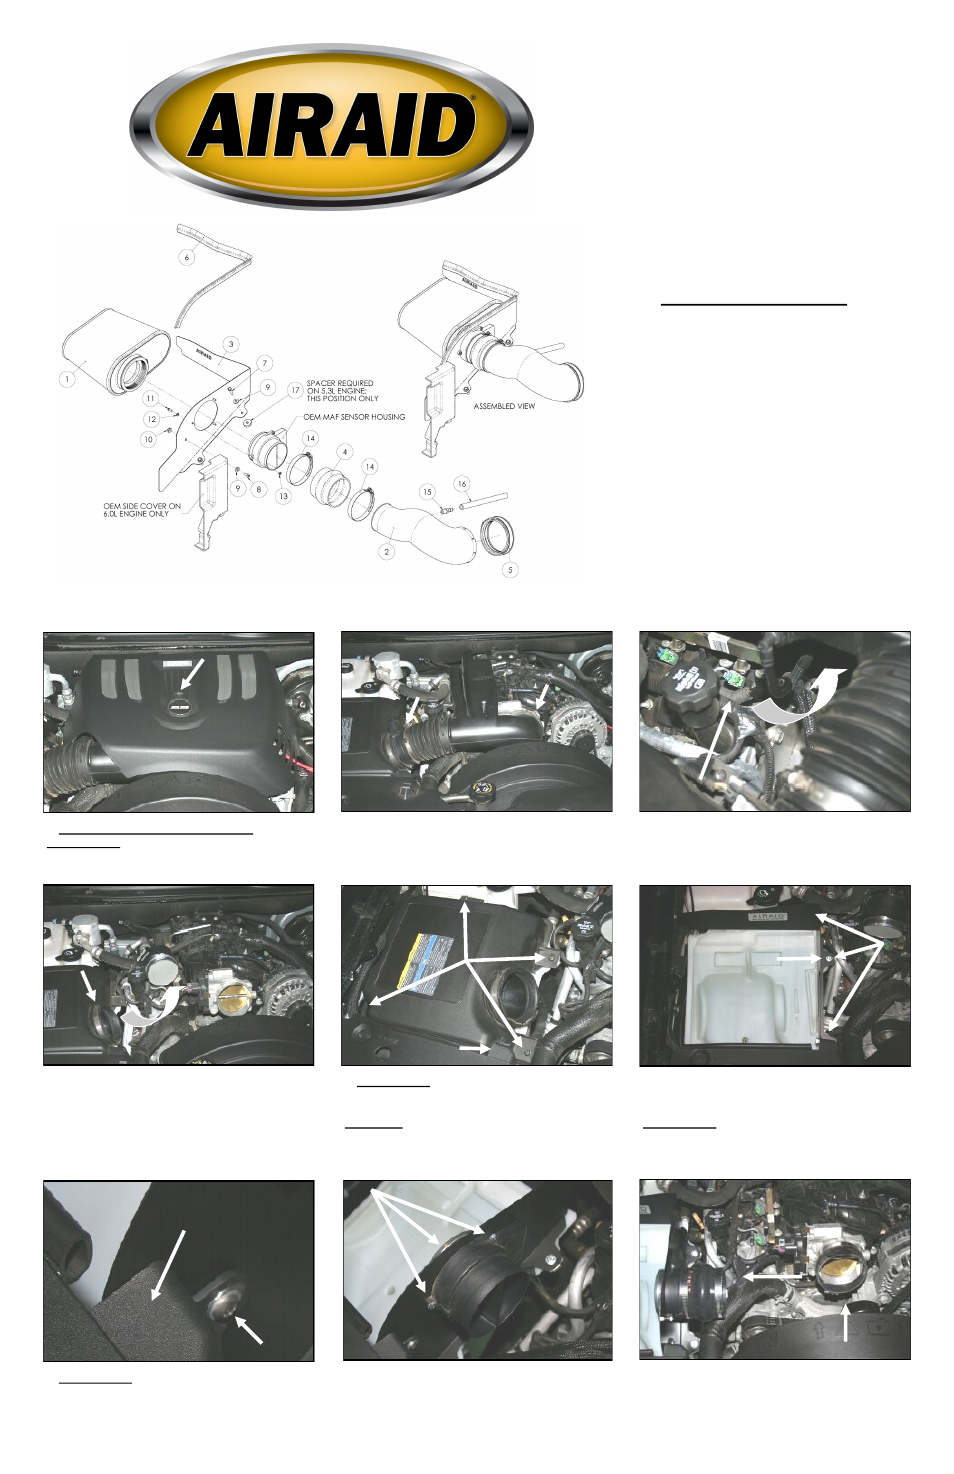
Component Identification
1.
Airaid Premium Filter
1
2. Airaid Intake Tube
1
3. MAF Panel
1
4. Silicone Hump Hose
1
5. CouplerW/#68 Clamp
1
6. Weather Strip 26”
1
7.
M6 x 25mm Hex Bolt
3
8.
¼ - 20 x 1/2” Button Head Bolt
1
9.
¼” Flat Washer
4
10.
¼ - 20 Serrated Nut
1
11.
8-32 x 1/2” Button Head Screw
3
12.
#8 Flat Washer
3
13.
8-32 Keps Nut
3
14.
#56 Hose Clamp
2
15.
¼” NPT x 3/8” Barbed Fitting
1
16.
3/8” x 8” Breather Hose
1
17.
Aluminum Spacer
1
1. Disconnect the negative battery cable.
6.0 Liter Only: Using a T-30 torx bit, remove the fac-
tory screw and engine beauty cover, and then set them
aside for reuse.
2. Using a 5/16” socket or flat blade screwdriver,
loosen the hose clamps on both ends of the factory
intake tube.
3. Slide the factory breather hose off of the metal tube
on the engine.
4. Loosen the clamp holding the Mass Air Flow
(MAF) sensor to the factory air box lid. Remove the
complete factory intake and breather tube. Remove
the MAF sensor from the lid (do not disconnect it),
and then set it aside.
5. 6.0 Liter Only: Using a flat blade screwdriver,
gently pry the plastic retaining clip from the oem side
cover.
All Models: Loosen the four mounting screws on the
factory airbox lid. Remove the factory airbox lid, fil-
ter, and resonator as an assembly.
6. Mount the MAF Panel (#3) onto the airbox base
using three M6 x 25mm Hex Bolts (#7), and ¼” flat
washers (#9).
5.3 Liter Only: Insert one aluminum spacer (#17)
between the panel and the lower airbox in the position
as shown. Tighten using a 10mm socket, ratchet and
extension.
6.0 ONLY:
OEM SIDE
COVER
5.3L Only: Insert
Spacer Under
MAF Panel
9. Slide the silicone hump hose (#4), and two #56
hose clamps (#14) onto the MAF sensor. Slide the
coupler (#5) and one #68 hose clamp onto the throttle
body. Tighten only the clamp on the MAF sensor for
now.
7. 6.0 Liter Only: Insert one ¼ - 20 x 1/2” button
head bolt (#8) and 1/4” flat washer (#9) through the
hole in the oem side cover, and through the hole in the
panel. Secure using one ¼ - 20 serrated nut (#10).
8. Mount the MAF sensor onto the panel using three 8
-32 x 1/2” button head screws (#11), #8 flat washers
(#12), and 8-32 keps nuts (#13). (Note: sensor should
be mounted with “flow” arrow on top).
OEM SIDE
COVER
Full color instructions can be viewed on our web site at Airaid.com. Use the Product Search function to find your part number, and click View Details.