Airaid 250-310 User Manual
Installation instructions, Component identification, For part numbers
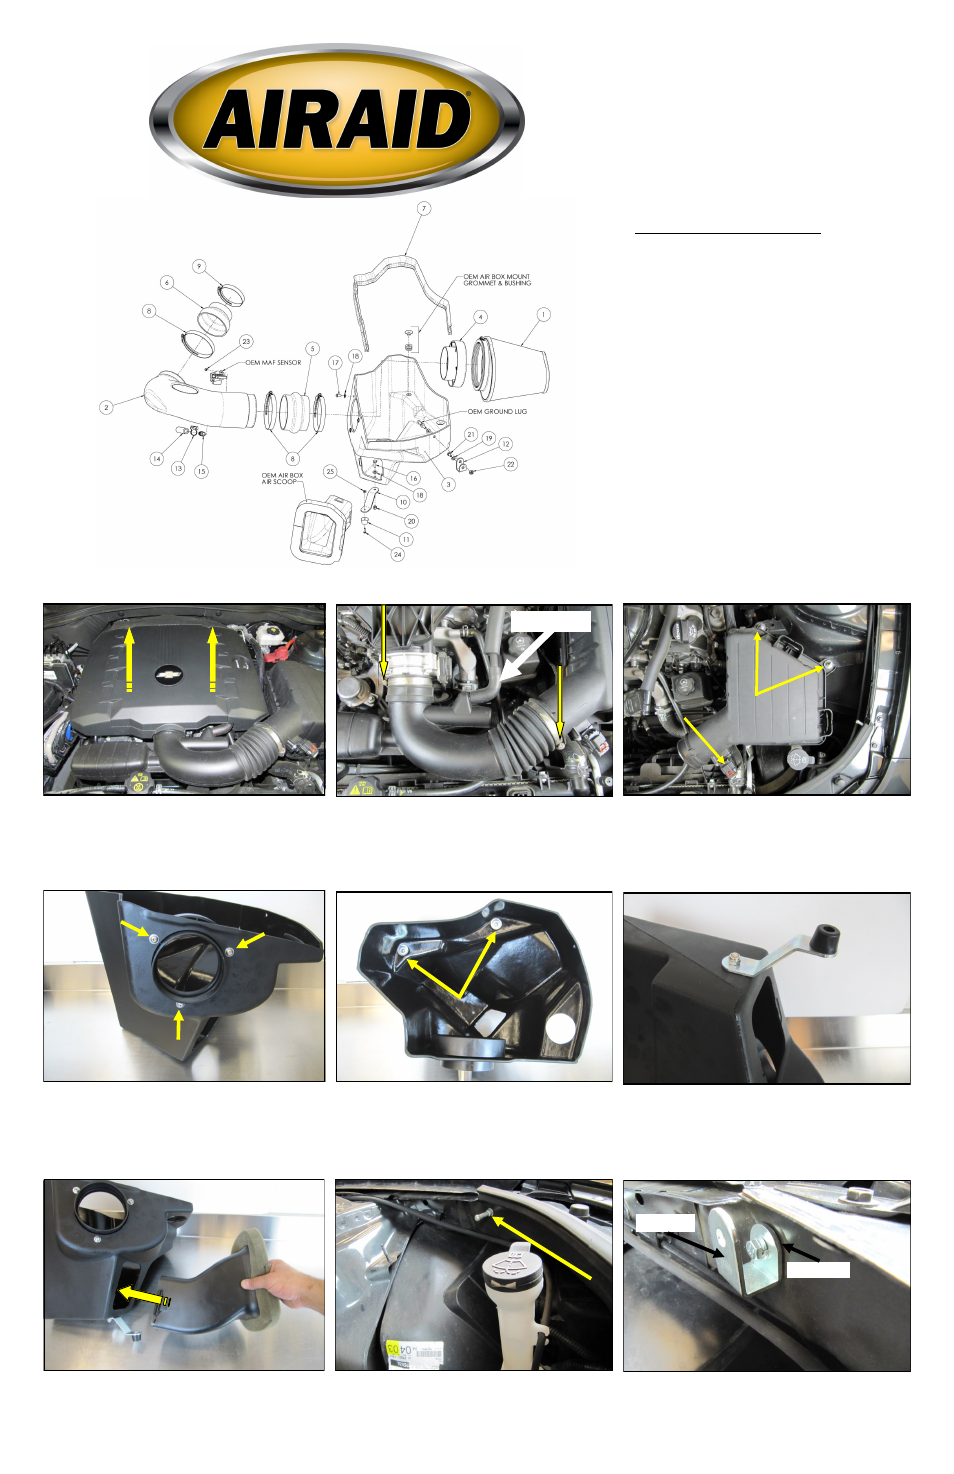
Installation Instructions
For Part Numbers:
250-310
720-242 Airaid Oiled Media Filter
251-310
721-242 SynthaMax Dry Media Filter - Red
252-310
722-242 SynthaMax Dry Media Filter - Black
253-310
723-242 SynthaMax Dry Media Filter - Blue
2012-15 Chevrolet Camaro
3.6L V6
2. Disconnect the PCV breather at the 90 degree. fit-
ting. Loosen the two intake tube clamps and remove the
tube from the vehicle.
3. Disconnect the Mass Air Flow sensor. Using a deep
10mm socket, remove and save the two nuts that secure
the factory airbox to the inner fender. These will be re-
used in step 10. Lift up and remove the entire airbox and
scoop assembly.
4. Install the Filter Adapter onto the Airaid Cool Air
Box as shown using three 1/4-20 Button Head Screws
(#17), and 1/4” Flat Washers (#18). Refer to the line
drawing above for details.
5. Transfer the two air box mounting grommets and
steel sleeves from the factory air box into the Airaid
Cool Air Box.
6. Turn the Box upside down and mount the Lower
Bracket (#10) using the 1/4-20 x 3/4” Hex Bolt (#16),
1/4” Flat Washer (#18), and 1/4” Nylon Lock Nut (#20)
as shown. Attach the Plastic Bumper (#11) to the Bracket
using the 8-32 x 5/8” Button Head Screw (#24), and the
#8 Kep Nut (#25).
8. Remove and save the ground lug from the driver’s
side inner fender. It will be reused in step #11.
7. Transfer the factory air scoop into the Airaid Cool Air
Box. When properly installed, the small locking tab will
be inside the Box and the large one will be on the out-
side.
9. Install the Side Bracket (#12) where the ground lug
was installed, using the 6mmx12mm Hex Bolt (#21), and
Lock Washer (#19).
Component Identification
1.
Airaid Premium Filter
1
2.
Intake Tube
1
3.
Cold Air Box
1
4.
Filter Adapter
1
5.
Silicone Hump Hose
1
6.
Silicone Reducing Coupler
1
7.
Weatherstrip 36"
1
8.
#64 Hose Clamp
3
9.
#48 Hose Clamp
1
10.
Lower Bracket
1
11.
Bumper
1
12.
Side Bracket
1
13.
#16 Speed Clamp
1
14.
PCV Hose, 4.5" Long
1
15.
1/4" NPT Barbed Fitting
1
16.
¼-20 x 3/4” Hex Bolt
1
17.
¼-20 x 1/2” Button Head Screw
3
18.
1/4” Flat Washer
5
19.
¼” Lock Washer
1
20.
¼” Nylon Lock Nut
1
21.
M6x1.0x12 Hex Bolt
1
22.
M6 Flange Nut
1
23.
#8-32 x ½” Button Head Screw
2
24.
8-32 x 5/8” Button Head Screw
1
25.
#8 Kep Nut
1
Disconnect The Negative Battery Terminal!
1. Remove the oil fill cap and then lift up on the front of
the engine cover to remove it from the vehicle. Replace
the oil cap to make sure nothing falls into the motor dur-
ing the install.
90 deg. fitting
Short Side
Long Side
Full color instructions can be viewed on our web site at Airaid.com. Use the Product Search function to find your part number, and click View Details.