Airaid 400-166 User Manual
Installation instructions, Component identification
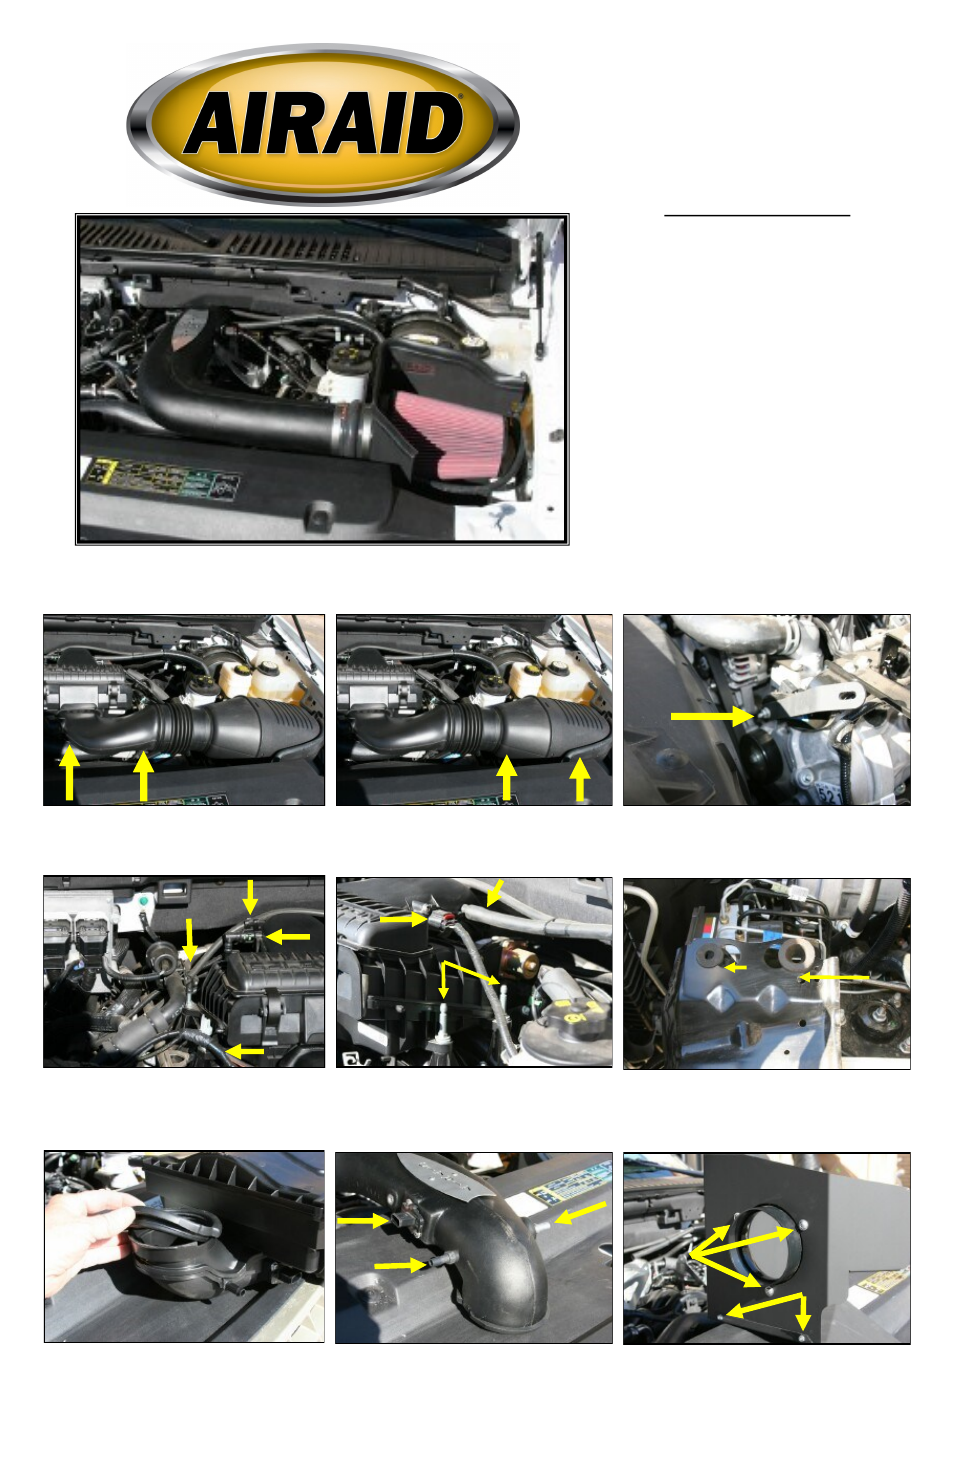
Installation Instructions
For Part Numbers:
400-166
700-469 Airaid Oiled Media Filter
401-166
701-469 SynthaMax Dry Media Filter - Red
402-166
702-469 SynthaMax Dry Media Filter - Black
403-166
703-469 SynthaMax Dry Media Filter - Blue
2005 Ford Expedition 5.4L V8
2. Grasp large oval section of intake tube and pull up
and away from inner fender well, and remove entire
intake tube. (Note: Intake tube is held in with rubber
grommets, no bolts.)
3. Remove 13mm nut on power steering reservoir brack-
et. Install Airaid intake tube support bracket, replace
nut, and leave slightly loose. (Nut will be tightened
after final adjustments.)
4. A.) Remove breather line by pushing up on green lev-
er and pulling fitting away from airbox. B.) Remove
vacuum line from clip. C.) Pull up on, and remove heat-
er control valve from tower bolt. D.) Pull up on, and
remove wiring harness from tower bolt.
5. A.) Unhook the mass air flow sensor by pulling out
the red plastic tab first, and then remove the plug.
B.) Unhook the vacuum line. C.) Remove all four
tower bolts and remove air box. (Save tower bolts
for reinstallation.)
6. A.) Remove the two factory grommets by sliding side-
ways. B.) Install the two supplied grommets in reverse
order.
8. Remove the mass air sensor from the stock airbox
using the #20 torx tool. A.) Using the supplied
8/32 screws install the mass air sensor in the
Airaid intake tube. B.) Install the 3/8” plastic hose
fitting. Do not over tighten! C.) Install the sup-
plied grommet, and then the supplied aluminum
fitting, rounded end first.
7. Remove the factory rubber seal from the airbox, and
install it on the Airaid intake tube.
9. A.) Assemble the Cool Air Dam using the four 6-32
screws and locknuts. B.) Install the air filter adapter
using three ¼-20 Allen bolts and washers.
Component Identification
1.
Airaid Premium Filter
1
2.
MAF Panel Black
1
3.
Bottom Panel Black
1
4.
Black Filter Adapter
1
5.
Airaid Intake Tube
1
6.
Driver Side Bracket
1
7.
Passenger Side Bracket
1
8.
Weather Strip 25”
1
9.
Urethane Hump Hose
1
10.
¼-20x1/2” Bolt
6
11.
6-32 Screw
4
12.
6-32 Keps Nut 4
13.
#6 Flat Washer 4
14.
Bushing 4
15.
Aluminum Fitting
1
16.
8-32 x 3/8” Button Screw 2
17.
M6-1 x 25 Hex Bolt
3
18.
M6 Nut 2
19.
¼” Flat Washer
9
20.
Rubber Grommet
2
21.
Bracket
1
22.
Grommet 1
23.
Bracket 1
24.
¼”NPT x 3/8” Barb 1
25.
Plastic Hose Mount 2
26.
#72 Hose Clamp 2
1.Disconnect The Negative Battery Terminal!
Grasp intake tube and sharply lift up and away from
airbox.
Full color instructions can be viewed on our web site at Airaid.com. Use the Product Search function to find your part number, and click View Details.
B
A
C
D
A
B
C
B
A
B
A
B
C
A