Airaid 400-214-1 User Manual
Installation instructions, A. b. c, Adapter gasket o-ring calibration plate
Installation Instructions
For Part Numbers:
400-214-1
720-472 Airaid Oiled Media Filter
401-214-1
721-472 SynthaMax Dry Media Filter - Red
402-214-1
722-472 SynthaMax Dry Media Filter - Black
403-214-1
723-472 SynthaMax Dry Media Filter - Blue
2008 -10 Ford F-250 Thru F-550 Super Duty
6.4L V8 Power Stroke
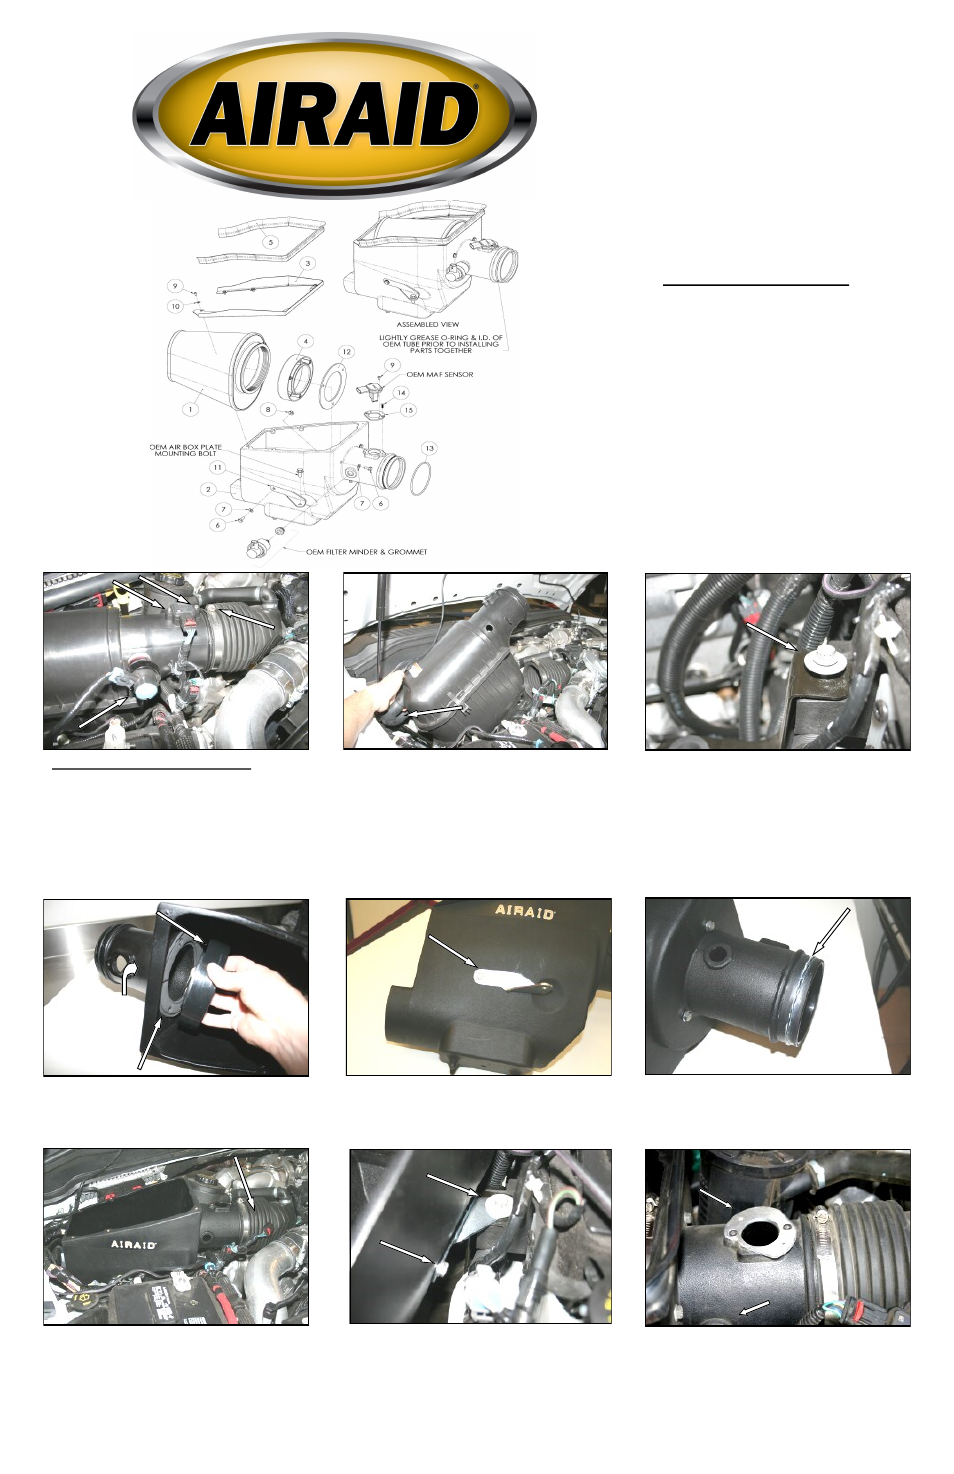
Component Identification
1.
Airaid Premium Filter
1
2.
Airaid Cool Air Box
1
3.
Top Panel
1
4.
Filter Adapter
1
5.
Weather Strip 33 1/4”
1
6.
1/4-20x5/8” Hex Bolt
4
7.
¼” Flat Washer
4
8.
1/4-20 Serrated Nut
1
9.
8-32x3/8” Button Head Bolt
8
10.
#8 Flat Washer
6
11.
Bracket
1
12.
Adapter Gasket
1
13.
1/8” x 4” O - Ring
1
14.
8-32x1/2” Flat Head Screw
2
15.
Calibration Plate
1
16.
T20 Torx Security Bit
1
17.
O-Ring Grease
1
1. Disconnect the negative battery cables.
A) Loosen the hose clamp that holds the intake tube
to the airbox. B) Disconnect the filter minder wiring
harness, and then remove the factory filter minder and
grommet from the intake tube (save for reuse).
C) Disconnect the Mass Air Flow (MAF) sensor wir -
ing harness. Using the supplied Torx bit, remove the two
screws, and the (MAF) sensor from the factory airbox.
Save the MAF sensor for reinstallation in step #10.
3. Remove one bolt from the factory airbox mounting
plate, and save it for reinstallation in step #8.
6. Install the O-ring (#17) into the groove on the
Cool Air Box as shown. Apply a light coat of the
supplied grease onto the O-ring.
4. Install the adapter gasket (#12), and filter adapter
(#4) into the Airaid Cool Air Box (#2) using three
1/4-20x5/8” hex bolts (#6), and 1/4” flat washers
(#7).
7. Apply a light coat of the supplied grease onto the
inside of the factory tube. Install the Airaid Cool Air
Box into the vehicle making sure it is seated correct-
ly into the factory grommets, and the inlet is aligned
with the factory hole in the fender. Slide the factory
intake tube over the O-ring and then tighten the fac-
tory hose clamp.
9. A.) Install the Calibration Plate onto the Cool Air
Box using two 8-32 x 1/2” Flat Head Screws (#14).
B.) Reinstall the factory grommet, and filter minder
into the Cool Air Box, and then reconnect the filter
minder wiring harness.
2. Remove the factory airbox and tube from the vehi-
cle as an assembly, by pulling straight up on the box.
It is only held in place by grommets, no bolts.
5. Install the bracket (#11) using one 1/4-20x5/8”
hex bolt (#6), 1/4” flat washer (#7), and 1/4-20 ser-
rated nut (#8) as shown. Just snug the bolt for now, it
will need to be adjusted in step #8.
8. Reinstall the factory bolt that was removed in
step #3, through the bracket that is bolted onto the
side of the Cool Air Box. Adjust the box for fit, and
tighten both bolts.
A.
B.
C.
Tube
Adapter
Gasket
O-ring
Calibration Plate
Bolts & Washer
s
Factory Tube
Filter Minder