Airaid 400-260 User Manual
Installation instructions, Component identification
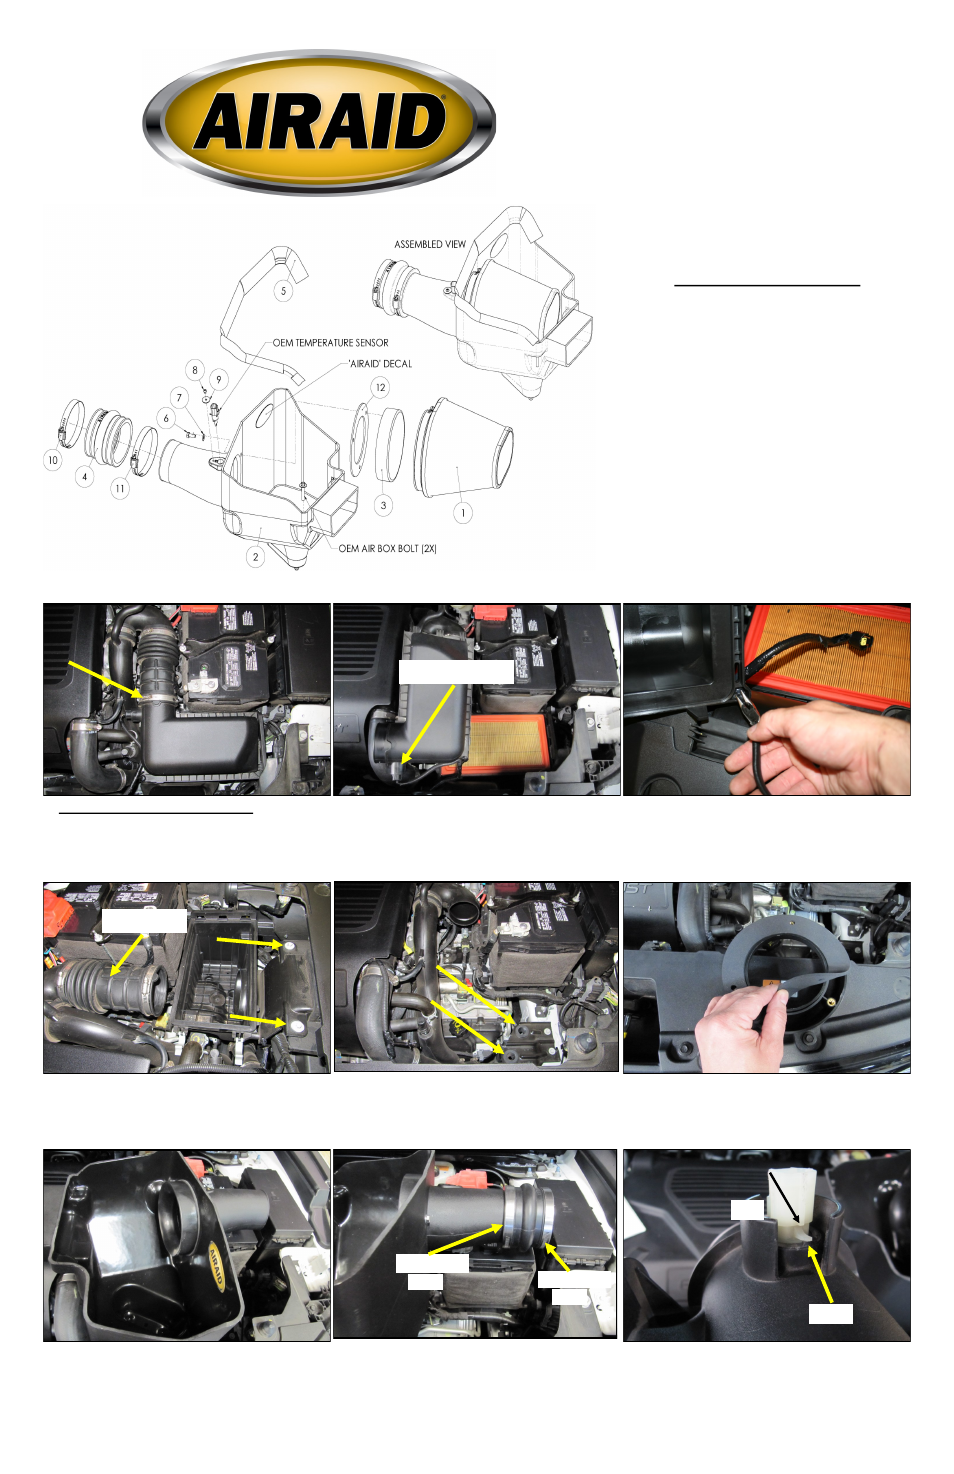
Installation Instructions
For Part Numbers:
400-260
720-479 Airaid Oiled Media Filter
401-260
721-479 SynthaMax Dry Media Filter - Red
402-260
722-479 SynthaMax Dry Media Filter - Black
403-260
723-479 SynthaMax Dry Media Filter - Blue
2013-14 Ford Explorer Sport
3.5L V6 Eco-Boost
1. Disconnect the negative battery cable.
Loosen the clamp on the air box side of the intake tube.
2. Unfasten the factory air box clips and separate the
upper half of the air box from the intake assembly. Dis-
connect the air temperature sensor.
3. Using a pair of needle nose pillars, carefully compress
the fins of the wiring harness anchor and pull it out of the
air box lid.
4. Using an 8mm socket, remove the two factory air box
bolts and set aside. The will be reused in step 11. Loosen
the second intake tube clamp and remove it from the ve-
hicle
5. Remove the factory air box assembly from the vehicle.
Be sure to retain the two air box mounting grommets.
6. Prepare the Filter Adapter for installation by position-
ing the Adapter Gasket on the mounting side and lining
up the holes.
8. Install the Hump Hose, large side first onto the Intake
tube. Loosely install the #56 Hose Clamp on the small
side of the Hump Hose, and the #60 Hose Clamp on the
Large side. Slide the Hump Hose and Clamps downward
onto the tube, as far as it will go, creating a compact
assembly as shown.
Component Identification
1.
Airaid Premium Filter
1
2.
Airaid Cool Air Box
1
3.
Filter Adapter
1
4.
Hump Hose Reducer
1
5.
Weather Strip 26 3/8”
1
6
.
¼-20x5/8” Hex Head Bolt
3
7.
¼” Flat Washer
3
8.
8-32 x 1/4” Button Head Bolt
1
9.
#8 x 3/4” O.D. Flat Washer
1
10.
#56 Hose Clamp
1
11.
#60 Hose Clamp
1
12.
Adapter Gasket
1
13. (Not Pictured)
Wire Harness Extension
1
14. (Not Pictured)
Black Zip Tie
1
7. Install the Filter Adapter to the inside of the Cool Air
Box, using the three 1/4”-20 hex head bolts and 1/4” flat
washers as shown.
9. Remove the Air Temperature Sensor from the factory
air box. Gently push back on the sensor so the locking tab
will clear the ramp and rotate the sensor 1/4 turn counter
clockwise. The sensor is now free and can be pulled out.
Large side
# 60
# 56
Small side
Full color instructions can be viewed on our web site at Airaid.com. Use the Product Search function to find your part number, and click View Details.
Air Temp Sensor
Intake Tube
Ramp
Tab