Airaid 450-321 User Manual
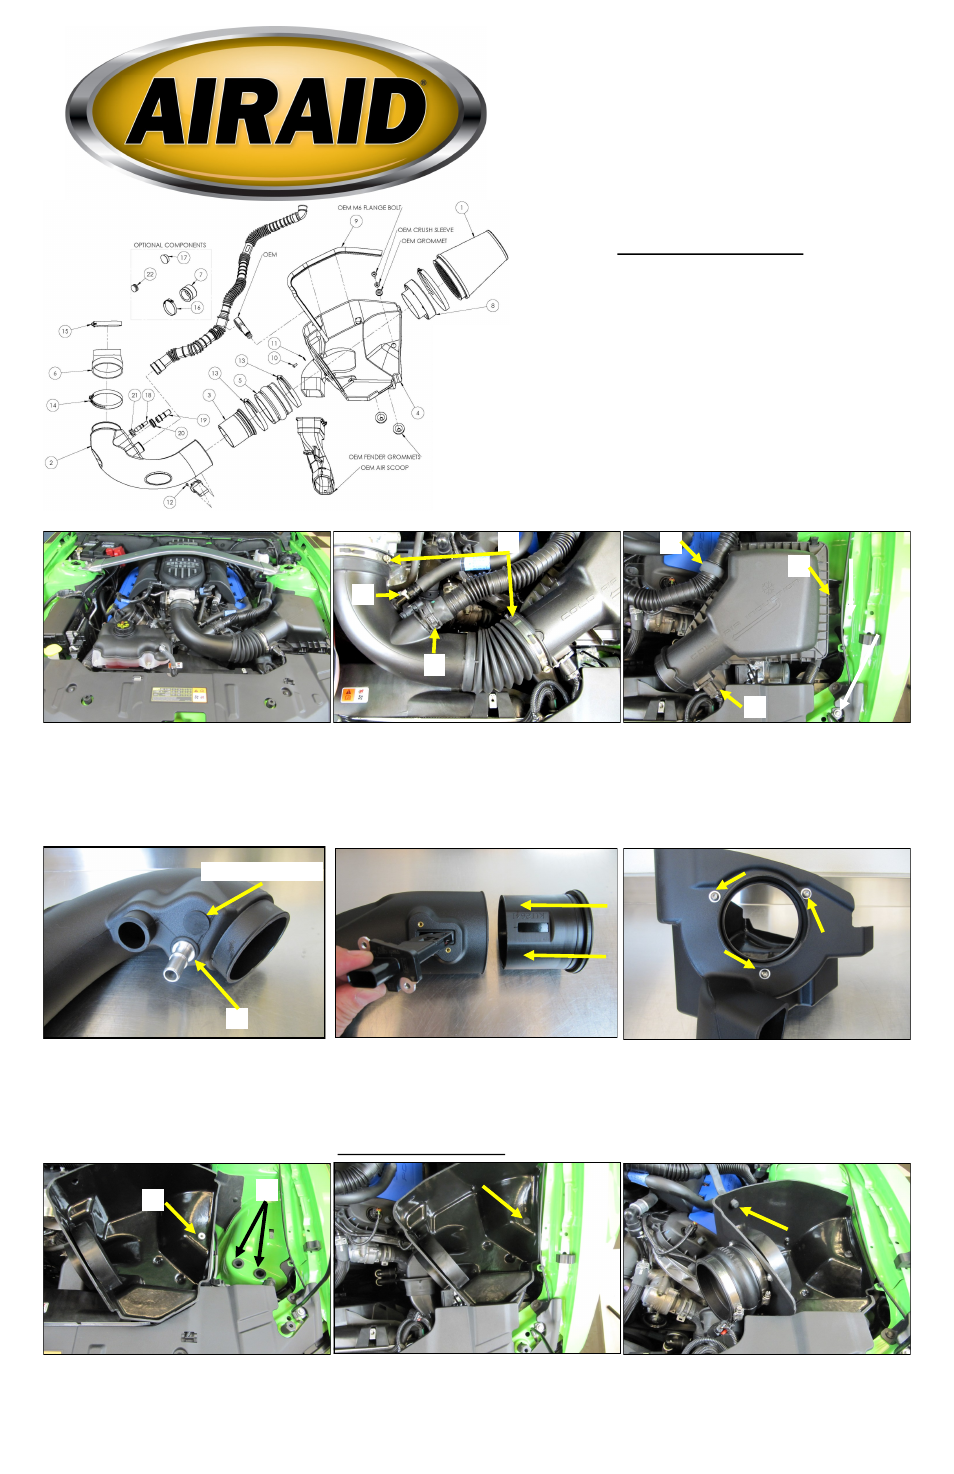
Installation instructions, Component identification
Installation Instructions
For Part Numbers:
450-321
700-461 Airaid Oiled Media Filter
451-321
701-461 SynthaMax Dry Media Filter - Red
452-321
702-461 SynthaMax Dry Media Filter - Black
453-321
703-461 SynthaMax Dry Media Filter - Blue
2012-13 Ford Boss Mustang
2011-14 Ford Mustang GT with Boss 302 manifold
M-9424-M50BR conversion
2. A) Loosen the hose clamps on the factory intake
tube B) Squeeze the clamp and disconnect the resonator
from the air intake tube. C) Carefully depress the hose
lock tabs, and disconnect the crank case breather line
and the brake aspirator line (if equipped, AT models
only). D) Remove the factory intake tube.
3. A) Slide the r ed tab, and disconnect the wir ing har -
ness from the Mass Air Flow sensor (MAF). Carefully
pry the harness anchor from the air box using a screw-
driver. B) Separate the resonator tube from the stand off
attached to the Air box lid. C) Using a 10mm socket, re-
move the bolt securing the air box to the inner fender and
remove the air box assembly. This bolt will be reused in
step 9.
4. Install the Grommets and Fittings into the Airaid intake
tube A) All models will require the use of the 5/8” Fitting
(#19) and the 5/8”Grommet (#20). B) Automatic trans-
mission equipped vehicles will also use the 3/8” Fitting
(#18) and 3/8” Grommet (#21). Manual transmission
vehicles will not need the 3/8” components and will use
the Blind Grommet(#22).
5. Using the supplied Torx driver, remove the MAF sen-
sor from the factory airbox and create the Tube assem-
bly.
A) Slide the Modular Ventur i Tube (#3) into the
Airaid intake tube (#2) making sure to align the two slots
for the MAF sensor. B) Install the MAF sensor into the
intake tube using two provided 8-32x3/8” screws (#12).
Do Not Use The Factory Screws!
6. Install the filter adapter (#8) using three 1/4-20 button
head bolts (#10), and flat washers (#11) into the Airaid
Cool Air Box as shown.
8. Install the Cool Air Box into the vehicle. Make sure
that the Air inlet mates with the factory duct, and the two
locating pins on the bottom align with the factory grom-
mets. Next reinstall the factory bolt that was removed in
step #3 through the steel sleeve and grommet and into
the inner fender.
7. Transfer the factory air box mounting grommets. A)
Locate and remove the Two Lower air box mounting
grommets, and install them in the inner fender. B) Re-
move the Upper air box mounting grommet and steel
sleeve, and re-install into the Airaid Cool Air Box
9. Install the hump hose onto the filter adapter using two
#72 hose clamps (#13) as shown. Leave the two hose
clamps loose for now. Transfer the Resonator stand off
from the factory air box into the Cool Air Box.
A
.
C
.
Component Identification
1.
Airaid Premium Filter
1
2.
Airaid Intake Tube
1
3.
Modular Venturi Tube
1
4.
Cool Air Box
1
5.
Urethane Hump Hose
1
6.
Silicone Reducer
1
7.
Urethane Cap*
1
8.
Filter Adapter
1
9.
Weather Strip 25”
1
10.
¼-20 Button Head Bolt
3
11.
¼” Flat Washer
3
12.
8-32 x 3/8” Button Head Bolt 2
1. Disconnect The Negative Battery Terminal.
Additional Installation Note: This Intake system can
also be installed on a Mustang GT 5.0L with the Boss
intake manifold conversion and contains the fitting re-
quired to connect the brake aspirator line for AT
equipped vehicles.
B
INSTALL NOTE:
If you are installing this kit on a vehicle equipped with a
Power Dome Hood with Heat Extractors
we suggest the use of our optional
AIRAID pre-filter (Part #799-469) to give an added layer of protection from the ele-
ments.
A
.
B
.
C
.
A
.
Blind Grommet
.
A
.
B
.
13.
#72 Hose Clamp
2
14.
#64 Hose Clamp
1
15.
#56 Hose Clamp
1
16.
60mm Hose Clamp
1
17.
Firewall Plug*
1
18.
3/8”Aluminum Fitting
1
19.
5/8”Aluminum Fitting
1
20.
5/8”Grommet
1
21.
3/8”Grommet
1
22.
Blind Grommet
1
23.
#20 Torx Driver
1