Airaid 510-312 User Manual
Installation instructions, Component identification
Installation Instructions
For Part Numbers:
510-312
700-462 Airaid Oiled Media Filter
511-312
701-462 SynthaMax Dry Media Filter - Red
512-312
702-462 SynthaMax Dry Media Filter - Black
513-312
703-462 SynthaMax Dry Media Filter - Blue
2012-15 Toyota Tacoma
4.0L V6
3. Separate the wiring harness from the air pump bracket
and disconnect the pump from the vehicles wiring har-
ness.
2. Compress the spring clamps on each end of the fac-
tory air pump hose and remove it from the vehicle.
4. Remove the three 6mm bolts fastening the air pump to
the inner fender and remove the air pump from the vehi-
cle.
5. Loosen the clamp on the factory intake tube and re-
move the two 8mm bolts securing the other end on the
inner fender. Slide the intake tube out from the inner
fender hole and set it aside.
6. A.) Disconnect the Mass Air Flow meter.
B.) Pry the wire harness anchor out of the airbox.
C.) Disconnect the crankcase breather line.
Loosen the clamp on the throttle body side of the factory
airbox and remove the two 6mm bolts securing it to the
motor. Remove the entire airbox assembly from the vehi-
cle.
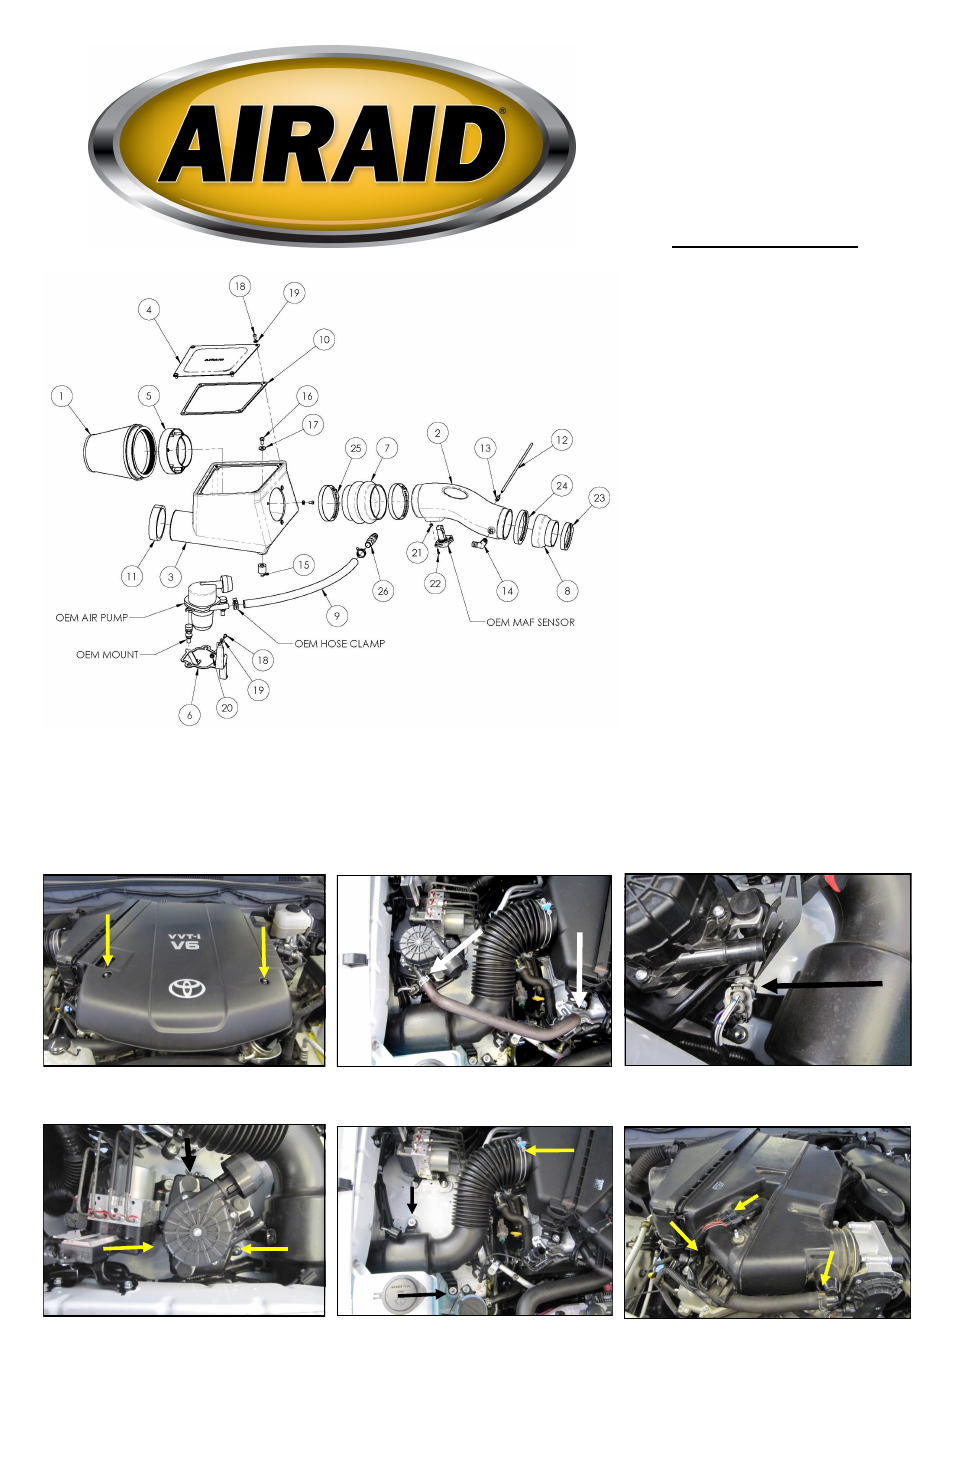
Component Identification
1.
Airaid Premium Filter
1
2.
Airaid Intake Tube
1
3.
Cold Air Box
1
4.
Air Box Lid
1
5.
Filter Adapter
1
6.
Air Pump Bracket
1
7.
Hump Hose
1
8.
Reducing Coupler
1
9.
3/4” Hose, 20”
1
10.
Airbox Gasket
1
11.
Foam Weather Strip
1
12.
1/8 x 20 1/2” Vacuum Line
1
13.
1/8 NPT Barbed Fitting
1
14.
3/8 NPT Barbed Elbow
1
15.
M8 CAB Mount
3
16.
8 mm x 1.25 x 16 Bolt
3
17.
5/16 Flat Washer
3
18.
1/4-20 x 1/2 Button Head Bolt
8
19.
1/4 Flat Washer
8
20.
1/4-20 Flange nut
1
21.
#8 spacer
2
22.
8-32 Socket Head Screw
2
23.
#48 Hose Clamp
1
24.
#64 Hose Clamp
1
25.
#68 Hose Clamp
2
26.
3/4” Barbed Fitting
1
27.
Harness extension
1
Note: This intake system is not compatible
with the factory engine cover.
Disconnect The Negative Battery Terminal.
1. Using a 10mm Socket, remove the two acorn nuts on
the top of the motor and remove the engine cover.
A.
C.
B.
Installation Note:
In addition to common hand tools, this install requires the use of a heat gun, wire crimpers, and wire strippers .
A successful install of this intake requires component relocation , AC line reconfiguration, and basic 12V wiring skills. Please read through
the instructions in their entirety and make sure all steps are clear before attempting the install. Contact Airaid @ (800) 498-6951 8:00 AM
- 5:00 PM MST weekdays for questions regarding this intake or it’s installation.
Full color instructions can be viewed on our web site at Airaid.com. Use the Product Search function to find your part number, and click View Details.