Operation, maintenance & repair, How the valve works, Using the long blanking plug – Airmar CS4500-650—Ultrasonic Speed User Manual
Page 4: Servicing the ultrasonic insert, Servicing the valve assembly
4
6. Sand and clean the area around the hole, inside and outside, to ensure
that the sealant will adhere properly to the hull. If there is any petroleum
residue inside the hull, remove it with either mild household detergent
or a weak solvent (alcohol) before sanding.
7. Proceed with “Bedding” and “Installing” on page 3.
Operation, Maintenance & Repair
How the Valve Works
The valve is not a watertight seal! The sensor incorporates a
self-closing valve which minimizes the flow of water into the
vessel when the ultrasonic insert is removed. The curved flap
valve is activated by both a spring and water pressure. Water
pushes the flap valve upward to block the opening, so there is no
gush of water into the boat. Always use the ultrasonic insert or the
long blanking plug secured with the retaining pin, safety rings, and
safety wire for a watertight seal.
Using the Long Blanking Plug
To protect the ultrasonic insert, use the long blanking plug when:
• The boat will be kept in salt water for more than a week.
• The boat will be removed from the water.
• Aquatic growth build-up is suspected due to inaccurate
readings from the instrument.
1. Inspect the o-rings on the long blanking plug (replace if
necessary) and lubricate them with the silicone lubricant supplied
or petroleum jelly (Vaseline®) (see Figure 6). The o-rings must be
intact and well lubricated to make a watertight seal.
2. Remove the ultrasonic insert from the housing by removing the
safety wire, one safety ring, and the retaining pin.
Do not remove the cap nut (see Figure 3).
3. Grasp the ultrasonic insert and pull upward slowly.
NOTE: In the unlikely event that the ultrasonic insert cannot be
removed, see “Servicing the Valve Assembly” below.
4. Slide the long blanking plug into the housing with the arrow on
the top pointing forward toward the bow. Seat it into place with a
pushing twisting motion until the key fits into the notch (see
Figure 6). Secure it with the retaining pin and safety rings.
5. Reattach the safety wire to prevent the insert from backing out
in the unlikely event that the cap nut fails or is screwed on
incorrectly (see Figure 3).
Servicing the Ultrasonic Insert
CAUTION: The active face of the ultrasonic insert is fragile thus
easily damaged. Do not scratch, gouge, or sand it with coarse
sandpaper.
Aquatic growth will seriously affect the ultrasonic insert’s performance.
Clean the active face with a dull putty knife being careful to avoid
scratching the surface (see Figure 6). If fouling is severe, lightly wet
sand the surface with fine grade (#320) wet/dry paper.
O-rings must be free of abrasions and cuts to ensure a watertight
seal. Install three small o-rings on the ultrasonic insert (see Figure 6).
Place the remaining three small o-rings on the long blanking plug.
Servicing the Valve Assembly
Should the valve fail, remove it for servicing. A replacement
o-ring and Valve Kit 33-415 is available.
WARNING: If the insert is caught in the valve assembly trapping
the cap nut, TEMPORARILY hold the SHORT emergency plug in
place with the safety wire. Immediately, separate the insert from
the valve assembly. If they cannot be separated and the sensor
must be left unattended, cut the cable [a minimum of 1m (3') from
the insert] to free the cap nut. Later, splice the cable using
Airmar’s Junction Box 33-035.
1. Remove the short emergency plug from the safety wire (see
Figure 3).
2. Inspect (replace if necessary) and lubricate the o-rings with
silicone lubricant or petroleum jelly (Vaseline
®
). The o-rings
must be intact and well lubricated to make a watertight seal.
3. Unscrew the cap nut. With the short emergency plug ready in
one hand, remove the ultrasonic insert and valve assembly as
one unit. Rapidly insert the short emergency plug to minimize
the flow of water into the boat.
NOTE: The short plug is not secure until the cap nut is in place
4. To free the cap nut, remove the ultrasonic insert from the valve
assembly by removing one safety ring and the retaining pin.
Grasp the ultrasonic insert and pull upward slowly.
5. Secure the short emergency plug with the cap nut. Hand-
tighten only. Do not over tighten. Reattach the safety wire.
6. Clean, repair, or replace the valve assembly, so the flap valve
moves freely and seats against the valve housing (see Figure 6).
7. To reinstall the valve assembly and ultrasonic insert, inspect
(replace if necessary) and lubricate the o-rings with silicone
lubricant or petroleum jelly (Vaseline
®
). The o-rings must be
intact and well lubricated to make a watertight seal.
8. Remove the safety wire and cap nut from the short emergency
plug. With the valve assembly ready in one hand, remove the
emergency plug. Rapidly slide the valve assembly into the
housing being sure to engage the key in the notch. Screw the
cap nut in place and hand-tighten only. Do not over tighten.
9. Reinstall the ultrasonic insert and secure it with the retaining pin
and safety rings. Attach the safety wire to the short emergency
plug, the cap nut, and the safety ring (see Figure 3).
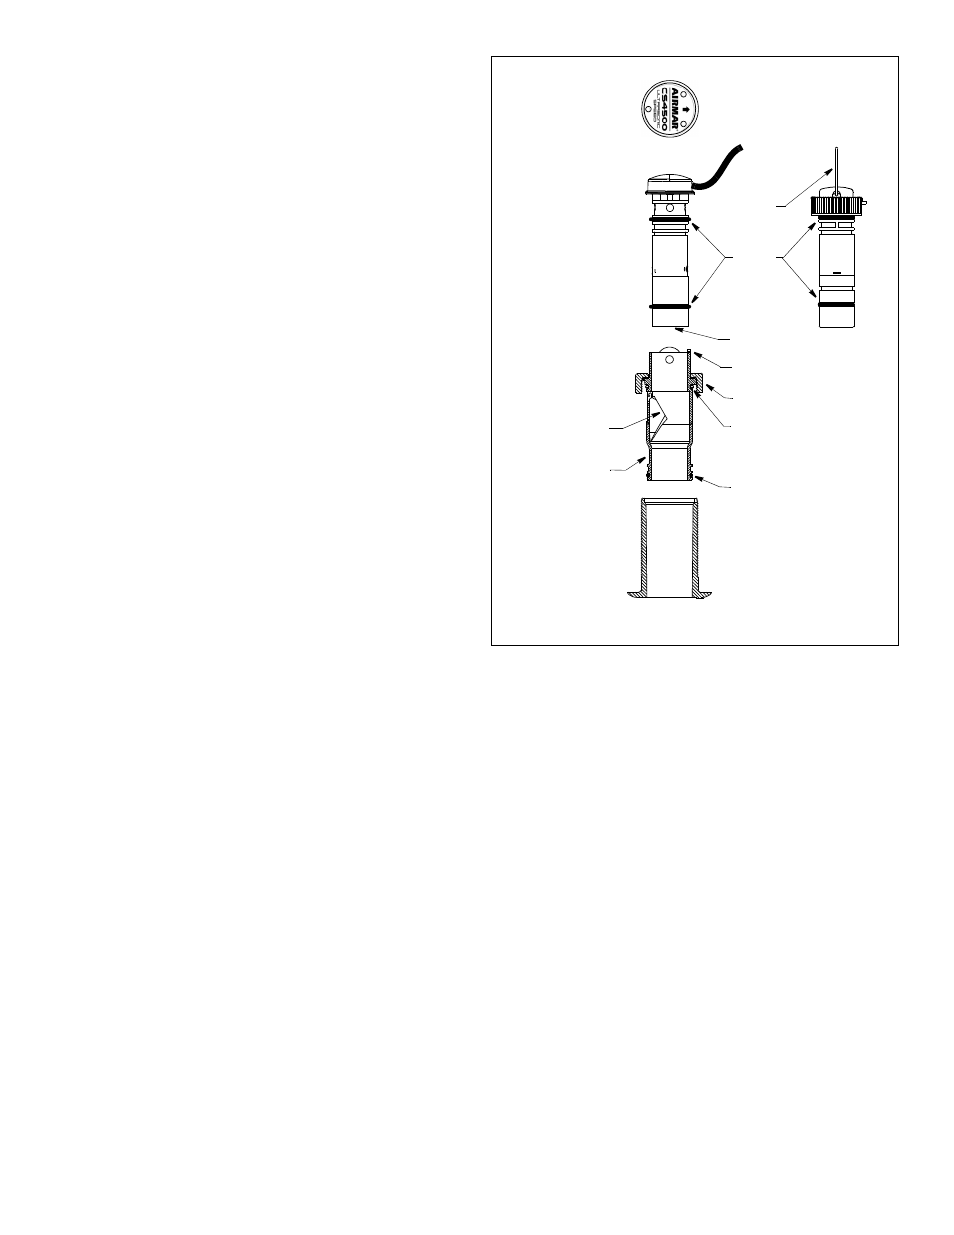
Figure 6. Servicing
ultrasonic
top view of
small
valve
housing
medium
valve
housing
flap
insert
ultrasonic
pull ring
cap nut
valve
key (2)
o-rings
o-ring
large
o-ring
assembly
blanking
plug
BOW
►
insert
active face
long
Copyright © 2002 - 2011 Airmar Technology Corp.