Airmar, Using the blanking plug, Winterizing – Airmar ST800—Retractable with Valve User Manual
Page 4: Servicing the paddlewheel insert, Servicing the valve assembly, Replacement sensor & parts
4
Copyright © 2004 - 2011 Airmar Technology Corp. All rights reserved.
Using the Blanking Plug
To protect the insert, use the blanking plug:
• When the boat will be kept in salt water for more than a week.
• When the boat will be removed from the water.
• When aquatic growth buildup is suspected due to inaccurate
readings from the instrument.
1. On the blanking plug, inspect the O-rings (replace if necessary) and
lubricate them with the silicone lubricant supplied or petroleum jelly
(Vaseline
®
) (see Figure 4). The O-rings must be intact and well
lubricated to make a watertight seal.
2. Remove the paddlewheel insert from the housing by removing the
safety wire and unscrewing the cap nut (see Figure 2). This will jack out
the insert.
3. Slide the blanking plug into the housing. Screw the cap nut several
turns until the threads are engaged. Rotate the blanking plug until the
key fits into the notch in the housing. Continue to tighten the cap nut.
Hand tighten only. Do not over tighten.
4. Reattach the safety wire to prevent the paddlewheel insert from backing
out in the unlikely event that the cap nut fails or is screwed on
incorrectly.
Winterizing
After the boat has been hauled for winter storage, remove the blanking
plug to let the water drain away before reinserting it. This will prevent any
water from freezing around the blanking plug and possibly cracking it.
Servicing the Paddlewheel Insert
Aquatic growth can impede or freeze the paddlewheel’s rotation and must
be removed. Clean the surface using a Scotch-Brite
®
scour pad and mild
household detergent. If fouling is severe, push out the paddlewheel shaft
using a spare shaft or a 4D finish nail with a flattened point. Then, lightly
wet sand the surface with fine grade wet/dry paper.
The water lubricated paddlewheel bearings have a life of up to 5 years on
low-speed boats [less than 10kn (11 MPH)] and 1 year on high-speed
vessels. Paddlewheels can fracture and shafts can bend due to impact
with water borne objects and mishandling in boat yards. O-rings must be
free of abrasions and cuts to ensure a watertight seal. Order a
replacement Paddlewheel, Shaft & O-ring Kit No. 33-499-01.
1. Using the new paddlewheel shaft, push the old shaft out about 6mm
(1/4"). With pliers, remove the old shaft (see Figure 4).
2. Place the new paddlewheel in the cavity with the flat side of the blade
facing the same direction as the arrow on the insert top.
3. Tap the new shaft into place until the ends are flush with the insert.
4. Install a large O-ring near the top and a small O-ring near the
paddlewheel.
5. Place the two remaining O-rings in similar positions on the blanking plug.
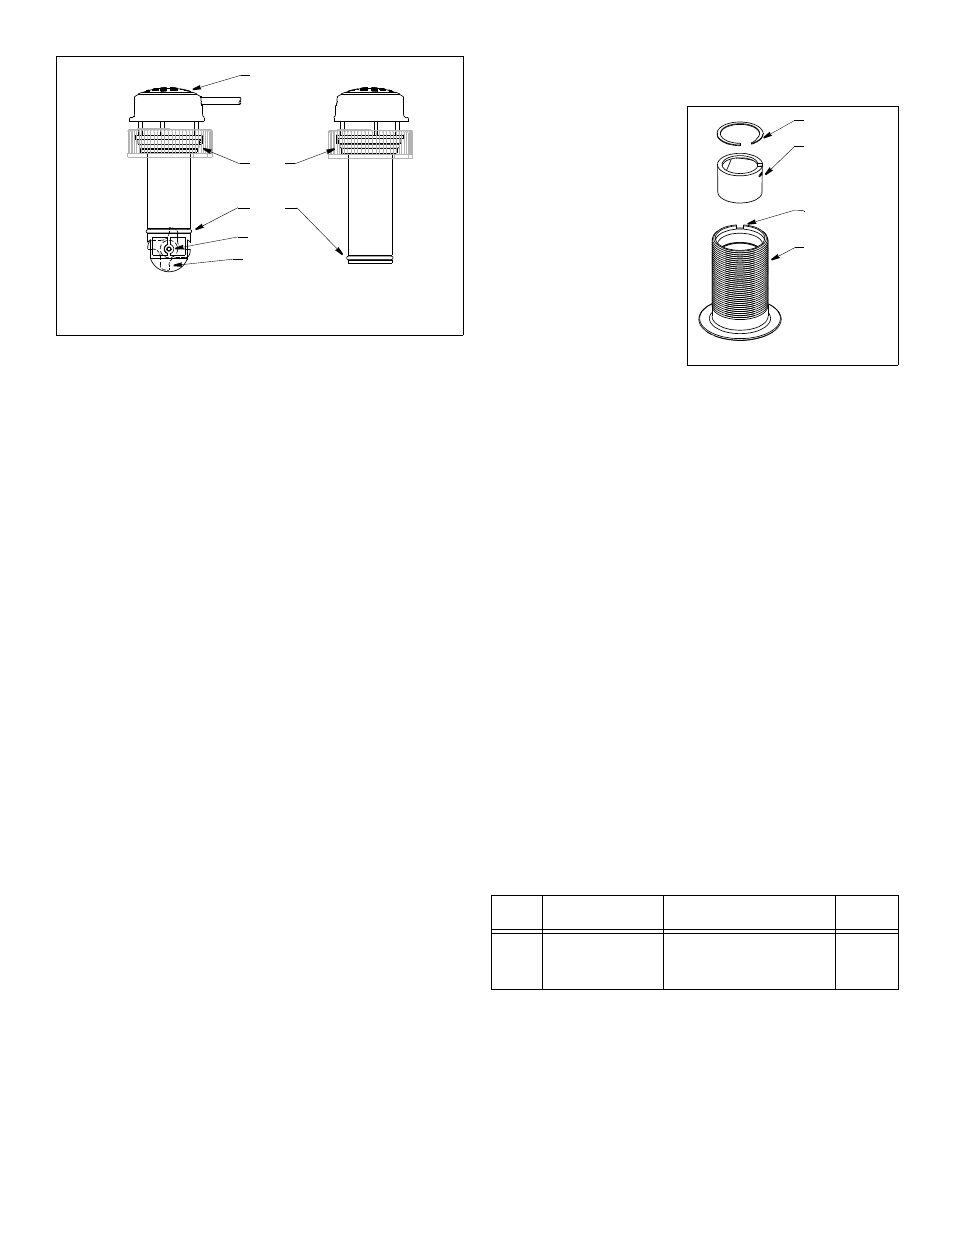
Servicing the Valve Assembly
Should the valve fail, remove it for servicing.
1. On the blanking plug, inspect
the O-rings (replace if
necessary) and lubricate them
with silicone lubricant or
petroleum jelly (Vaseline
®
).
The O-rings must be intact and
well lubricated to make a
watertight seal.
2. Remove the snap ring from
the valve assembly using a
screw-driver to pry the end of
the ring free. Lift the ring out
(see Figure 5).
3. Slide the valve assembly
upward and out of the housing
slowly.
NOTE: The flap valve retainer
pin is a loose slip-fit and may
slide out when the assembly
is removed.
4. Insert the blanking plug into the housing. Screw the cap nut several
turns until the threads are engaged. Rotate the blanking plug until the
key fits into the notch in the housing. Continue to tighten the cap nut.
Hand tighten only. Do not over tighten. Reattach the safety wire (see
Figure 2).
5. Clean, repair, or replace the valve assembly so the flap valve moves
freely and seats against the valve housing.
6. To reinstall the valve assembly, first reassemble the flap valve in the
valve housing with the retainer pin and spring in place (see Figure 5).
7. Remove the blanking plug. Slide the valve assembly into the housing
with the flap valve pointing downward. Insert the snap ring being certain
that it LOCKS INTO THE GROOVE in the housing wall.
8. Slide the paddlewheel insert (or the blanking plug) into the housing with
the arrow on the top pointing forward toward the bow. Screw the cap
nut several turns until the threads are engaged. Rotate the insert/plug
until the key engages the notch in the housing. Be sure the arrow on the
top is facing forward toward the bow. Continue to tighten the cap nut.
Hand tighten only. Do not over tighten.
9. Reattach the safety wire to prevent the paddlewheel insert from backing
out in the unlikely event that the cap nut fails or is screwed on
incorrectly (see Figure 2).
Replacement Sensor & Parts
The information needed to order a replacement sensor is printed on the
cable tag. Do not remove this tag. When ordering, specify the part number
and date. For convenient reference, record this information on the top of
page one.
Lost, broken, and worn parts should be replace immediately. If you have
purchased a plastic housing and have a wood hull or desire greater
strength, purchase an Airmar metal housing. If you have purchased a low
profile housing and prefer a flush housing, see below.
Paddlewheel, Shaft & O-ring Kit
33-499-01
Obtain parts from your instrument manufacturer or marine dealer.
Gemeco (USA)
Tel:
803.693.0777
Fax:
803.693.0477
email:
Airmar EMEA
Tel:
+33.(0)2.23.52.06.48
(Europe, Middle East, Africa) Fax:
+33.(0)2.23.52.06.49
email:
Blanking
Plug
Hull Nut
or Isolation Bushing
Housing, Hull Nut & Washer
Paddlewheel
& Valve Kit
33-481-01
04-004 plastic
02-030 bronze
02-530-02 stainless steel
04-186-1 isolation bushing
33-340-02 plastic, low profile, P120
33-340-01 bronze, low profile, B120
33-451-01 stainless steel, low profile,
SS520
33-493-01
Figure 4. Replacing the paddlewheel and O-rings
arrow
flat side
of blade
shaft
faces bow
large
O-ring
small
O-ring
Copyright © 2006 Airmar Technology Corp.
paddlewheel
insert
blanking
plug
snap ring
valve assembly
flap valve
spring
retainer pin
housing
notch
Figure 5. Servicing
the valve assembly
Copyright © 2006 Airmar Technology Corp.
AIRMAR
®
TECHNOLOGY CORPORATION
www.airmar.com
BOW ►