Allstar Performance ALL10422-25 User Manual
Aluminum pit jack, Owners manual, Page 1 of 4
Allstar Performance 8300 Lane Dr., Watervliet, MI 49098
Phone: (269) 463-8000 Fax: (800) 772-2618 www.allstarperformance.com
Form 1070
Rev. 032609
Aluminum Pit Jack
OWNERS MANUAL
Page 1 of 4
BEFORE OPERATION
It is the owner and/or operator's responsibility to completely read and understand these instructions and warnings before operat-
ing the jack.
ASSEMBLY INSTRUCTIONS
1. Jack handle is shipped in two pieces. Locate the lower section of the handle and place into the handle socket of jack assembly
shown in Figure #2. Ensure the knurled handle base screw retainer bolt is unthreaded allowing handle to drop into position.
Once handle is fully seated, tighten the knurled handle base screw retainer bolt. Note: Handle should turn freely and should
not come out of handle base.
2. Place the upper section of handle into the lower section aligning the detent ball with hole in the lower section of the handle.
Once the upper handle piece is seated into the lower handle piece, the detent ball should lock both pieces together.
WARNING
1. Jack is designed for lifting vehicles only and is not intended for any other purpose.
2. Consult vehicle owner’s manual prior to jacking up of a vehicle.
3. Use jack on solid, level ground. Ensure front wheels of the vehicle being raised are in a parallel position.
4. No person should remain in vehicle that is being jacked up.
5. When lifting a vehicle, be sure to place the center of the jack saddle directly under the axle or frame.
6. After lifting vehicle, place jack stands under the axles and or frame rails.
7. No person should be under a vehicle that is supported by jack only.
8. Never move the jack while it is supporting a vehicle.
9. When lowering a vehicle, make sure nobody is near or under the vehicle. Slowly lower vehicle with careful
attention to the position of jack saddle.
10. The safety valve is factory adjusted and no further adjustment is required.
11. While not in use, always store with handle in an upright position.
OPERATING INSTRUCTIONS
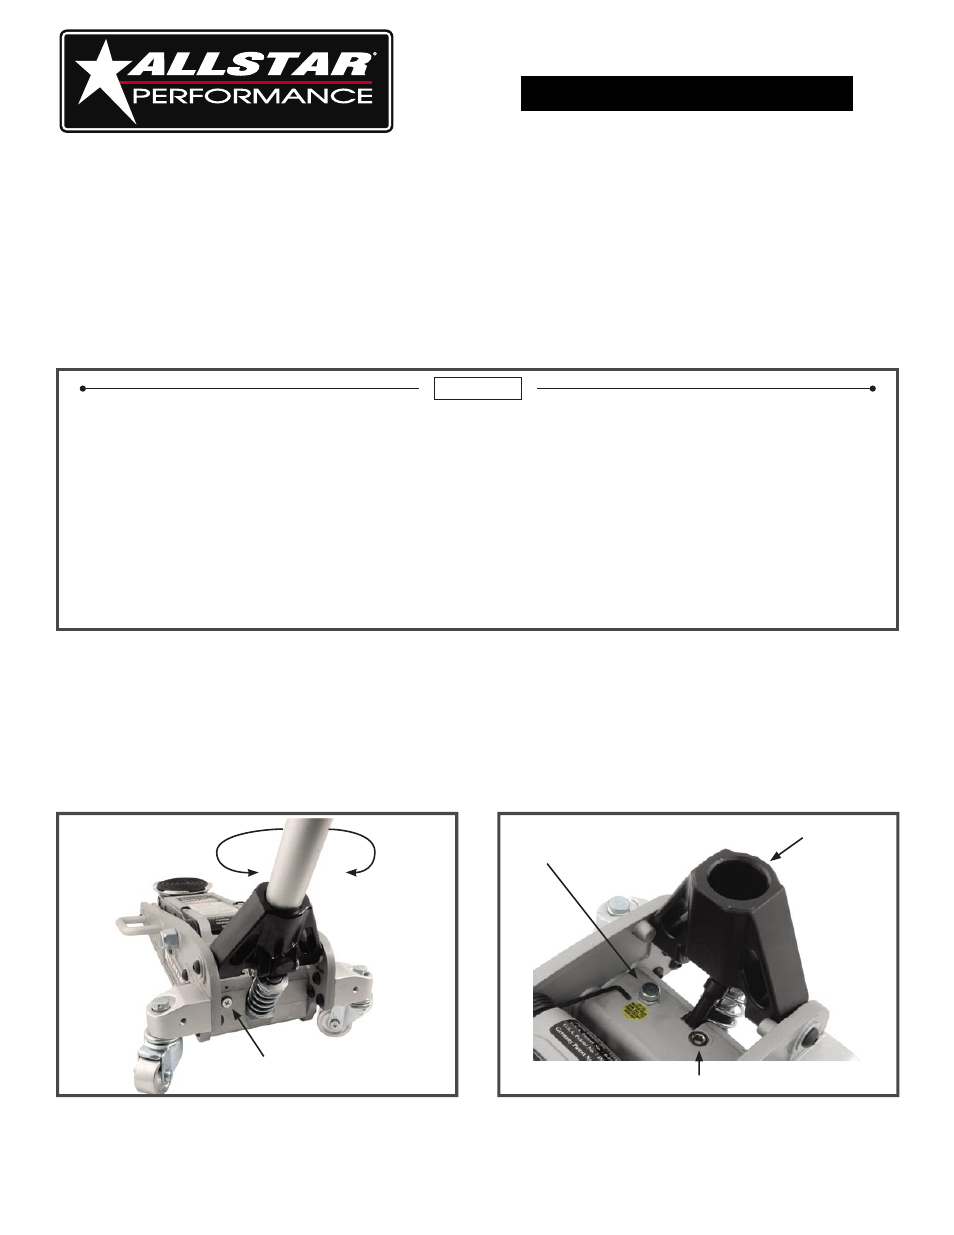
1. To release air trapped in hydraulic system some jacks have a bleed valve located in the top of the base as shown in Figure #2.
Opening the bleed valve will release trapped air.
2. Opening the release valve by turning handle counter-clockwise and slowly pumping 10-15 full strokes should remove any
excess trapped air. If additional bleeding or filling is required, reference the Filling and Bleeding Section on page 2.
3. Close release valve by turning handle clock-wise until seated. Use caution when tightening handle, over tightening handle
will damage release valve.
4. Jack is now ready to lift.
5. To lower jack, open release valve by turning handle counter-clockwise.
To Raise Jack:
Close Relief Valve
To Lower Jack:
Open Relief Valve
Figure #1
Open
Close
Oil Fill Plug
Figure #2
Air Bleed Valve
(Some Models)
Handle Socket
8mm Plug