Grass Valley K2 Solo 3G Media Server Quick Start v9.0 Dec.20 2012 User Manual
Configure channels, Record and play, K2 solo 3g media server quick start guide
Continue with Quick Start procedures on the reverse side.
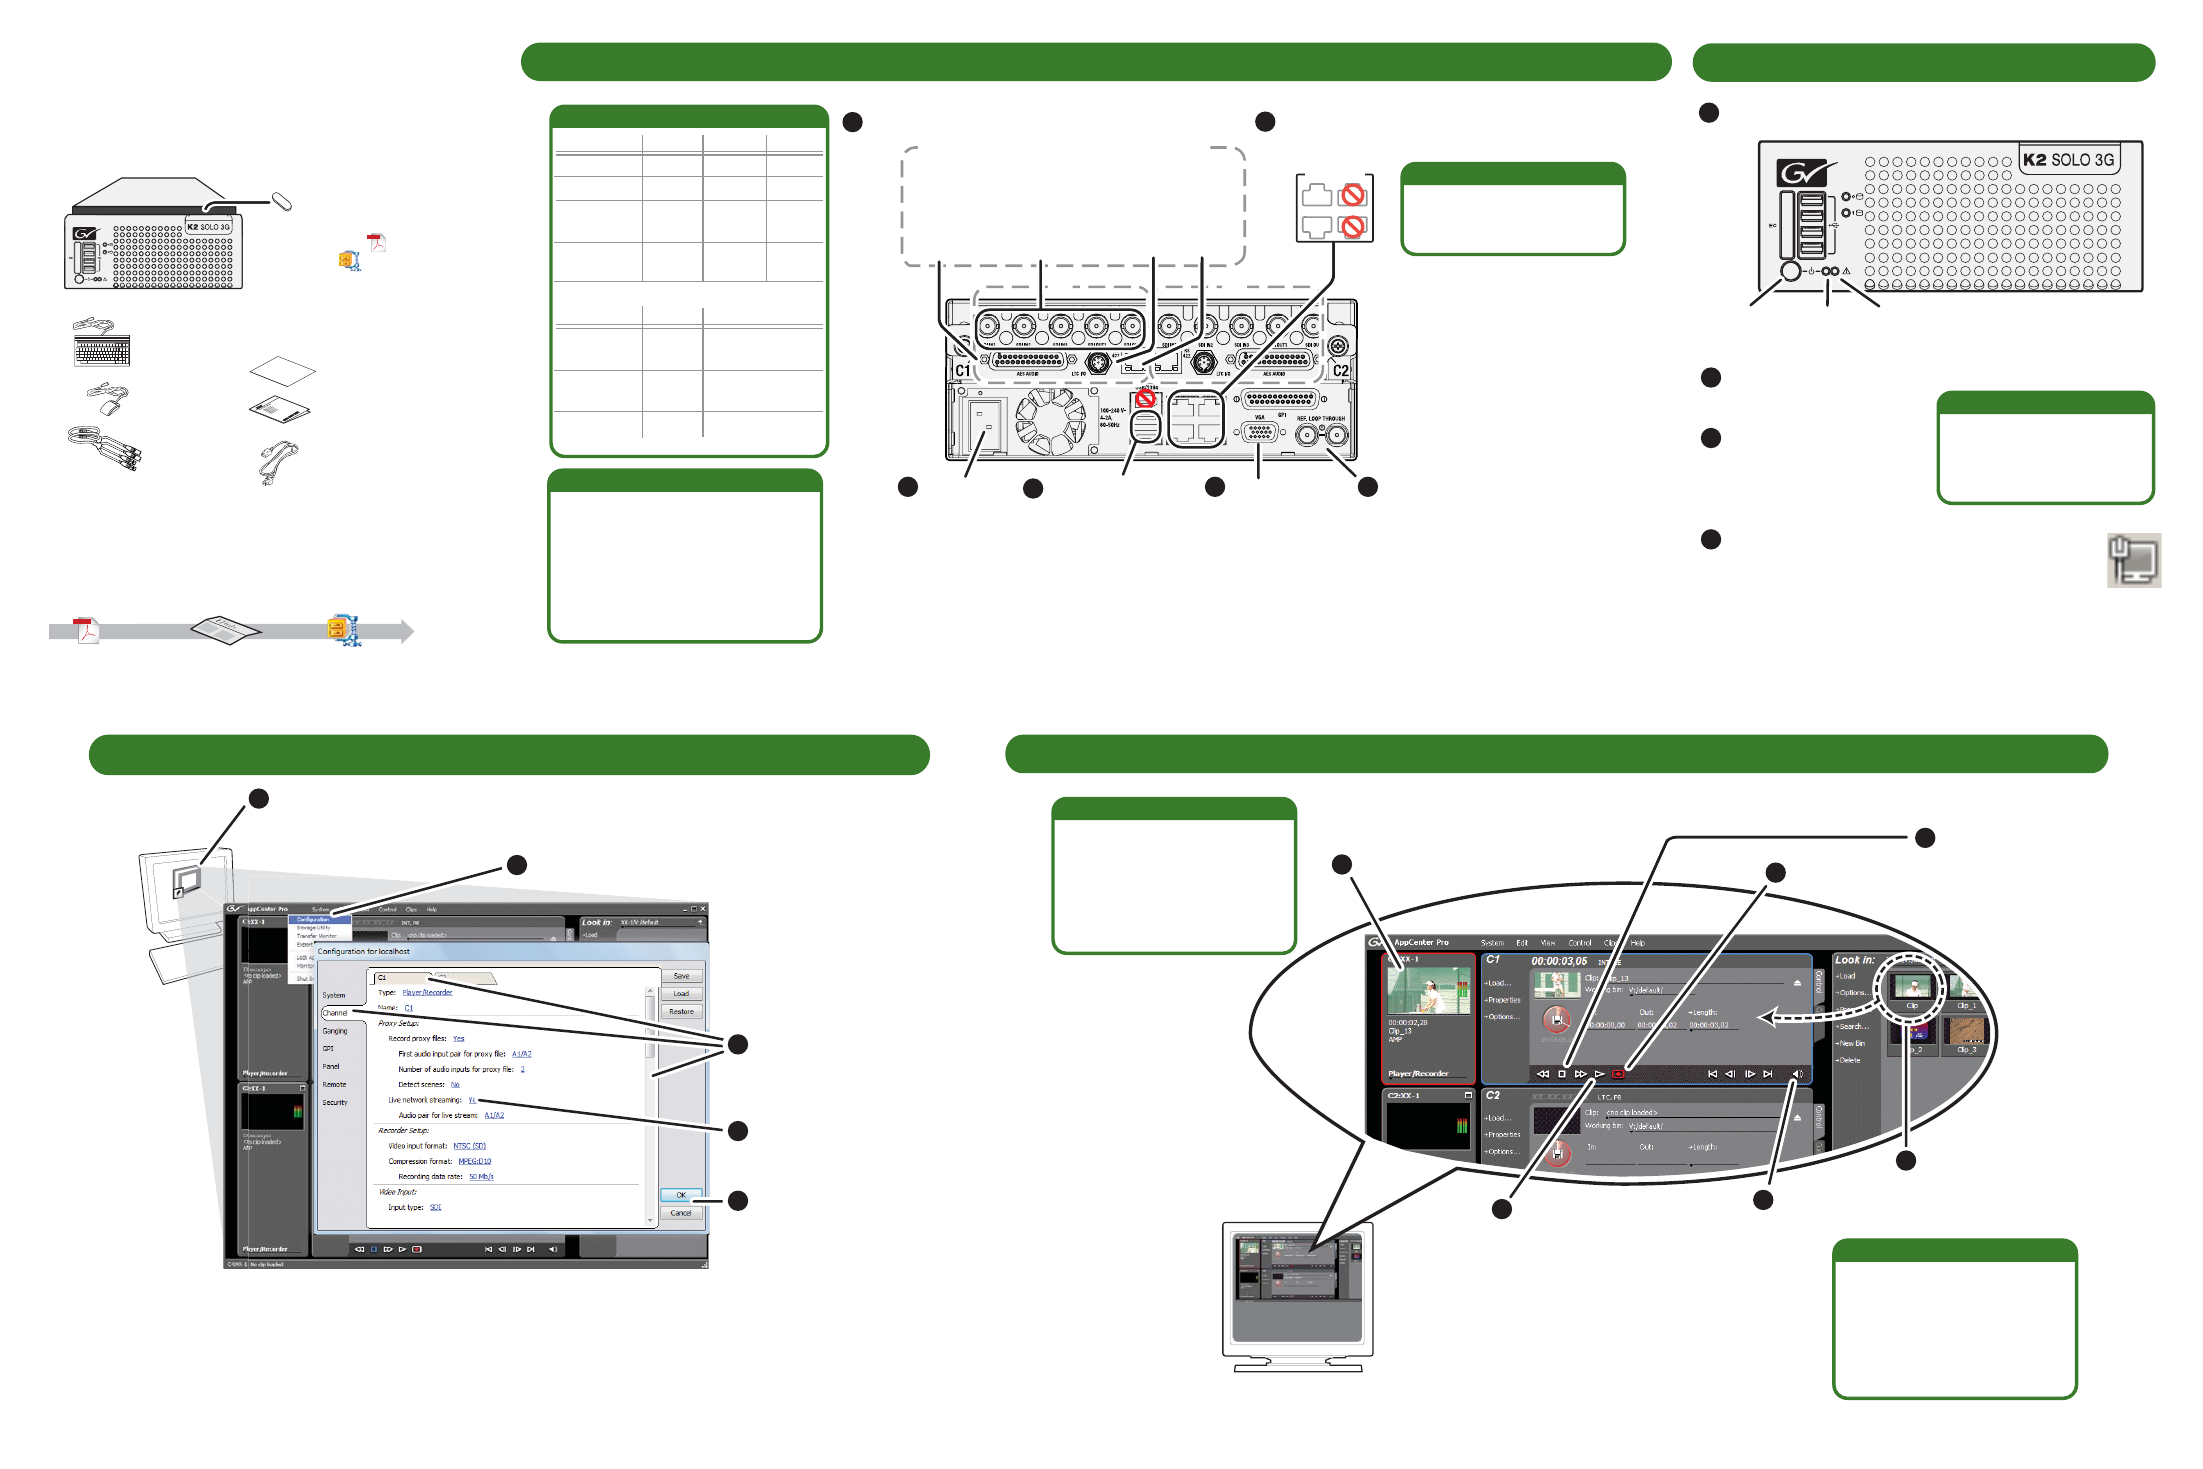
3. Configure channels
AppCenter
A
ppCenter
er
Open AppCenter and logon with the administrator account
(User Name=Administrator/Password=adminGV!). If a
licensing message appears, refer to
K2 Release Notes
.
Click tabs,
buttons, and
scroll bar to
locate settings.
Select from
drop-down lists
to make settings.
Click
OK
and
Yes
to save
settings.
C
b
sc
lo
S
d
to
C
Y
se
Click
System | Configuration
.
1
2
3
4
5
4. Record and play
1
Select a channel
6
Play the clip
5
Adjust audio level
as needed
3
Stop record
4
Drag a clip into the
channel
2
Begin record
A channel becomes an input
channel when you begin
recording. The same channel
becomes an output channel
when you load a clip for
playout.
Bi-directional channels
On the AppCenter menu, click
Control | Options
. On the
Options dialog box click
Timecode
and select the
timecode for recording and
display.
Timecode for Record
K2 Solo 3G
Media Server
Quick Start Guide
Before you begin, unpack the following items.
071-8872-00
October 15, 2012
Locate the documentation you need on the
Recovery Flash Drive or download from
http://www.grassvalley.com/dl/k2_summit
us
s
s
us
s
s
us
s
s
us
s
s
us
s
s
us
s
s
K2 Solo Media Server
Power cord
LTC cables
Accessories Instructions
Licenses and
Warranties
us
s
s
us
s
s
us
s
s
us
s
s
us
s
s
us
s
s
rass
all
roup
rass
all
roup
rass
all
roup
rass
all
roup
Keyboard
Mouse
NOTE: Do not lose the Recovery Flash
Drive. It contains the image for this
specific K2 Solo Media Server.
Recovery Flash Drive contains:
-K2 Release Notes
-K2 Doc Set
-Software and images.
Adobe
Release
Notes
Documentation path to install
K2 Solo Media Server
System
Guide
Quick Start
Guide
Adobe
1. Make cable connections
Connect
power
cord
Each channel (C1, C2) can be
an input (record channel) or an
output (play channel). Connect
video/audio IN and OUT to each
channel, as appropriate for your
intended use.
Standard bi-directional channels
Connect keyboard
and mouse
Connect VGA
monitor
Make SDI connections on each channel
1
1
1
5
1
4
If desired,
connect reference
1
3
1
6
Connections per channel (C1, C2, etc)
C1
C2
SDI video in
and out.
Supports
embedded
audio.
LTC
I/O
RS-422
AES
audio
1
2
GigE Ports
-Port 1 - Control network
-Port 2 - FTP/Streaming
-Ports 3 & 4 - Not used
Ethernet cabling
3
4
1
2
Connect network cables
to Ethernet ports
Some SDI connections
require special licensing
and configuration. Refer to
the
K2 AppCenter User
Manual
.
*
Make other connections as
needed. Refer to the
K2
System Guide
for complete
instructions.
SDI connections
Standard
Multi-Cam*
3D/Video +
Key record*
Super
Slo-Mo*
Active
Video1 Video2
Video Key
(L eye) (R eye)
Phase1 Phase2 Phase3
Standard
Active Active
Duplicates
OUT1
3D/Video +
Key play*
Super Out*
Video Key
(L eye) (R eye)
Active Super Out info
IN1 IN2 IN3
OUT1 OUT2
2. Start up
Press the standby switch
to power on.
Identify the following:
Service
LED
Standby
switch
Power
LED
Power LED goes on and
stays on. Service LED
stays off.
Normal startup sequence
3
1
2
Log on with the default
Windows admin account:
-Username: Administrator
-Password: adminGV!
3
3
On the Windows desktop, check the system
tray. When the network icon indicates connectivity,
the K2 Solo Media Server is operational.
3
4