Grass Valley K2 Summit Client Quick Start Nov.23 2009 User Manual
K2 summit production client quick start guide, Configure channels, Disable write filter
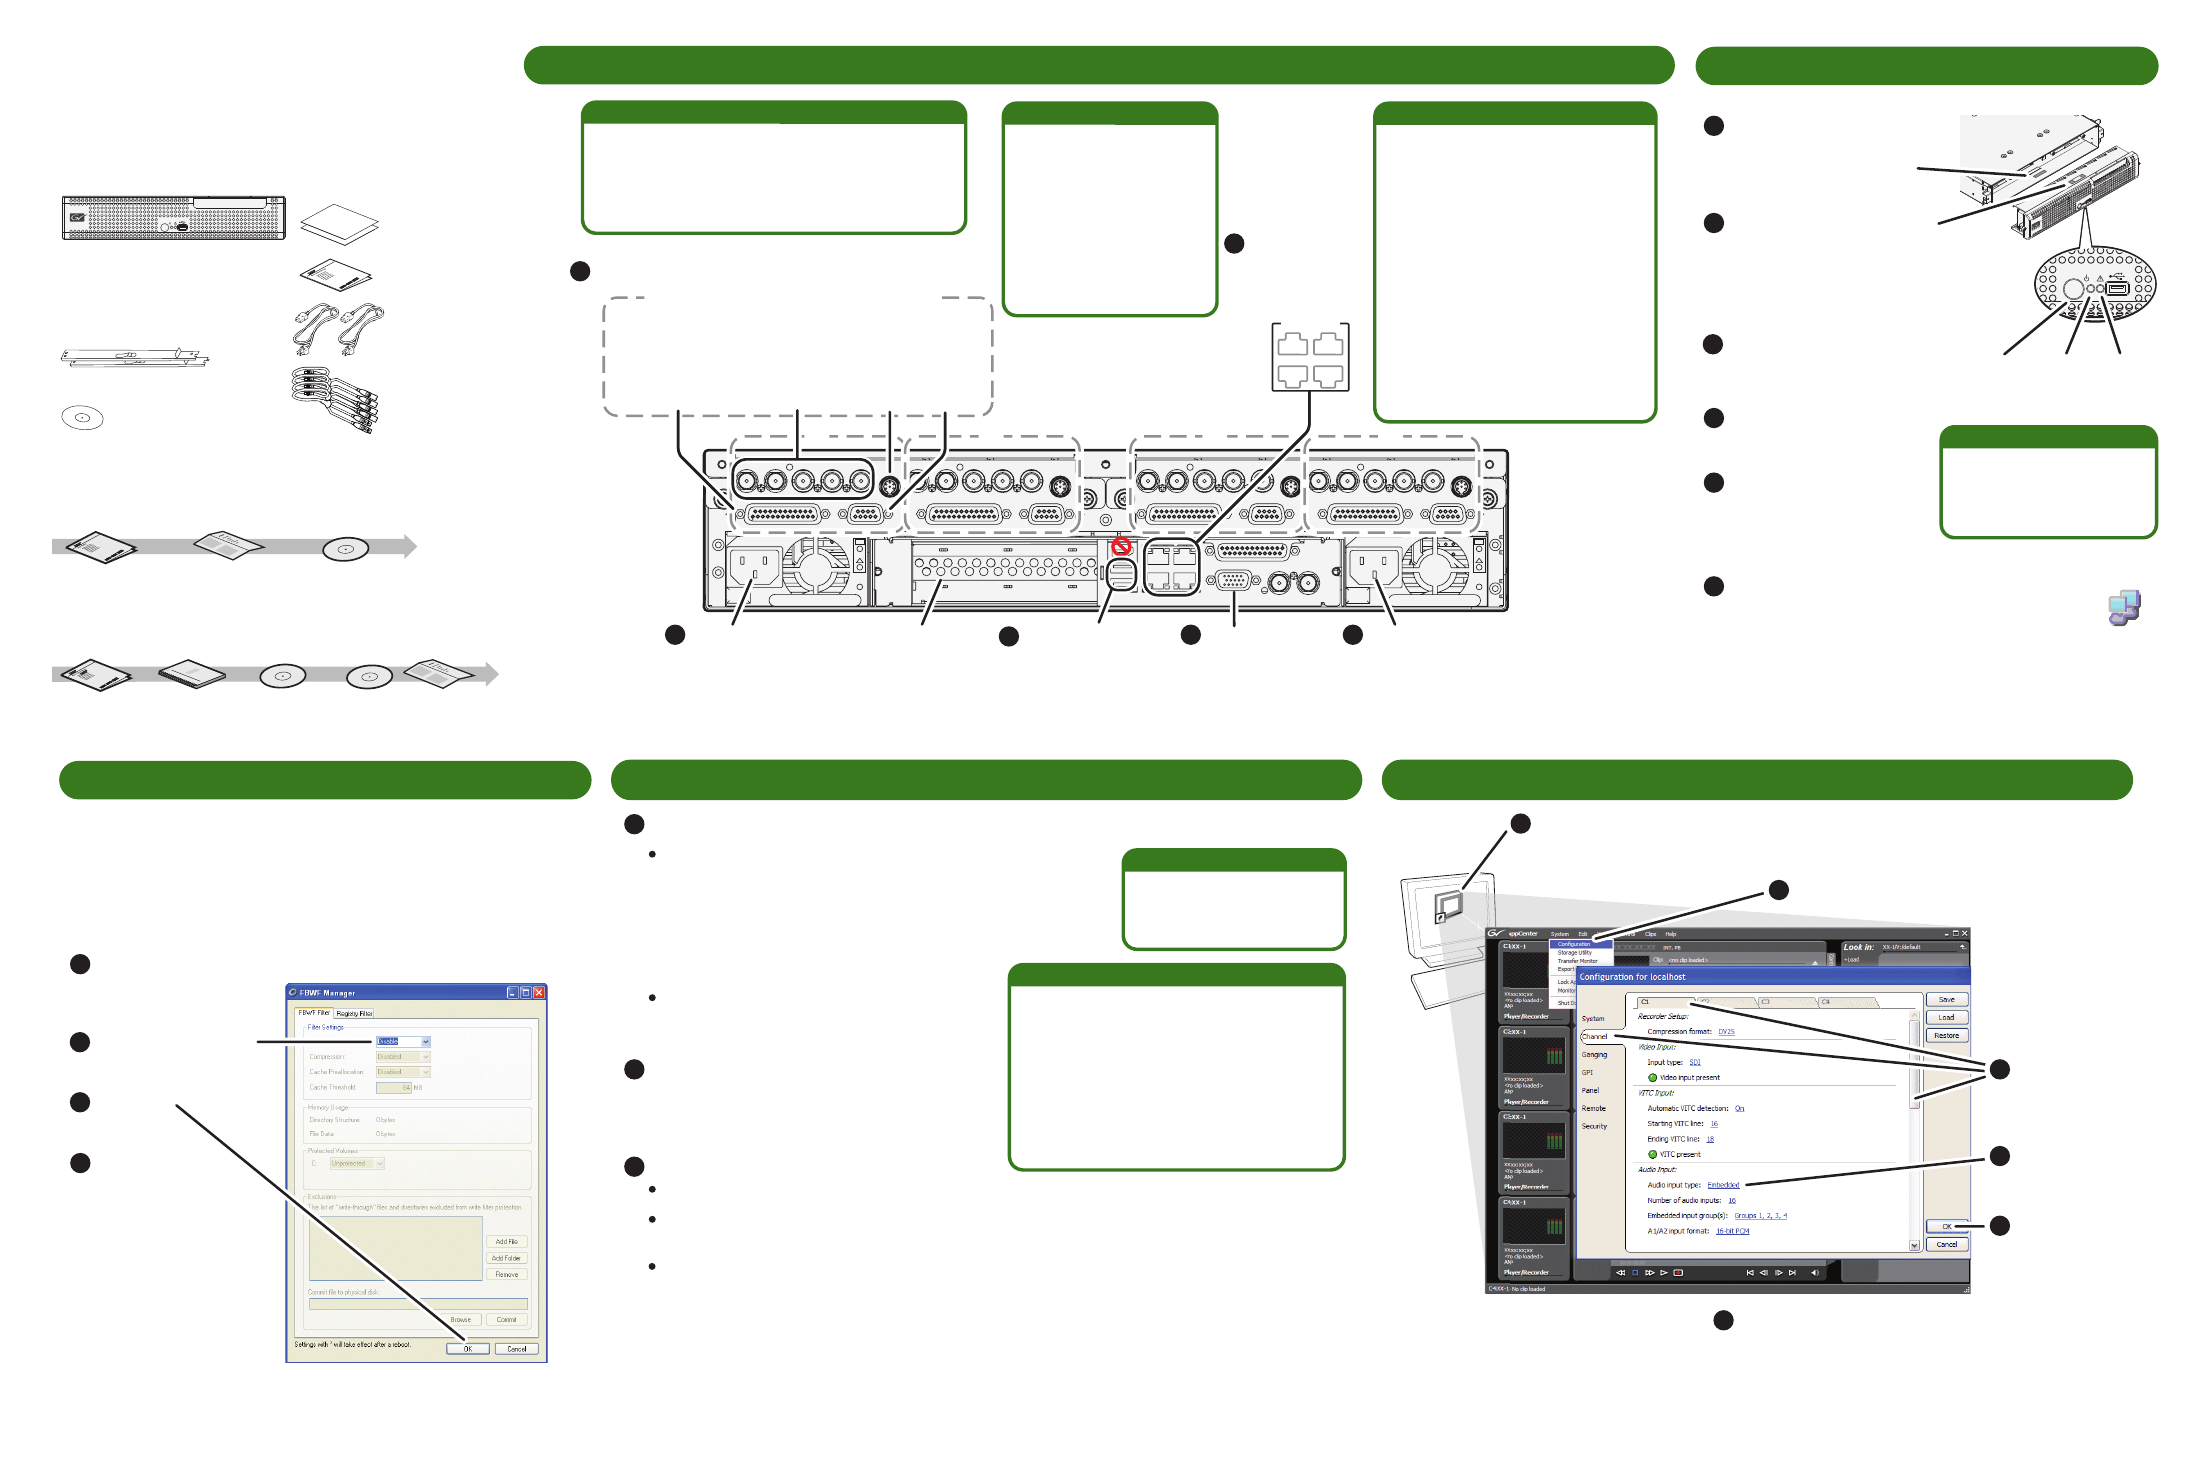
Connections per channel (C1, C2, etc)
K2 Summit
Production Client
Quick Start Guide
Before you begin, unpack the following items...
071-8722-00
October 27, 2009
...and locate the documentation you need.
C1
C2 C3
C4
!
OK
~AC
!
OK
~AC
SDI IN1
SDI OUT1
SDI OUT2
LTC I/O
AES AUDIO
RS422
SDI OUT1
SDI OUT2
USB/1394
100BT/1000BT
GPI
VGA
REF. LOOP THROUGH
AES AUDIO
RS422
LTC I/O
SDI IN2
SDI IN3
SDI IN1
SDI IN2
SDI IN3
SDI IN1
SDI OUT1
SDI OUT2
LTC I/O
AES AUDIO
RS422
SDI OUT1
SDI OUT2
AES AUDIO
RS422
LTC I/O
SDI IN2
SDI IN3
SDI IN1
SDI IN2
SDI IN3
1. Make cable connections
2. Start up
4. Configure network and, if necessary, storage
Connect
power
cord
Optional Fibre Channel card
for connection to standalone
direct-connect storage or
shared Fibre Channel storage.
Connect
power
cord
Each channel (C1, C2, etc.) can be an input
(record channel) or an output (play channel).
Connect video/audio IN and OUT to each
channel, as appropriate for your intended use.
Bi-directional channels
SDI connections
Press the standby switch
to power on.
Replace the bezel/fan
and identify the following:
Service
LED
Standby
switch
Power
LED
Power LED goes on and
stays on. Service LED
stays off.
Normal startup sequence
Continue with Quick Start procedures on the reverse side.
Make other
connections as
needed. Refer to the
K2 System Guide for
complete
instructions.
Use SiteConfig as appropriate for your K2 system and on-site networking.
Before power on, take
note of the chassis serial
number, located behind
the bezel/fan.
Locate the Recovery Flash
Drive, which is labeled with
this unit’s serial number.
Make sure it remains stored
with this specific unit.
Connect keyboard
and mouse
Connect VGA
monitor
Stand-alone internal or direct-connect storage – Install
SiteConfig on a control point PC, discover the K2 Summit
Production Client, and configure network interfaces.
- Configure Control Team for the control network.
- If desired, configure Media Connection #1 for the
FTP/Streaming network.
Refer to K2 Release Notes for instructions.
Shared storage – Configure network
interfaces as instructed in the K2 SAN
Installation and Service Manual.
Internal storage – No storage configuration is necessary. Storage is pre-configured.
Direct-connect storage – Use Storage Utility to Bind RAID disks and make file system.
Refer to the K2 System Guide.
Shared storage – Use the K2 System Configuration application to add the K2 Summit
Production Client to the K2 SAN and configure it on the SAN. Refer to the K2 SAN
Installation and Service Manual.
2
3
3
4
1
2
Log on with the default
Windows admin account:
-Username: Administrator
-Password: adminK2
3
5
On the Windows desktop, check the system
tray. When the network icon indicates connectivity,
the K2 Summit Production Client is operational.
3
6
3
2
3
1
Configure storage as follows:
Click Start | All Programs | Grass Valley | Write Filter Utility.
FBWF Manager opens.
1
Set Filter to Disable.
2
Click OK.
3
When prompted,
restart the K2
Summit Production
Client.
4
3
3
5. Configure channels
C1
C2
C3
C4
SDI video in
and out.
Supports
embedded
audio.
LTC
I/O
RS-422
AES audio
Make connections as desired on each channel
1
1
1
2
1
3
1
4
1
5
1
5
Connect
network cables
to Ethernet
ports
1
3
2
4
GigE Ports
-Port 1 - Control network
-Port 2 - Media (iSCSI) network
-Port 1 - Control network
-Port 2 - FTP/Streaming
-Ports 3 & 4 - Not used
Internal or direct-connect storage:
Shared iSCSI storage basic:
-Port 1 & 4 - Control network
-Port 2 - Media (iSCSI) network A
-Port 3 - Media (iSCSI) network B
Shared iSCSI storage redundant:
-Port 1 - Control network
Shared FC storage basic:
-Port 1 & 4 - Control network
Shared FC storage redundant:
Ethernet cabling
AppCenter
A
ppCenter
er
Open AppCenter and logon with the K2 administrator account
(K2Admin/K2admin). If a licensing message appears, refer to
K2 Release Notes.
Click tabs,
buttons, and
scroll bar to
locate settings.
Select from
drop-down lists
to make settings.
Click OK and
Yes to save
settings.
C
b
s
lo
S
d
to
C
Y
s
Click System | Configuration.
1
2
3
4
5
6
DHCP is enabled and the
chassis serial number is
the hostname.
Default network settings
Configure network name resolution via host
files or otherwise, as required by on-site
networking. FTP/Streaming network
hostnames must include “_he0” suffix.
When changes are complete, enable the write filter.
3. Disable write filter
The K2 Summit Production Client has a file-based write filter to
protect from changes and increase on-air reliability. The write filter
must be disabled before making changes and enabled after
changes are complete.
Disable the write filter as follows:
To enable the write filter, set Filter to Enable and restart.
K2 Summit Production Client
Power cords
LTC cables
Release Notes
Licenses and
Warranties
Rack slides
Documentation CD
us
s
s
us
s
s
us
s
s
us
s
s
us
s
s
us
s
s
rass
all
roup
rass
all
roup
rass
all
roup
rass
all
roup
us
s
s
us
s
s
us
s
s
us
s
s
us
s
s
us
s
s
rass
all
roup
rass
all
roup
rass
all
roup
rass
all
roup
K2 SUMMIT
PRODUCTION
CLIENT
NOTE: Do not lose the Recovery Flash
Drive that is stored inside the bezel.
It contains the image for this specific
K2 Summit Production Client.
Release
Notes
Documentation path to install
K2 client with internal storage
System
Guide
Quick Start
Guide
Documentation path to install
K2 client with shared or direct-connect storage
Release
Notes
System
Guide
Quick Start
Guide
SAN Manual
(shared storage)
*Cabling Guide packed with RAID primary chassis
*Cabling
Guide
K2flxxxxx
xxxxxxxxxxxxxx
flxxxxx
flxxxxx
Grass Valley
Ethernet connection names
Is named this in Windows
Network Connections...
Control Team (Control
Connection #1)
This rear panel
GigE port...
1
Media Connection #1
2
Media Connection #2
3
Control Team (Control
Connection #2)
4
IN1 - Active
IN2 - Not used
IN3 - Not used
OUT1 - Active
OUT2 - Monitor Out.
Configurable to
display timecode.