Coupler & ball engagement, Safety chains – ShoreLand'r Powersports Trailer 2008 User Manual
Page 5
Midwest Industries, Inc.
Ida Grove, IA 51445
800.859.3028
www.shorelandr.com
0003513
Page 5
REV B 4/11/2008
then turn the adjustment nut clockwise to tighten
the grip on the ball. Make sure the nut returns to its proper
position in the retainer clip, then latch the hitch on the ball.
If it is still loose repeat the process until the grasp on the
ball is right.
2. Latch does not snap into full latch position:
A. Check adjustment. Latch mechanism may be to tight.
Loosen by reversing procedure in step #l and turning the nut
counterclockwise.
B. Check to see that the coupler housing has not been
damaged, keeping the ball hitch from fitting completely into the
housing as designed.
3. Keep the tongue blocked up when not in use so the coupler
and mechanism are not in the ground being exposed to dirt
and moisture.
4. Apply a small amount of an automotive grease to the ball
before hitching coupler to prevent wear of the two parts during
towing.
5. Make sure the latch safety pin is in position before towing.
COUPLER & BALL ENGAGEMENT
If the coupler and towing ball resist attempts to make engagement,
do not force latch assembly. Instead, check the ball diameter to
verify that it conforms to Society of Automotive Engineers (SAE)
specifications. Standard two-inch diameter ball should be within
the limits of 2.000-inches to 1.970-inches. Balls larger than 2.000-
inches will not readily fit the coupler. A two-piece coupler ball is not
recommended.
If the coupler becomes damaged it must be repaired or replaced
before towing. When the coupler is placed on the ball, the latch
should close firmly. Keep the latch mechanism lightly oiled and
clean.
Improper engagement of the coupler and ball can cause damage if
the vehicles separate in transit: thus, caution must be exercised to
insure a secure hook-up. Lower the coupler onto the ball with the
coupler latch in the vertical position. Continue to lower the trailer
tongue until the jack clears the ground, then flip the coupler latch
to its locked (horizontal) position. At this point visually observe that
the ball is fully engaged in the ball hitch. An even better check to
make sure the two are fully engaged is to raise the tongue of the
trailer again using the jack. Raise until the ball hitch connection
starts to raise the rear of the tow vehicle. If the connection was not
properly made, the ball and socket will separate as the tongue of
the trailer is raised.
SAFETY CHAINS
Listed in the chart below are the different class sizes of safety chains
and the rated load each chain must be capable of withstanding.
TRAILER
TRAILER WEIGHT
MINIMUM BRAKING
CLASS
GVWR IN LBS.
STRENGTH IN LBS.
I
to 2,000
2,000
II
2,000 to 3,500
3,500
III
3,500 to 5,000
5,000
WARNING: Failure to properly attach safety chains between
the trailer and tow vehicle can result in a run away trailer.
WARNING: Before trailering to avoid accidents...
Hitch only to ball size marked on coupling.
•
Ball clamp must capture ball and lever or handwheel
•
is fully clamped.
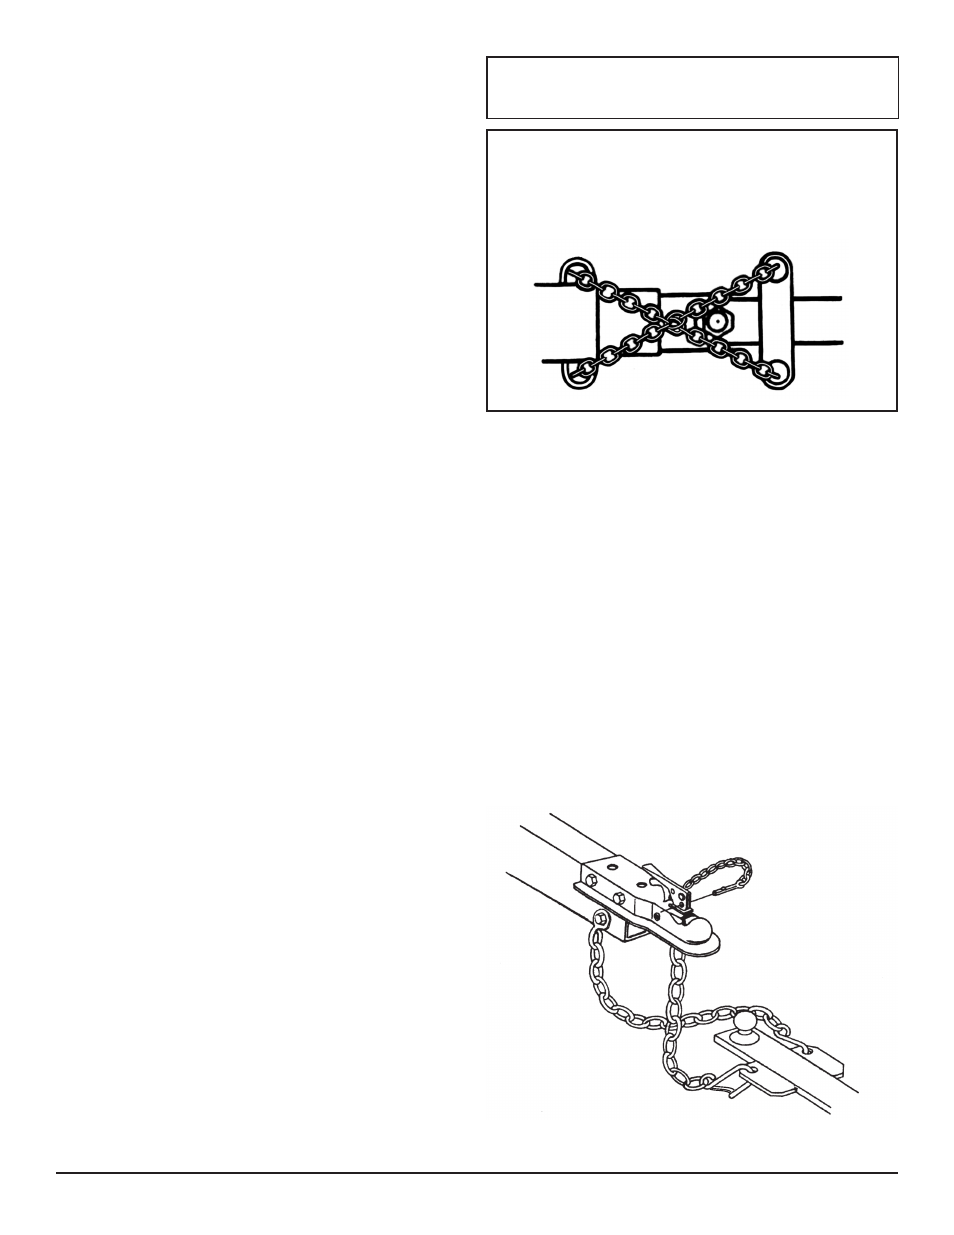
Cross safety chains under coupling.
•
Allow only enough slack for turns.
•
Bottom View Shown
The safety chains on your trailer are an added insurance that it
will not become detached from the tow vehicle. ShoreLand’r®
provides all safety chains with an added clasp to keep them
from becoming accidentally detached from the tow vehicle.
Your trailer hitch on the tow vehicle should have two attach-
ing holes or rings for attaching the safety chains, preferably one
on each side of the ball hitch. Crisscross the chains under the
tongue, the chain on the left side of the trailer tongue attached
to the right side of the ball hitch, the chain on the right side of
the trailer tongue attached to the left side of the ball hitch.
This prevents the trailer tongue from dropping to the road should
the coupler or ball hitch fail. The chains should be rigged as tight as
possible with just enough slack to allow tight turns to be made. This
can be accomplished by twisting the chain hook in a clockwise or
counterclockwise direction thus twisting the link spacing and mak-
ing the chain shorter. Also by keeping your chains as short as pos-
sible you prevent them from dragging on the road and wearing the
chain links.
If for any reason you find it necessary to replace a safety chain, use
only original equipment.