SMA SUNNY WEBBOX Quick Reference Guide User Manual
1 information on this document 2 safety, 3 system requirements, 4 preparation 5 unpacking 6 commissioning
SWebBox-IS-en-13 | Version 1.3
AMERICAN ENGLISH
2
3
4
Validity
This document is valid for the Sunny WebBox from hardware version M1 and firmware version 1.61.
The Sunny WebBox is a data logger that records and logs the data of a PV system and makes it available for
retrieval.
Only operate the Sunny WebBox using the supplied plug-in power supply and in the specified voltage range.
The Sunny WebBox is only to be used with original accessories or accessories that are explicitly recommended
by SMA*. Only use the Sunny WebBox for the purposes described in this document.
For safety reasons, it is not permitted to modify the product or install components that are not explicitly
recommended or distributed by SMA for the product. Unauthorized modifications and installations are forbidden
and will void all warranty claims. Any use of the product other than described in the Intended Use section does
not qualify as appropriate. The type label must remain permanently attached to the product. Only use the product
in accordance with the information provided in the enclosed documentation. Any other use can result in personal
injury or property damage.
Before installing or using the product, read and observe all instructions, safety precautions and warning
messages in this document and in the product documentation on the enclosed CD.
* SMA = SMA America LLC, SMA Solar Technology Canada Inc
Safety Precautions
1 INFORMATION ON THIS DOCUMENT
2 SAFETY
8"3/*/(
Danger to life due to electric shock
Lethal voltages are present in the device and in the plug-in power supply.
• Do not open the device or the plug-in power supply.
• Only use the device indoors and in a dry environment. Keep it away from liquids.
$"65*0/
Risk of injury due to incorrect cable routing
Incorrectly routed cables may cause a tripping hazard.
• Install the cabling in such a way that no one can step on or trip over it.
3 SYSTEM REQUIREMENTS
Operating system
Recommended Display Resolution
• Microsoft Windows 7
• Microsoft Windows Vista
• Microsoft Windows XP SP2
• Linux from kernel version 2.6.12* (KDE)
• MacOS from version 10.6
* with Sun Java Runtime Environment (JRE) from version 6
• 1,024 pixels x 768 pixels
Web browser
• Internet Explorer from version 8
• Firefox from version 3.6
This quick reference guide will guide you through the commissioning stages of the Sunny WebBox.
Observe also the information on set-up/mounting location in the Sunny WebBox user manual.
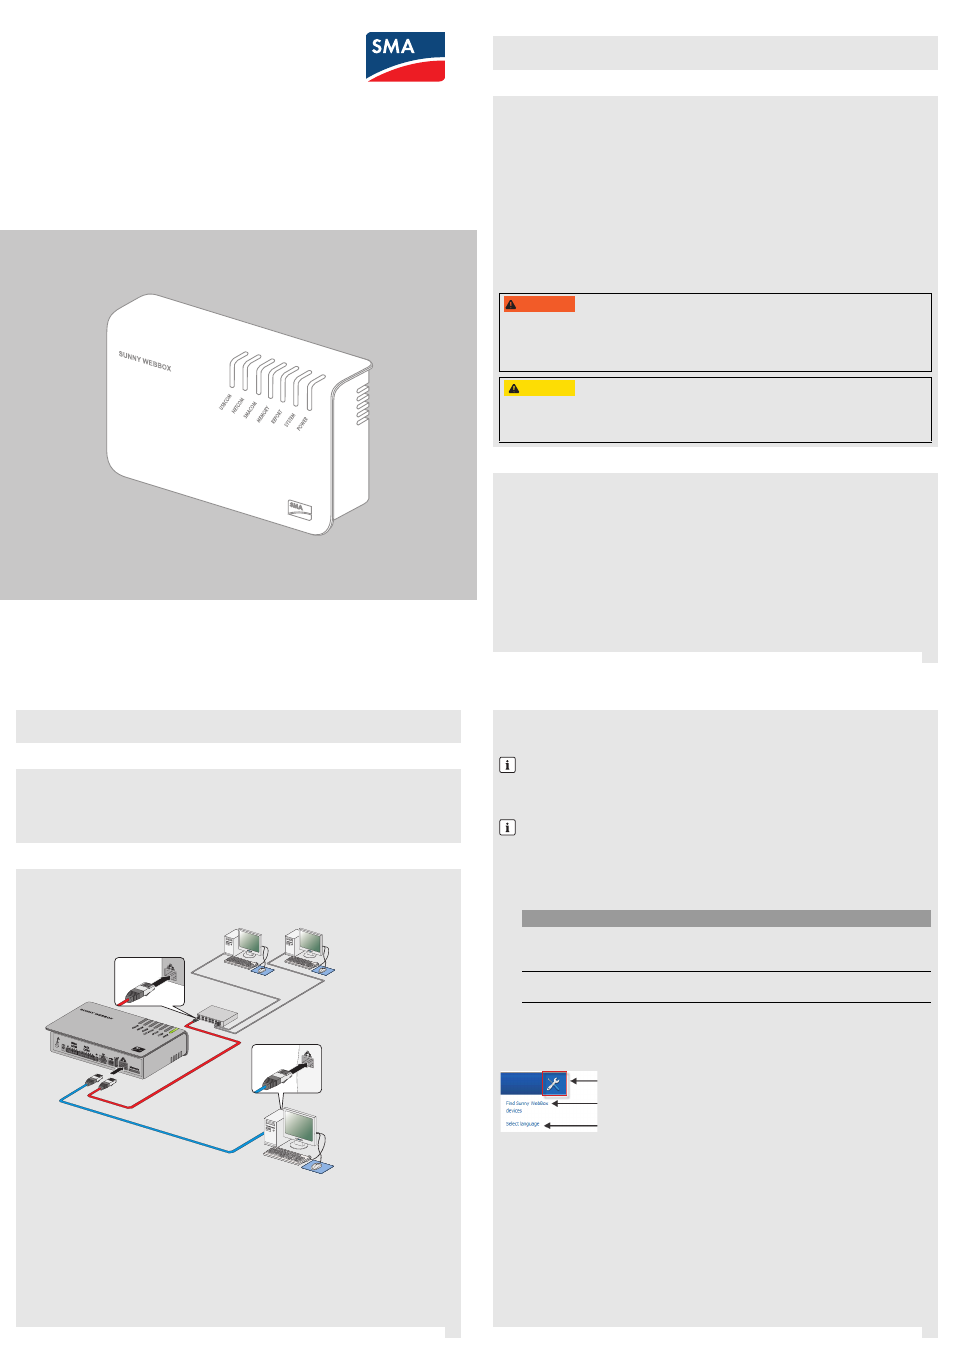
For commissioning, you will need the following items from the packaging:
• Sunny WebBox
• Plug-in power supply with travel adapter
• Blue network cable (Ethernet crossover cable)
• Red network cable (patch cable)
1. Use the red network cable to connect the Sunny WebBox and a node connected to the computer
(e.g. router, network switch, hub).
or
Use the blue network cable to connect the Sunny WebBox directly to a computer.
2. Connect the plug-in power supply to the Sunny WebBox and plug into an outlet.
☑ The Sunny WebBox starts and is ready for operation as soon as the LEDs REPORT, SYSTEM and POWER
are glowing green. The start-up procedure can take up to 90 seconds. With Sunny WebBox devices from
hardware version M1 and from firmware version 1.61, the start-up procedure can take up to 240 seconds.
3. If the LEDs REPORT, SYSTEM or POWER are not glowing green, see the TROUBLESHOOTING section
4 PREPARATION
5 UNPACKING
6 COMMISSIONING
The Sunny WebBox Assistant will guide you through the configuration of the Sunny WebBox.
Install the Sunny WebBox Assistant on the computer. Use the enclosed CD or download the
Sunny WebBox Assistant from the download area at www.SMA-Solar.com.
Starting the Sunny WebBox Assistant
1. Launch the appropriate Sunny WebBox Assistant start-up file for your operating system:
☑ The Sunny WebBox Assistant opens in the web browser.
✖ If the Sunny WebBox Assistant does not open, see the section TROUBLESHOOTING.
Menu Overview
Select this button to open the menu Settings.
Starts the Sunny WebBox search
Selects the program language
Searching for the Sunny WebBox
2. Accept the license agreement and click [Next].
3. If the Sunny WebBox has not yet been commissioned, commission it (see Section 6, page 1) and select
[Next].
☑ The Sunny WebBox Assistant starts searching for Sunny WebBox devices in your network.
✖ If the Sunny WebBox Assistant cannot find the Sunny WebBox, see the TROUBLESHOOTING section
Configuring the Sunny WebBox
4. Select the Sunny WebBox to be configured.
5. Select [Configure the WebBox].
☑ The Sunny WebBox Assistant will guide you through the basic settings of the Sunny WebBox. Follow the
instructions of the Sunny WebBox Assistant.
7 CONFIGURING WITH THE SUNNY WEBBOX ASSISTANT
Enabling JavaScript in the web browser
The user interface of the Sunny WebBox and the Sunny WebBox Assistant require JavaScript in order to
correctly display and run contents and functions.
• Enable JavaScript in your web browser. If necessary, refer to the help section of your web browser.
Commissioning all nodes
If you wish to integrate the Sunny WebBox in the local network without the Dynamic Host Configuration
Protocol (DHCP), commission all the nodes of your local network. The Sunny WebBox Assistant will help
assign a free IP address.
Operating system
Sunny WebBox Assistant start-up file
• Microsoft Windows 7
• Microsoft Windows Vista
• Microsoft Windows XP SP2
Sunny-WebBox-Assistant.exe
• Linux*
• MacOS
* with Sun Java Runtime Environment (JRE) from version 6
Sunny-WebBox-Assistant.jar
Quick Reference Guide for Commissioning
SUNNY WEBBOX