Jordan Valve Mark 53 Series – Differential Back Pressure User Manual
I & m mark 53/54, Installation
3170 Wasson Road • Cincinnati, OH 45209 USA
Phone 513-533-5600 • Fax 513-871-0105
[email protected] • www.jordanvalve.com
I & M Mark 53/54
Installation & Maintenance Instructions
Supplement for Mark 53 and Mark 54
Warning: Jordan Valve pressure regulators must only be used, installed and repaired in accordance with these
Installation & Maintenance Instructions. Observe all applicable public and company codes and regulations. In
the event of leakage or other malfunction, call a qualified service person; continued operation may cause system
failure or a general hazard. Before servicing any valve, disconnect, shut off, or bypass all pressurized fluid. Before
disassembling a valve, be sure to release all spring tension.
1.
Installation
The installation instructions for the Differential Regulator
are identical to the instructions for the Mark 50 and Mark
60 with the following additions:
Connect the reference pressure feedback line
to the threaded port in the spring housing. The
Flow-Thru Spring Housing has full size threaded
connections so that the reference fluid can be
piped directly through the Spring Housing.
Trapped air in the upper section of the Spring
Housing can be bled off by opening the Bleed Port
or Bleed Valve (if supplied) or by loosening the Seat
Nut on the Mark 53 and 53C or by loosening the
Packing Nut on the Mark 53H.
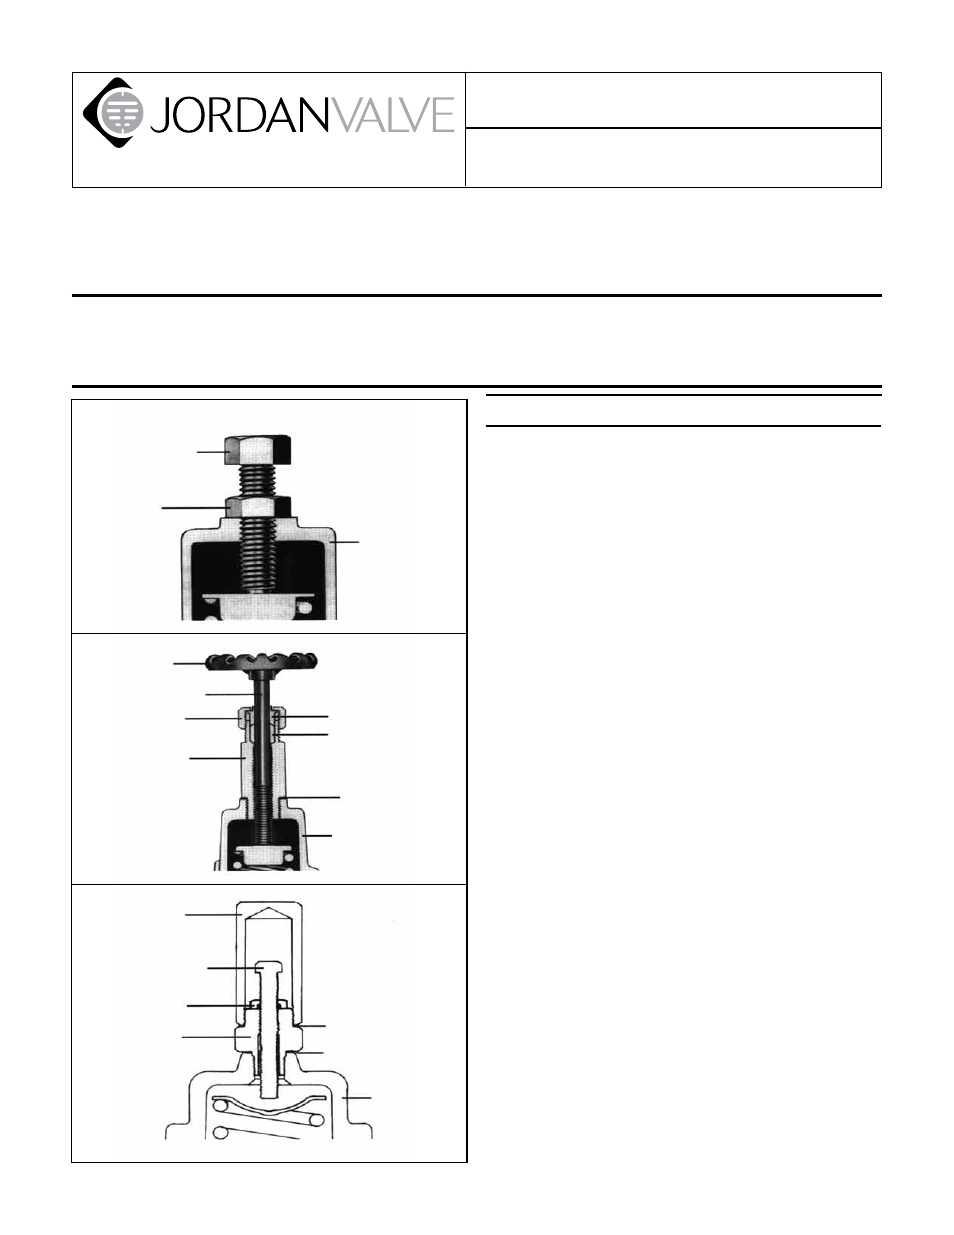
Seat Nut Type (Standard)
The seal Nut Type Differential Regulators are identical
in all respects to the Mark 50 or the Mark 60 with one
exception. The Seal Nut replaces the Lock Nut. Follow
the instructions in the Mark 50 or 60 I & M.
Handwheel Type
1.
To remove the packing, remove the Handwheel
Screw and Washer from the Adjusting Screw.
2.
Remove the Handwheel and then remove the
Packing Nut.
3.
The Packing Gland and the Packing can now be
removed from the cavity of the Packing Box.
4.
Teflon-impregnated, square-braided packing is
recommended, but other types may be used
depending upon your requirements.
5.
Reassemble in reverse order.
Closing Cap Type
1.
If your Differential Regulator is equipped with a
Closing Cap, the only maintenance that will likely
ever be required is the replacement of the gaskets.
2.
To replace the gaskets, remove the Closing Cap.
Then remove the Adjusting Screw and Lock Nut.
The Closing Cap Bushing can then be removed.
Replace the gaskets as you reassemble the valve in
the reverse order.
Note: The Mark 53 and Mark 54 Differential Regulators have the same valve body and seating construction as the
Mark 50 and Mark 60 respectively. This supplemental presents only those instructions necessary to maintain the
topworks, and is to be used in conjunction with the Installation and Maintenance Instructions for the Mark 50 and
Mark 60 for other maintenance procedures.
Seal Nut Type
Handwheel
Type
Closing Cap
Type
Adjusting Screw
Spring
Housing
Seal Nut
Spring Housing
Gasket
Packing
Packing Gland
Packing Box
Packing Nut
Adjusting Screw
Handwheel
Gasket (Upper)
Gasket (Lower)
Spring
Housing
Closing Cap
Bushing
Lock Nut
Adjusting Screw
Closing Cap