Larco Universal Wall Box User Manual
Universal wall box installation instructions, Surface mount installation
www.larco.com
Universal Wall Box
Installation Instructions
2
3
4
5
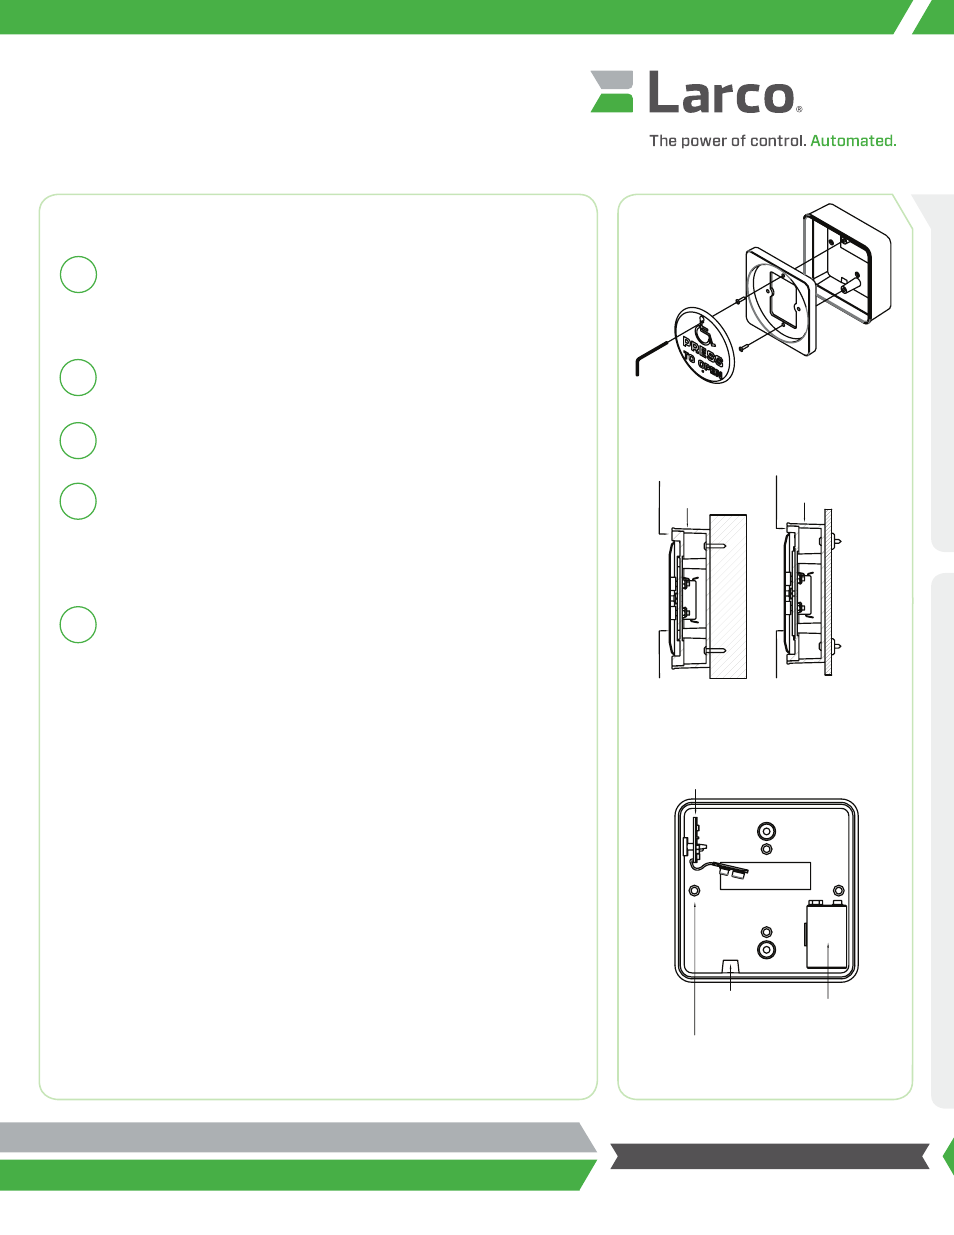
1
Determine wall switch mounting location based on wall construction,
applicable standards and intended use. In high use and abuse areas, a
solid mounting surface or additional reinforcement may be required
behind the box.
Punch out holes in box in areas indicated on the front view drawing by the
notation “mounting screw punch outs.”
Determine stud location in mounting area. Drill holes in mounting surface
and into mounting stud.
Insert appropriate fastener through box and into mounting surface and
tighten securely. For mounting directly into a stud or solid wall, the
recommended fastener is a #8-32 x 1” wood screw. For mounting into
a hollow wall or surface, the recommended fastener is a #8-32 x 1”
toggle bolt.
Complete wall switch assembly using instructions included with your
wall switch.
Surface Mount Installation
Universal Wall Box Mounting
Front View
Solid Wall Mounting Hollow Wall Mounting
NOTE: Larco’s Labor Saver System can be used to affix mounting boxes to partitions
and walls where mechanical fasteners cannot be used. Instructions for the Labor
Saver System can be found in the Resource section of our website: www.Larco.com.
Observe all manufacturers’ recommendations for safety and operation of their
products. ANSI/BHMA standards that offer specific recommendations for each type
and class of automatic door have been developed. To obtain a copy of the ANSI/
BHMA standard that applies to the installation, visit www.buildershardware.com or
www.ansi.org.
WALL SWITCH
COVER PLATE
WALL SWITCH
ADAPTER PLATE
WALL SWITCH
COVER PLATE
WALL SWITCH
ADAPTER PLATE
WALL BOX
WALL BOX
MOUNTING SCREW
PUNCH OUTS
9V BATTERY
CONDUIT
PUNCH OUT
TRANSMITTER