Linkskey LKV-IPM01 User Manual
Quick installation guide
KLE - Quick Installation Guide KVM Link Extender 1 x PC/KVM port IP-based KVM Link Extender for Remote Server Management
Rev. 1.1 Copyright© All rights reserved. 2006
KLE
1 x PC/KVM port IP-based KVM Link Extender
w/ serial power control
& PPP Sever/client connection support via external modem
Quick Installation Guide
Thank you for purchasing the KLE – a full-featured IP KVM
Extender for remote server control over IP! This Quick Installation
Guide will help you connect the KLE to your conventional KVM Switch
and/or server(s) and install it within your networking environment for
remote client access across Intranet/Internet.
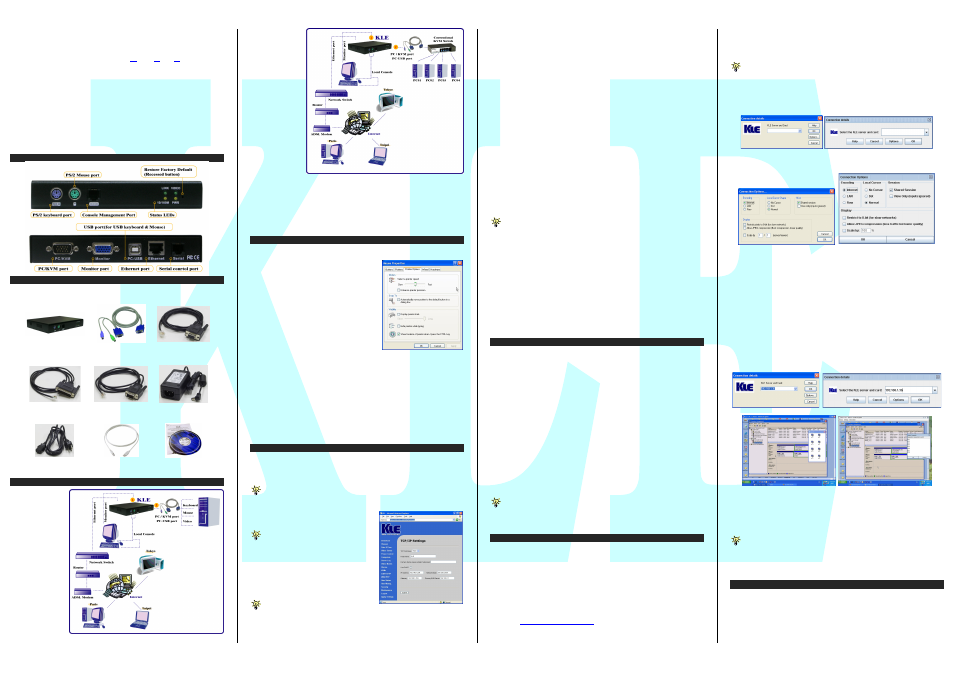
Check the Front-Panel and Rear Panel
Take out the Package contents
Take out the KLE and the accessories from the packaging box, and
check whether you have all these items in the KLE packaging box.
Begin your KLE installation …
1.
Power on the
KLE: plug the
Power adapter to
the power socket
on the side of
KLE.
2.
Set up your
local console:
connect a PS/2
keyboard, mouse,
and monitor to
the KLE
keyboard, mouse
and monitor port.
3-a.
Connect to
single server
/computer: If
you need only
connect to one server/computer. Just connect the PC/KVM port on the
backpanel of
KLE to the
server, using the
3-in-1 slim
KVM combo
cable and/or the
USB cable.
or, 3-b.
Connect to
Multiple
Servers/compu
ters: If you have
to connect to
multiple
servers/compute
rs, you’ll have
to use a
conventional
KVM Switch in between. Just connect the PC/KVM port on KLE
backpanel to the console port of the KVM Switch, using either the 3-in-1
slim KVM combo cable or the USB cable.
4.
Boot up connected computers (if they are not powered-on yet): On
the KLE local console, you should verify that the keyboard, mouse and
monitor are all working on each of the connected server(s).
Prepare your computers for KLE connection
1.
Turn off mouse acceleration and “Snap to” option on each of your
computers/servers: Mouse
synchronization can function properly
only when these two options are turned off
on all connected computers. Taking
Windows XP/2003 for example: Go to
Control Panel/Mouse/Pointer speed and
set the mouse speed to be at the exact
middle of the scale, then uncheck both the
Enhance Pointer Precision option and the
Snap to option. For more details, please
refer to the User Guide, Section 2.2.
2.
Use a more common display
frequency such as 60 Hz / 72 Hz / 75 Hz and pixel dimension: We
suggest you use more standard display modes, such as:
800x600@60Hz / 72 Hz / 75 Hz
1024x768@60Hz / 70 Hz / 75 Hz
1280 x 1024@60 Hz
3. Disable transitional effect: Go to Control Panel/ Display /
Appearance / Effects. And then uncheck the option to disable transition
effects such as Fade for the menus and tool tips. This will much improve
your video quality when you are using Medium or Low Quality as your
KLE video filter setting.
Configure KLE for connection within LAN
1.
Connect the KLE to your LAN: Connect the Ethernet port of the
KLE to one of the LAN port on your network switch/hub within your
LAN, using an Cat5 UTP cable. (Since the KLE accessories do not
include a UTP cable, you should prepare one for use!)
Upon connection to LAN, the Link LED will be lit to indicate ready
Ethernet connectivity. If it is not lit, that means the connection is not
ready. An orange 10/100M LED is lit to
indicate a 100 Mbps connection;
otherwise, it’s 10 Mbps connection.
If your LAN is using different
network segment other than
192.168.1.xxx, you might consider
configuring one computer to have an IP
address of 192.168.1.xxx such that you
can access the KLE web and then change
KLE IP address to one appropriate to
your regular IP segment.
The factory default IP setting of KLE
as you receive it in the box packaging are such as:
Port base:
5900
IP address:
192.168.1.200
Subnet mask:
255.255.255.0
Default
gateway:
192.168.1.254
DNS:
192.168.1.1
2.
Log in KLE Web management interface: Access the KLE web
management interface by a standard browser connection. Just type in the
address bar of your browser:
https://<IP_address>:<PortBase+8>
For example: https://192.168.1.200:5908
and log in with the following username and password:
Username:
superuser
Password:
superu
3.
Configure KLE TCP/IP settings: go to the LAN TCP/IP page to
configure settings such as port base, IP address, Network Mask,
Gateway and DNS server.
For example, we could configure KLE such as followings:
Port base:
6080
IP:
192.168.1.36
Subnet mask:
255.255.255.0
Default
gateway:
192.168.1.11
DNS:
192.168.1.1
With these settings, it means you’ll use 6080 for viewer port base and
6088 for SSL browser connection. For example, you should type
https://192.168.1.36:6088 in the browser address bar for KLE Web
management access. And within the viewer prompt window, you should
type: 192.168.1.36:6080
Note that the DNS setting is required only when you want to use the
mail alert function to notify users about specific server alert events via
e-mail.
4.
Validate the new settings: Click Submit button below to commit it to
KLE’s flash memory. Then go to the Apply Setting Page, and click the
Apply Setting button to make new settings effective on the KLE.
5.
Verify the presence of KLE within your LAN: try to ping the IP
address of KLE from any computer on your LAN. For example, in the
DOS box you type:
ping
192.168.1.36
…. and it should reply your pinging.
You can now access KLE using any computer within your LAN
environment.
Configure router/firewall settings for internet access
To allow access to the KLE behind corporate firewall/router, please
configure the following settings on your router (not on your KLE):
1.
Configure a virtual server on your router: you should configure (or
ask your net admin to configure for you!) a virtual server as mapped to
the KLE local IP address
2.
Open a port range (<port_base> ~ <port_base_+_9>) both inbound
and outbound for the virtual server: you should open a port range
according to what you have configured as port base for KLE in previous
steps. Taking previous example, if we configure KLE as having a port
base of 6080, then we should open port range 6080~6089 ( that is,
<port_base> ~ <port_base +9>) both for inbound and outbound, in
which,
<port_base> = 6080 is the KLE viewer connection port
. . . . . . . . . . . . . . . . . . . . . . . . . . . . . . . . . . . . . . . . . . . . . .
<port_base + 8> = 6088 is the browser SSL connection port
<port_base + 9> = 6089 is for viewer internal communication, etc.
For example:
Router internet IP ÅÆ virtual server (port range open) ÅÆ KLE local IP
61.232.134.120 ÅÆ virtual server (port 6080~6089 open) ÅÆ 192.168.1.36
Once you have changed the port base of your KLE, you should also
modify the open port range on your router accordingly, if you want
internet access to come across.
Test KLE viewer connection from LAN and Internet
After you have installed KLE within your KVM Switch / server(s) /
networking environment, you could now test the viewer connection from
LAN and across Internet.
1.
Access KLE Browser Management Interface: Use a standard
browser to access KLE web management interface. Enter the valid IP
address and browser port number <port_base +8> within your browser
address bar.
https://IP_address:browser_port
Taking previous case for example, you should enter
https://192.168.1.36:6088
Then login with the default account:
User name: superuser
Password: superu
2.
Download and install the Win32 viewer program: Go to the
Download page, download and install it on your computer client. After
installation, you’ll see a KLE viewer desktop icon on the desktop.
You can download either win32 viewer or java viewer. The java
viewer will need Java Runtime Environment 1.5.0 or above to be already
installed on your computer client. Java viewer won’t need installation
process, just double-click on it to run the java program.
3.
Run the viewer program: double-click the KLE viewer desktop icon
and the Connection Details box appears.
Win32 viewer login Java viewer login
4.
Configure the connection options: click the Options button on the
KLE viewer Connection details box.
For viewer connection within LAN: you can choose LAN as your
encoding scheme. For connection from across internet: choose
internet. The 8-bit color reduction and the JPEG compression are also
options for use in limited bandwidth conditions. If you want no other
user to share your KLE viewer access while you are connected with
the KLE, you could uncheck the shared session option. After you choose
the suitable options, click OK.
5.
Enter the access IP and viewer port number within the IP
address/domain name field:
From
local
LAN:
<KLE_local_IP>:<port_base>
For example: 192.168.1.36:6080
Or
From across internet through a firewall/router
<router_Public_IP>:<port_base>
For example: 61.232.134.120:6080
6.
Click OK to make viewer connection …
Win32 viewer Java Viewer
Congratulation! Your first viewer connection is made!
And you’ll notice that there’s also a Select Computer box on top of the
viewer window with computer icons such as PC 1, PC 2, …. PC 8. Later
you can configure the name of the icon to be your real computer
name …
Mouse synchronization: Sometimes you will find the local mouse
cursor and the remote mouse cursor are out of sync. You can use the
following mouse synchronization hotkey to bring them in sync:
[Right_Ctrl] – [Right_Ctrl] – [Home]
….Use the right control key, not the left!
KLE display optimization
After you have made successful viewer connection to the KLE, you can
now go forth to optimize the display on the viewer screen.
1.
Open a viewer connection. (see previous section)
2.
Check the viewer screen for centering and video quality: Check if
the screen output is centered properly within the viewer screen.
1. KLE
2. 3-in-1 Slim KVM
Combo Cable
3. Console
Management Cable
[RJ12-RS232-F]
4. Modem serial cable
[RJ12-DB25]
5. Power control
cable [RJ12-RS232-
M]
6. External Power
Adapter (Out: 9V
2A; IN: 100~240V)
7. Power Chord
8. USB cable
9. Quick Install
Guide & Support
CD-ROM