Auriol 4-LD3091 User Manual
Page 3
- 1 -
Radio controlled weather
station
Preliminary note
Please read the instruction manual before using
the product for the first time- even if you are
experienced at using electronic equipment.
Please take special care when reading the
chapter "Important safety information". Keep this
instruction manual so you may use it a reference
material in the future. If you sell or give this
product to someone else it is very important to
also include this manual.
Important safety information
Set up the device safely
Place the device on a solid even surface.
It is not designed for operation in rooms with high
humidity (i.e. bathroom). Make sure that:
• sufficient ventilation is always guaranteed
(don’t place the device on shelves or where
curtains or furniture block the ventilation holes,
and ensure that there are at least 10 cm of
space on all sides);
• the device isn’t placed on a thick carpet or bed
during operation ;
• no direct heat sources (i.e. radiators) influence
the device;
• no direct sunlight reaches the device;
• contact with splashing or dripping water must
be avoided (don’t place any items filled with
liquids, i.e. vases, onto or next to the device);
• the device doesn’t stand near magnetic fields
(i.e. speakers);
• candles and other open flames must be kept
away from this product at all times to prevent
the spread of fire
• no foreign objects penetrate the housing.
- Batteries
Insert the batteries/ rechargeable batteries in the
correct polarity. Don’t try to recharge non-
rechargeable batteries and under no
circumstances throw them into fire. Danger of
explosion.
Do not use unequal batteries (old and new,
Alkaline and carbon, etc.) simultaneously. If you
will not use the device for a long time, remove the
batteries and store the device in a dry and dust-
free place. Improper use of batteries may cause
an explosion or leakage. If the batteries have
leaked, use gloves and clean the appliance
thoroughly with a dry cloth.
- Electrical devices should not be in the hands
of children
Never let children use electrical devices
unsupervised. Children can’t always recognize the
possible dangers properly. Batteries/
rechargeable batteries can be life threatening
when swallowed. Store the batteries where they
cannot be reached by small children. If a battery
is swallowed, medical aid must be sought
immediately.
Also keep the packaging foils away from children.
Danger of suffocation.
Intended use
This electronic appliance is intended for time
display and the described additional features. Any
other use or modification of the electronic
appliance does not comply with the intended
uses. The manufacturer is not liable for damages
caused by improper use or misuse. The device is
not intended for commercial use.
Cleaning instructions
Clean the product with a soft, dry and lint-free
cloth. A glasses cleaning cloth is ideal.
Scope of delivery
Please note: Check the scope of delivery after
purchase. Please ensure that all parts are
included and undamaged.
1.
Weather station
2.
Sensor
3.
Stand
4.
5x batteries 1.5V AA
Speed setting
When setting numerical values, press and hold
"+" or "-" to use the speed setting.
- 2 -
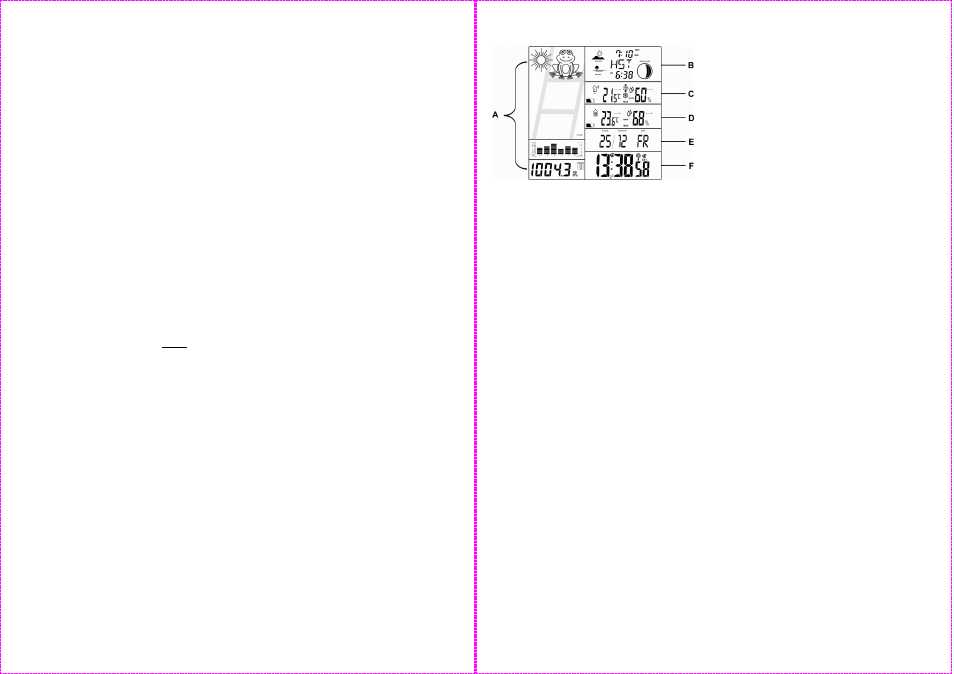
Display description
A
weather forecast (weather frog),
graphical air pressure of the last
12 hours, air pressure trend, numerical
air pressure
B
Sunrise and sunset times, tide display
(spring and neap tides), location
display, moon phase display
C
Display of the current outdoor sensor
(1,2 or 3), outdoor temperature,
temperature and frost alert, temperature
trend, outdoor humidity, humidity trend,
battery low indicator for outdoor sensor
D
Indoor temperature, temperature trend,
indoor humidity, humidity trend, battery
low indicator for weather station
E
Date and day of the week
F
Time and reception indicator, snooze
symbol, 2 alarm symbols, daylight
saving time indicator
Setup
Open the battery compartment at the back of the
weather station. Insert the batteries in the correct
polarity and close the battery compartment.
Remove the protective film from the weather
station display.
Position the station and the sensor directly next to
one another. Insert the batteries into the sensor
within the next 2 minutes.
The weather station now starts to receive the time
signal and the radio tower flashes in the display
next to the time. While receiving the signal, none
of the weather station's other functions can be
used. If signal reception is successful the weather
station's time and date are set automatically.
If the reception is not successful after 7 minutes
please move the weather station to a different
location at your site. Restart the reception by
pressing "+" and "-" together briefly. The weather
station will restart the reception attempt.
If the reception is not possible at all please set the
time manually.
While the weather station tries to receive the time
signal, it simultaneously searches for the signal
from the outside sensor and the red light on the
front of the sensor flashes.
If the transmission signal is received successfully
the current outside temperature appears on the
display of the weather station. Signal reception
and exact synchronisation with the sensor can
take up to 2 hours.
Replace the batteries if the battery icon appears
on the display.
Inside Hygrometer
Your weather station measures the humidity in the
range of 25-95% relative humidity.
Outside Hygrometer
Your weather station measures the humidity in the
range of 25-95% relative humidity from the
outside sensor.
Manual time setting, 12/24 hour
display, day of the week language,
time zone, °C/°F selection
Press and hold MODE. The 12/24 hours indicator
will blink on the display.
Press "+" or "-" to select the time format and
confirm your setting by pressing MODE.
The °C or °F indicator will now blink on the
display. Press "+" or "-" to select the temperature
unit and confirm your setting by pressing MODE.
The time zone adjustment will now blink on the
display. The time zone adjustment can be set
when using the weather station in a different time
zone.
Set the time zone difference to your home time
zone by pressing "+" or "-". An adjustment of -2 to
+2 hours is possible. Confirm your setting by
pressing MODE.
Set the hours, minutes, year, month, day and
language of the day of the week display in the
same way.
The day of the week language abbreviations are
as follows: EN=English, GE=German,
SP=Spanish, FR=French, IT=italian.